
Tamiya Ferrari Enzo
30 - August - 2015 - 18:22
After over a year of slacking on my blog, I’m back! Coinciding with a re-work of my web site and a move over from the blogspot location, I’m getting this blog moving again with a few new projects. I’ll touch on the second project in later posts, but for now, let’s have a look at…
The 1/12 Tamiya Ferrari Enzo!
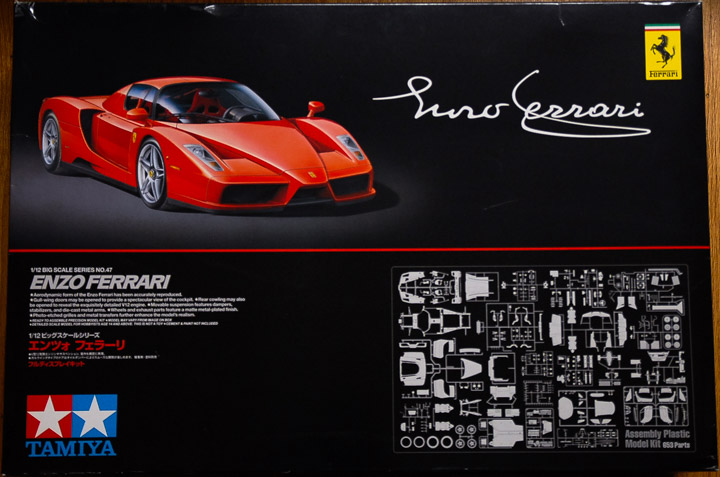
This kit is a monster, at 1/12 scale, with tons of detail and construction methods that mirror how the car is built at full scale. It’s got working, spring loaded doors, fully detailed engine and front trunk, working suspension and the molding is all top notch. Tamiya always does a great job with their kits and this one is no exception.
I also am calling upon some great resources from Scale Motorsport on this project. They offer a handy dvd full of reference photos of the Enzo, which allow me to pick through photos of the real thing and see which things the kit is missing and what details should be added.
But, as anyone who has followed a few of my projects knows, I’m never one to leave well enough alone. I couldn’t help but try to make this great kit even better. Scale Motorsport makes a few sets of extra parts for this kit that make it even more detailed.
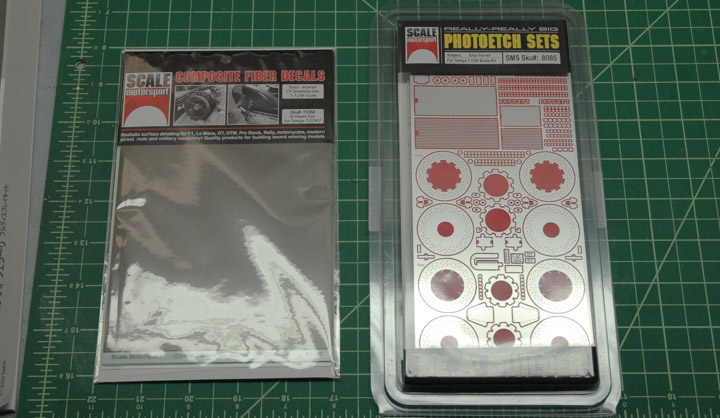
They offer a giant set of photo etch parts that add detail in some places, replace molded details in other places and generally make things look nicer. They also offer some great carbon fiber decal sets that are designed for this kit. I purchased the kit that covers the interior surfaces of the car that are unpainted carbon fiber on the real car.
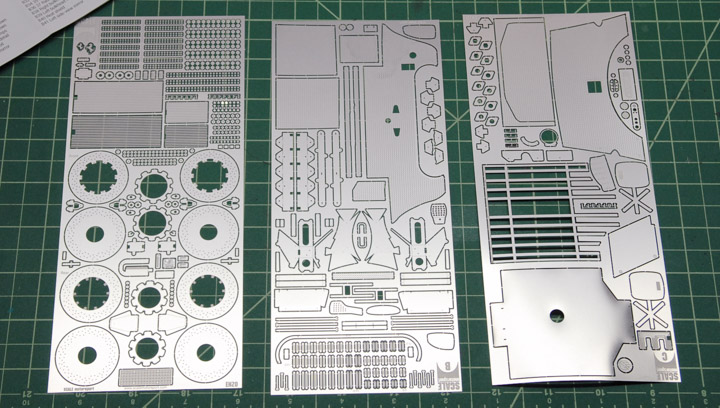
Below you can see the photo etch sheets, which are quite large.
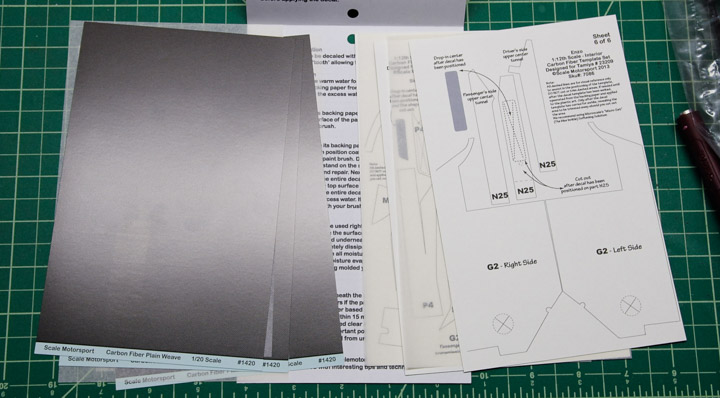
Below you can see the sheets of composite decals. On the back of each sheet are the cut lines for each piece along with the part number that they are to go on to.
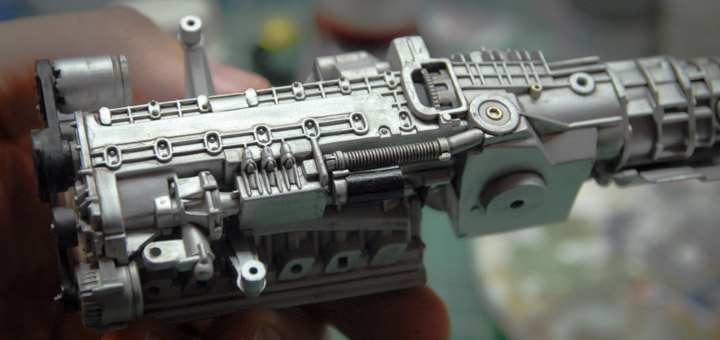
The first step in construction is the engine. At 1/12 scale, the engine is pretty huge. The big benefit here is that the parts are large, easy to work with and the detail well defined. This also presented the first opportunity to use some of the photo etch parts.
Below you can see the painted engine block with a quick dirt wash on it to help pick out the details.
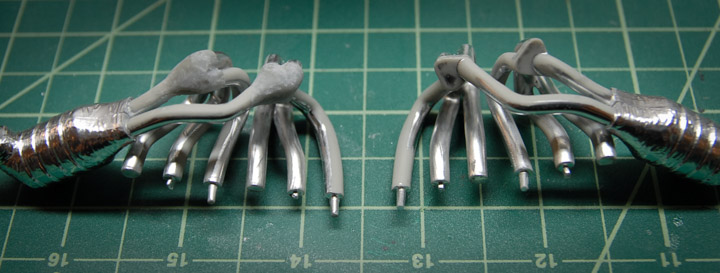
In picking through the reference photos, I noticed that the headers didn’t end in a flat plate like the plastic parts do, but had smooth 3-to-1 collectors. I decided that this was something that I needed to change. Using some Milliput epoxy putty, I formed some transitions, let them harden and then ground them into final shape. Below you can see the headers with and without the putty in place.
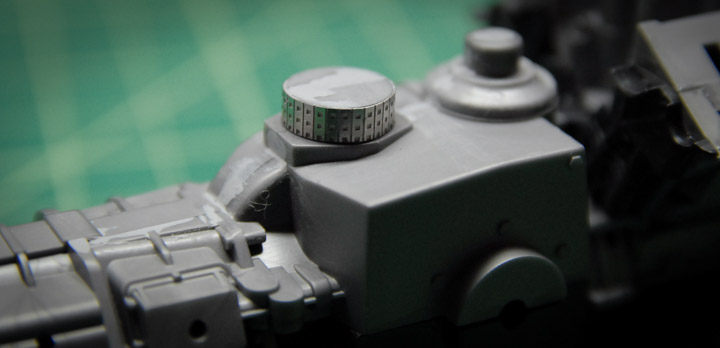
Part of the photo etch upgrade kit are these little plates that attach to the headers and catalytic converter.
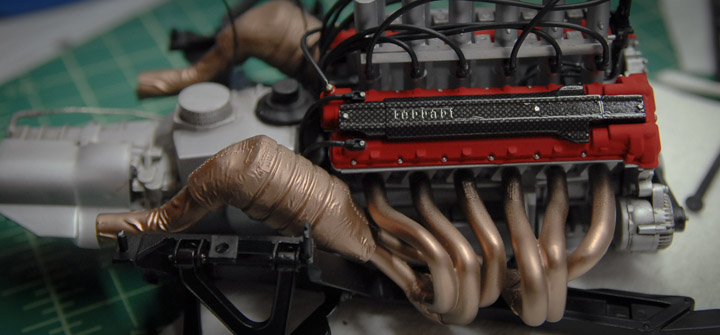
Below you can see the engine coming together and starting to look more engine-y. The valve cover piece was not part of the composite decal kit, but I order a few extra sheets of the decal so that I could add it in a few places. This one took quite a bit of fitting, cutting and adjusting to get it mostly conformed to the part. A healthy dose of decal softener and some clear coat got it looking pretty good.
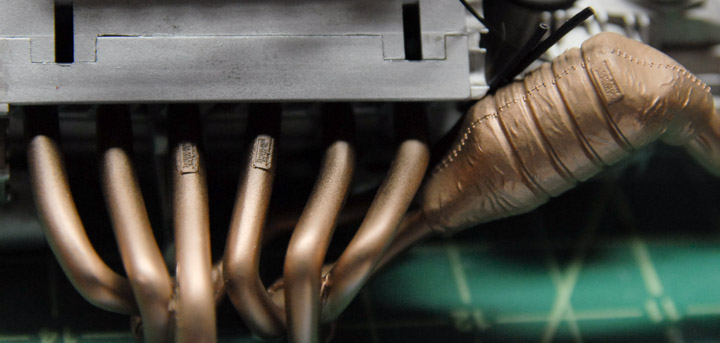
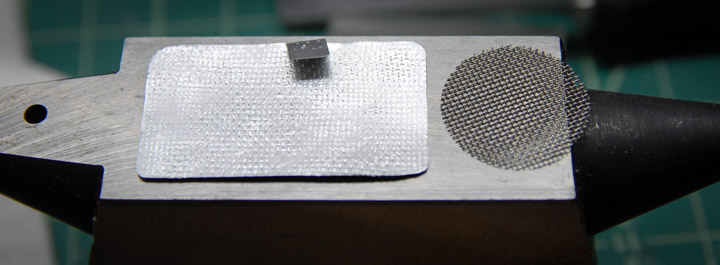
I noticed in the reference photos that on the real car, there was a heat shield underneath the headers, presumably to help keep heat away from the oil pan (?). Whatever they are for, there was no corresponding part either in the kit or in the additional photo etch, so I made something out of some things I had in my extras drawer. I had some of the thin aluminum that was left over from the Curtiss Jenny model, cut out a piece of the appropriate size and then, because the real part has some pattern stamped into it, I used a little piece of screen (from a faucet) to hammer some pattern into my piece.
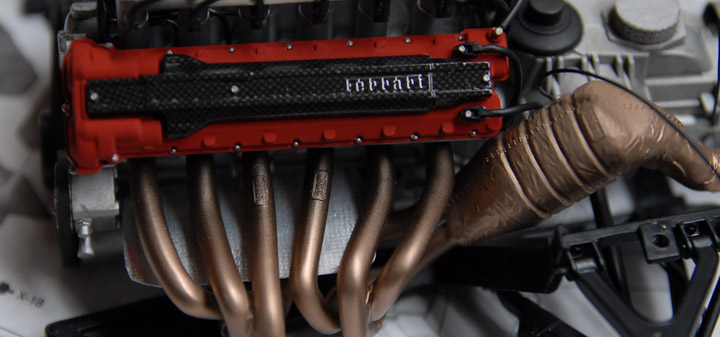
Below you can see the part installed.
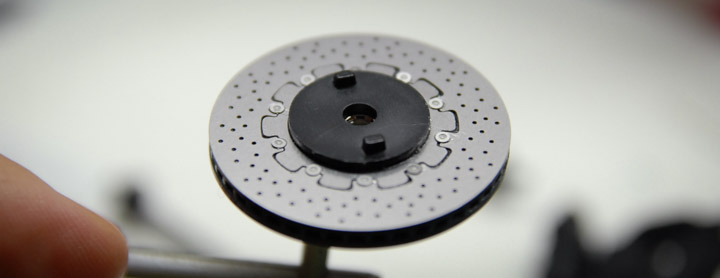
Next, construction moved to the drive train that is connected directly to the engine. This began with the brake assemblies. The photo etch kit had some replacement parts here. It had me sand the kit discs smooth and then put an outer disc, hub and bolts on in order to better represent the multi-piece rotors on the real car.
Looking at the reference, I thought that the brake calipers could be improved upon a bit, since the little tube that connects the two calipers was molded onto the plastic and wasn’t very convincing. I sanded that one off and replaced it with a bit of solder, in order to better mimic the real car.
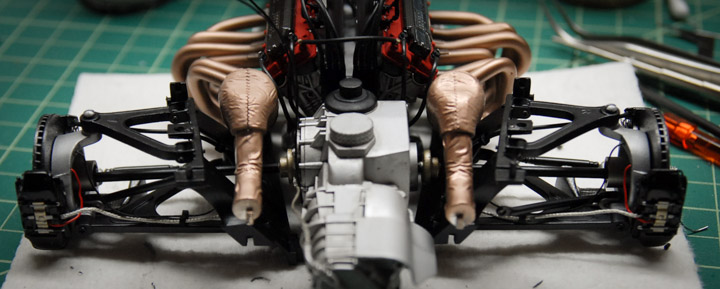
As the hubs and rear suspension came together, I tried to add in some of the plumbing that wasn’t added by the kit. In some cases, the kit did supply some plastic tubing to be used for brake lines. Those that have put together a Tamiya kit before will be familiar with the hollow tubing that they generally supply. It usually looks very nice, but can be tricky to work with, since it is very light weight and a bit springy. This just makes it difficult to get the tubes to stay right where you want them to be. My trick with these tubes is to carefully run a bit of solder through the tube that is just small enough to fit through. The weight of the solder helps the tubes act a little more like the real things and the solder also allows me to bend and shape the tube as I see fit. Below you can see the solder sticking out of the end of the tubes before I added them to the model.
Below you can see the rear assembly and some of the tubes that have been added.
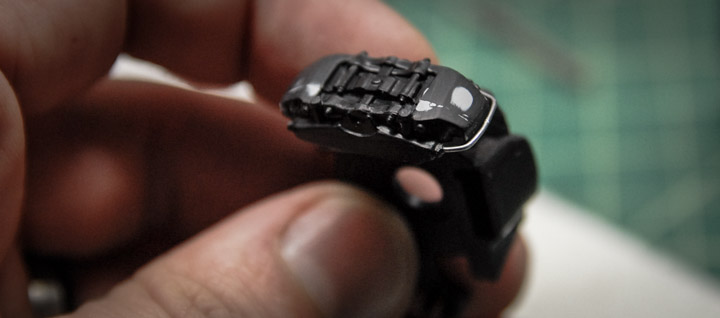
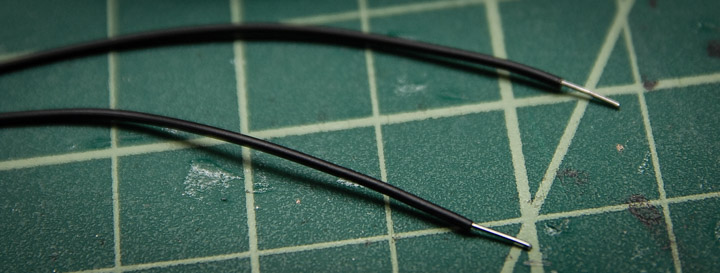
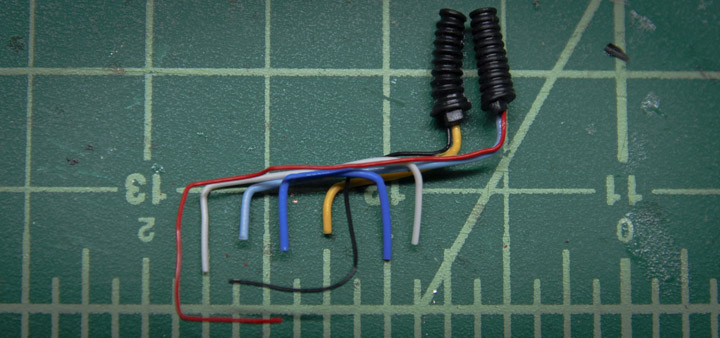
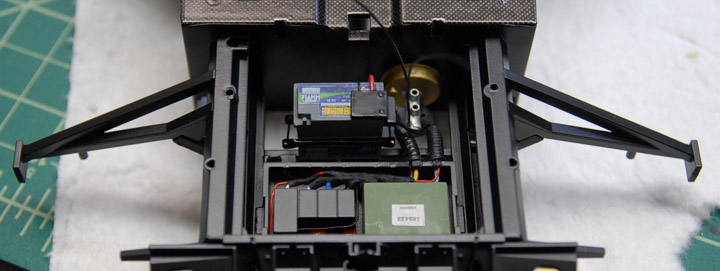
Next, assembly moved to the front trunk area. The kit includes the visible parts of the trunk, as well as the various electronics that go underneath the trunk. The trunk itself is removable, should you want to show off the details. After checking the reference, I decided I wanted some more wires under there, so I put together a simple wiring harness to tie into the various boxes. Below you can see the wires before they are installed.
Here they are in place. I also used some black tissue paper, dampened with a white glue and water mixture, to simulate the cloth wrap that is used around the real wires.
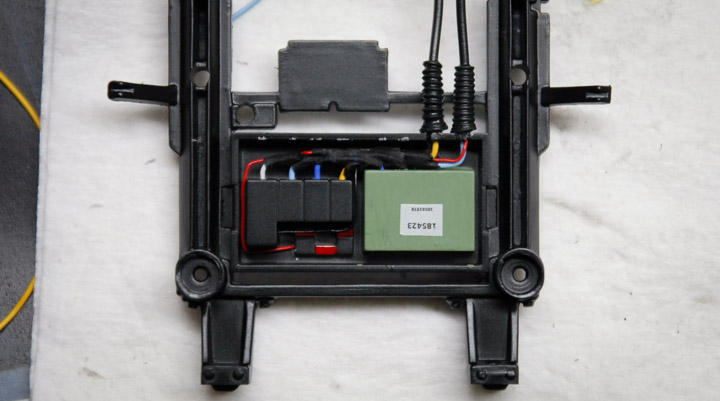
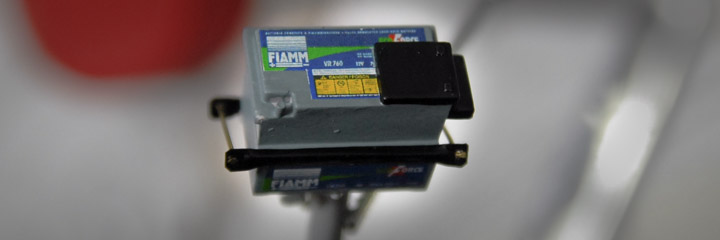
The battery didn’t have any decals with the kit, so I tracked down the brand that the car uses, and made a few decals of my own. I also fabricated an approximation of the little bracket that holds the battery in place.
Here you can see everything in place in between where the front wheels will be.
That’s all for now. Construction has moved on a bit further, so look for another post soon, with the front suspension construction and some difficulties with the photo etch on the muffler. Thanks for reading!
The 1/12 Tamiya Ferrari Enzo!
This kit is a monster, at 1/12 scale, with tons of detail and construction methods that mirror how the car is built at full scale. It’s got working, spring loaded doors, fully detailed engine and front trunk, working suspension and the molding is all top notch. Tamiya always does a great job with their kits and this one is no exception.
I also am calling upon some great resources from Scale Motorsport on this project. They offer a handy dvd full of reference photos of the Enzo, which allow me to pick through photos of the real thing and see which things the kit is missing and what details should be added.
But, as anyone who has followed a few of my projects knows, I’m never one to leave well enough alone. I couldn’t help but try to make this great kit even better. Scale Motorsport makes a few sets of extra parts for this kit that make it even more detailed.
They offer a giant set of photo etch parts that add detail in some places, replace molded details in other places and generally make things look nicer. They also offer some great carbon fiber decal sets that are designed for this kit. I purchased the kit that covers the interior surfaces of the car that are unpainted carbon fiber on the real car.
Below you can see the photo etch sheets, which are quite large.
Below you can see the sheets of composite decals. On the back of each sheet are the cut lines for each piece along with the part number that they are to go on to.
The first step in construction is the engine. At 1/12 scale, the engine is pretty huge. The big benefit here is that the parts are large, easy to work with and the detail well defined. This also presented the first opportunity to use some of the photo etch parts.
Below you can see the painted engine block with a quick dirt wash on it to help pick out the details.
In picking through the reference photos, I noticed that the headers didn’t end in a flat plate like the plastic parts do, but had smooth 3-to-1 collectors. I decided that this was something that I needed to change. Using some Milliput epoxy putty, I formed some transitions, let them harden and then ground them into final shape. Below you can see the headers with and without the putty in place.
Part of the photo etch upgrade kit are these little plates that attach to the headers and catalytic converter.
Below you can see the engine coming together and starting to look more engine-y. The valve cover piece was not part of the composite decal kit, but I order a few extra sheets of the decal so that I could add it in a few places. This one took quite a bit of fitting, cutting and adjusting to get it mostly conformed to the part. A healthy dose of decal softener and some clear coat got it looking pretty good.
I noticed in the reference photos that on the real car, there was a heat shield underneath the headers, presumably to help keep heat away from the oil pan (?). Whatever they are for, there was no corresponding part either in the kit or in the additional photo etch, so I made something out of some things I had in my extras drawer. I had some of the thin aluminum that was left over from the Curtiss Jenny model, cut out a piece of the appropriate size and then, because the real part has some pattern stamped into it, I used a little piece of screen (from a faucet) to hammer some pattern into my piece.
Below you can see the part installed.
Next, construction moved to the drive train that is connected directly to the engine. This began with the brake assemblies. The photo etch kit had some replacement parts here. It had me sand the kit discs smooth and then put an outer disc, hub and bolts on in order to better represent the multi-piece rotors on the real car.
Looking at the reference, I thought that the brake calipers could be improved upon a bit, since the little tube that connects the two calipers was molded onto the plastic and wasn’t very convincing. I sanded that one off and replaced it with a bit of solder, in order to better mimic the real car.
As the hubs and rear suspension came together, I tried to add in some of the plumbing that wasn’t added by the kit. In some cases, the kit did supply some plastic tubing to be used for brake lines. Those that have put together a Tamiya kit before will be familiar with the hollow tubing that they generally supply. It usually looks very nice, but can be tricky to work with, since it is very light weight and a bit springy. This just makes it difficult to get the tubes to stay right where you want them to be. My trick with these tubes is to carefully run a bit of solder through the tube that is just small enough to fit through. The weight of the solder helps the tubes act a little more like the real things and the solder also allows me to bend and shape the tube as I see fit. Below you can see the solder sticking out of the end of the tubes before I added them to the model.
Below you can see the rear assembly and some of the tubes that have been added.
Next, assembly moved to the front trunk area. The kit includes the visible parts of the trunk, as well as the various electronics that go underneath the trunk. The trunk itself is removable, should you want to show off the details. After checking the reference, I decided I wanted some more wires under there, so I put together a simple wiring harness to tie into the various boxes. Below you can see the wires before they are installed.
Here they are in place. I also used some black tissue paper, dampened with a white glue and water mixture, to simulate the cloth wrap that is used around the real wires.
The battery didn’t have any decals with the kit, so I tracked down the brand that the car uses, and made a few decals of my own. I also fabricated an approximation of the little bracket that holds the battery in place.
Here you can see everything in place in between where the front wheels will be.
That’s all for now. Construction has moved on a bit further, so look for another post soon, with the front suspension construction and some difficulties with the photo etch on the muffler. Thanks for reading!
Completed: Morgan Three Wheeler
05 - January - 2014 - 14:55
In the last post, I mentioned converting this model from an air-cooled engine to a water-cooled one.
When I began the project, I did my usual reference hunting on the internet. I pulled together a couple dozen images, made myself a printout of a collection of those and got to work. After a little while, I started to find large discrepancies between the model kit and my reference images. What I discovered was that there are a few different engines that all seemed to be used around the same time (mid 1930's). Of those, two were made by Matchless, one of which was air cooled. The differentiating features of the air-cooled engine are the fins on the cylinders and the smaller opening on the cowl behind the engine.
The other Matchless engine was water cooled, which can be spotted by the smooth cylinders, larger cowl opening and pipes going from the tops of the cylinders to the radiator inside the cowl.
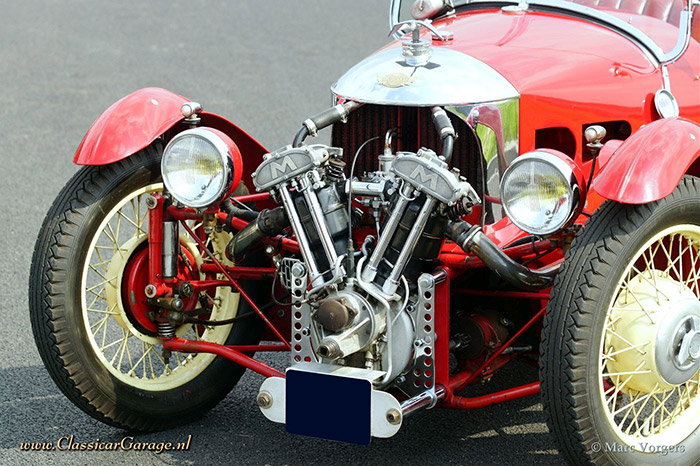
The kit had an air-cooled engine, but, like many other parts on this kit, it wasn't a very good rendition. The detail was largely obscured by extra flash and poor mold alignment, even after all of the chrome was stripped off. Aside from that, I really just liked the way that the water cooled engine looked better. So, I decided to make a replacement engine.
I'd been toying with the idea of making model parts in the computer and then having them 3d printed, and this was the perfect opportunity to try it out. This presented a good test case for a number of reasons. First off, this engine is not very big, so many of the details on the engine are on the tiny side of what 3d printers can handle. This meant that I could see how well the details are reproduced when it gets down to the limits of the printers. Also, this let me get the same part printed in two different materials, to see if the higher-detail material was worth the extra cost (spoiler: it was).
So that said, I fired up trusty ol 3dsmax, and modeled up an engine that was sized to fit in place of the kit engine. This took a bit of quality time with the assembled kit engine, some calipers, and lots of careful measuring. What you see below is what I came up with and sent to Shapeways for printing. I sent them two files, one for the engine and one for the radiator.
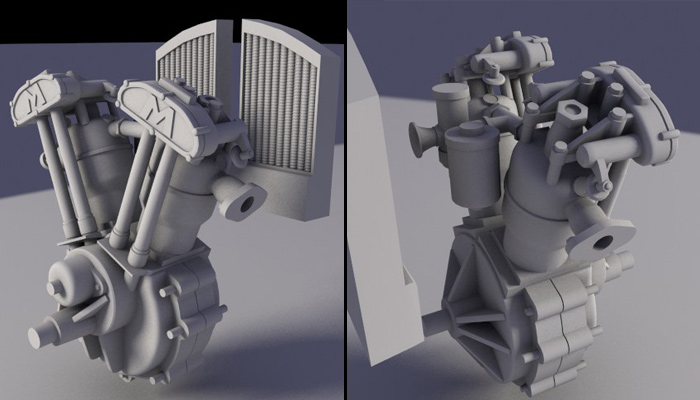
The radiator worked just fine and moved from prep to printing pretty quickly. The engine, on the other hand, got kicked back to me for various reasons. Mostly, it was because of various areas being too thin. Instead of them just trying to print whatever you send them (which is what I thought they would do), they check the file first and let you know if there are any areas that could cause trouble. After a few go-arounds with that process I ended up with the engine model you see below. It has many of the thin bits thickened up, and the valve spring cap things removed entirely.
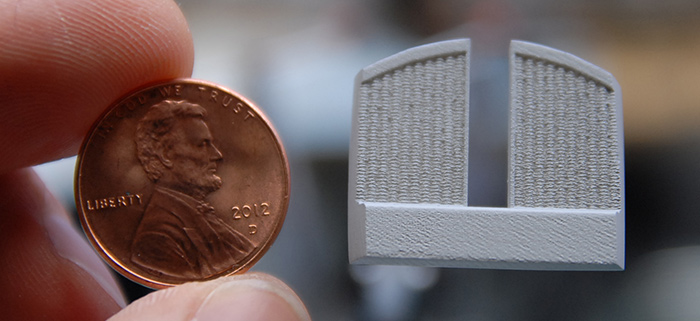
So, while the engine was being printed, the new radiator arrived! What you see below is my first 3d printed model part, cleaned and primed, next to a penny for scale.
A few weeks later, the 3d printed engine arrived and below you can see my first test fitting, as well as what the raw printed material looks like.
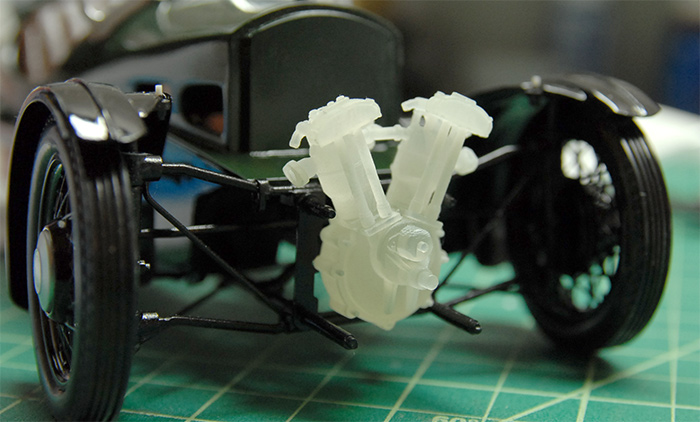
While the initial test fitting went pretty well, later fittings caused a little bit more trouble, as there were quite a few things to get aligned all at once. In the end, I ended up replacing some of the pins that were printed with the engine (the ones that go through the chrome plates) with small brass rod, for durability and so that I could reposition them slightly. Below you can see the final fitting, with radiator piping, made of brass rod and heat-shrink tubing, in place.
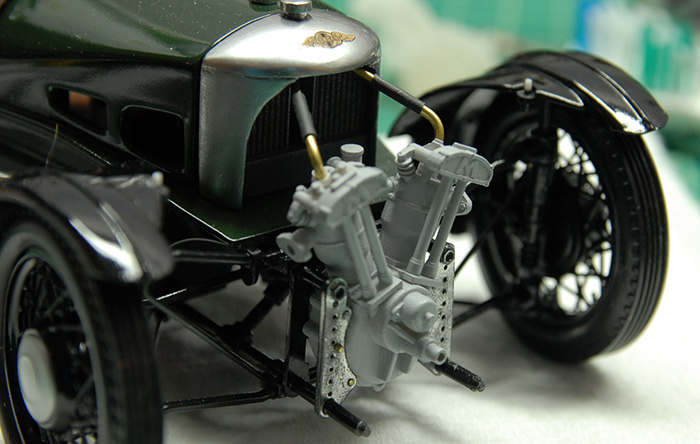
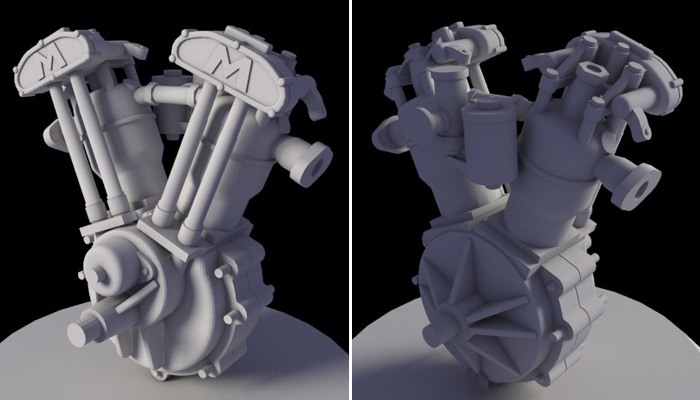
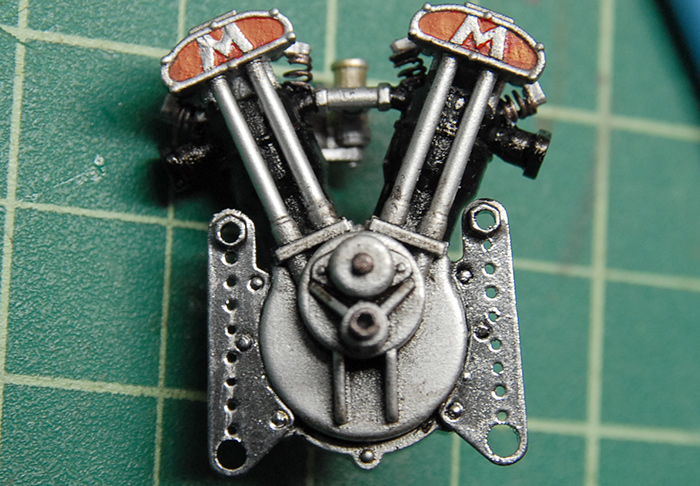
Once I was sure everything would fit, it was time for paint. Below you can see the painted engine, with some valve springs made from wound wire and the front frame plates attached.
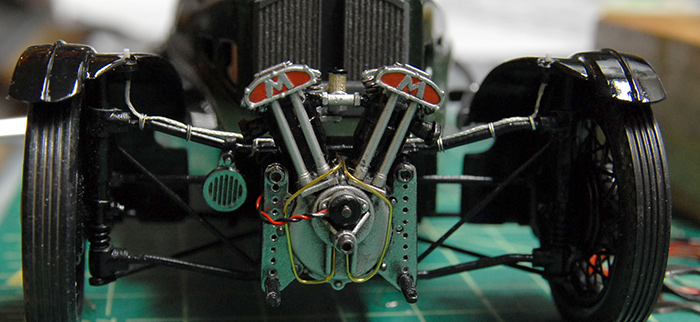
And finally, the finished engine, in place, along with some plumbing (although the radiator pipes are not glued on in this photo), ignition wiring and some wiring to where the headlights will go.
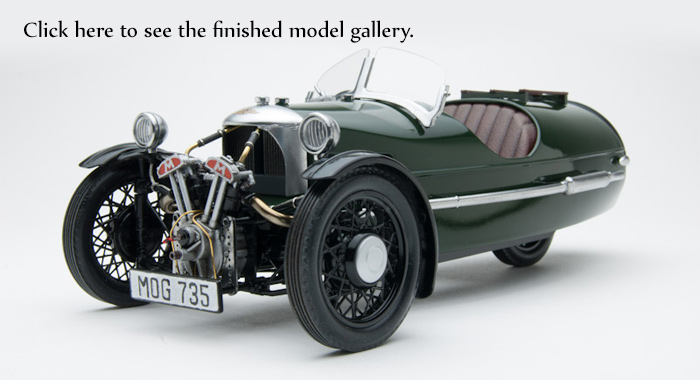
Overall, this was an informative project, and a good test for the 3d printing. Click on the image below to go to the galley of photos of the finished model:
Next up for me is some practice with car paint finishes.
I've also got something bigger in the works, which I'll reveal here once it's a bit closer to being ready ;)
Thanks for reading!
When I began the project, I did my usual reference hunting on the internet. I pulled together a couple dozen images, made myself a printout of a collection of those and got to work. After a little while, I started to find large discrepancies between the model kit and my reference images. What I discovered was that there are a few different engines that all seemed to be used around the same time (mid 1930's). Of those, two were made by Matchless, one of which was air cooled. The differentiating features of the air-cooled engine are the fins on the cylinders and the smaller opening on the cowl behind the engine.
The other Matchless engine was water cooled, which can be spotted by the smooth cylinders, larger cowl opening and pipes going from the tops of the cylinders to the radiator inside the cowl.
The kit had an air-cooled engine, but, like many other parts on this kit, it wasn't a very good rendition. The detail was largely obscured by extra flash and poor mold alignment, even after all of the chrome was stripped off. Aside from that, I really just liked the way that the water cooled engine looked better. So, I decided to make a replacement engine.
I'd been toying with the idea of making model parts in the computer and then having them 3d printed, and this was the perfect opportunity to try it out. This presented a good test case for a number of reasons. First off, this engine is not very big, so many of the details on the engine are on the tiny side of what 3d printers can handle. This meant that I could see how well the details are reproduced when it gets down to the limits of the printers. Also, this let me get the same part printed in two different materials, to see if the higher-detail material was worth the extra cost (spoiler: it was).
So that said, I fired up trusty ol 3dsmax, and modeled up an engine that was sized to fit in place of the kit engine. This took a bit of quality time with the assembled kit engine, some calipers, and lots of careful measuring. What you see below is what I came up with and sent to Shapeways for printing. I sent them two files, one for the engine and one for the radiator.
The radiator worked just fine and moved from prep to printing pretty quickly. The engine, on the other hand, got kicked back to me for various reasons. Mostly, it was because of various areas being too thin. Instead of them just trying to print whatever you send them (which is what I thought they would do), they check the file first and let you know if there are any areas that could cause trouble. After a few go-arounds with that process I ended up with the engine model you see below. It has many of the thin bits thickened up, and the valve spring cap things removed entirely.
So, while the engine was being printed, the new radiator arrived! What you see below is my first 3d printed model part, cleaned and primed, next to a penny for scale.
A few weeks later, the 3d printed engine arrived and below you can see my first test fitting, as well as what the raw printed material looks like.
While the initial test fitting went pretty well, later fittings caused a little bit more trouble, as there were quite a few things to get aligned all at once. In the end, I ended up replacing some of the pins that were printed with the engine (the ones that go through the chrome plates) with small brass rod, for durability and so that I could reposition them slightly. Below you can see the final fitting, with radiator piping, made of brass rod and heat-shrink tubing, in place.
Once I was sure everything would fit, it was time for paint. Below you can see the painted engine, with some valve springs made from wound wire and the front frame plates attached.
And finally, the finished engine, in place, along with some plumbing (although the radiator pipes are not glued on in this photo), ignition wiring and some wiring to where the headlights will go.
Overall, this was an informative project, and a good test for the 3d printing. Click on the image below to go to the galley of photos of the finished model:
Next up for me is some practice with car paint finishes.
I've also got something bigger in the works, which I'll reveal here once it's a bit closer to being ready ;)
Thanks for reading!
Beginning the Build: Morgan Three Wheeler
01 - December - 2013 - 14:19
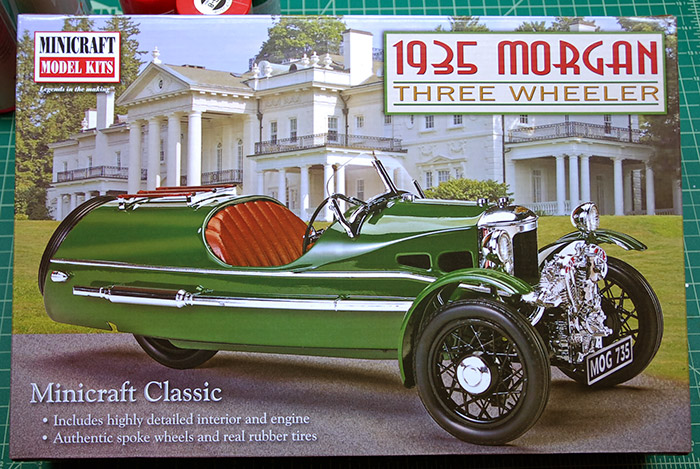
On my continuing quest for a better car paint finish, I've chosen a Morgan Three Wheeler model, from Minicraft, as my next build.
Often, when I pick out kits to build, I do so because of the difficulty and complexity of the kit. I look for well-engineered kits, with lots of extras like photo-etch, metal parts, great decals, etc. This kit, on the other hand, I picked out because I really like the Morgan Three Wheeler. I've seen a few in person and always though that they were just really cool vehicles.
As a result of that method of kit selection, this one ended up taking quite a bit of extra work to make it acceptable. Below you can see the parts as they came out of the box: A few trees of a fairly soft grey plastic, some hard-ish rubber tires, some clear parts, a length of tubing for the engine and one tree of thickly-coated chrome parts.
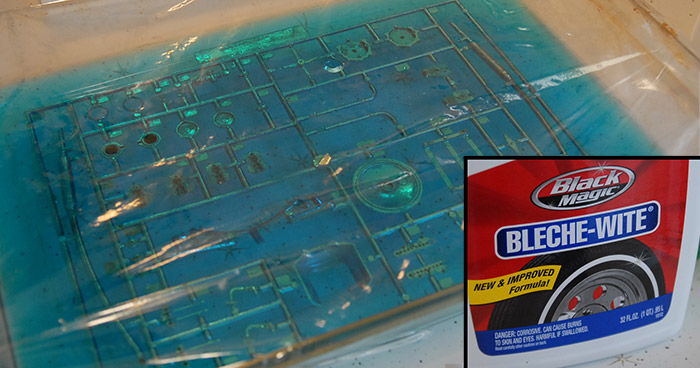
First and foremost, I knew that the chrome parts were just not going to cut it. The varnish/primer that they use under the chrome was on there pretty thick, and in combination with the chrome paint, was filling in many of the details on the parts. That's not evening mentioning the fundamental problem with parts that are painted on the trees: The spots that are left unpainted on the parts once they are cut off the sprue. I decided to give a technique a try that I had read about online and in magazines: de-chroming the parts with Bleche-wite. Bleche-wite is a cleaner that is meant to whiten the whitewalls of tires. It's a pretty aggressive cleaner, so should be handled with care, in a well-ventilated area. I used a baking dish, with the bottle of cleaner emptied into it. I dropped the chrome sprue in there and covered it with plastic wrap. I found that it took a couple multi-hour sessions to get all the chrome off, but because this solvent isn't as aggressive as something like lacquer thinner, I didn't have to worry about the plastic itself dissolving. If you are going to try this yourself, I recommend giving it a few hours in the cleaner and then giving it a light scrubbing with a toothbrush (don't use the brush afterward, despite the tooth-whitening potential), and repeat that process until all the chrome and underlying varnish is all gone.
With that out of the way, I should probably mention something about this kit: It is a mess. Compared to many of the other kits that I have built, from the likes of Tamiya, Hobbyboss and Dragon, this one is of markedly lower quality. There is heaps of flash, the registration between the mold halves is not very good, there are ejector pin marks and sinks all over the place and it just requires a great deal of work to get into shape.
That said, I began by getting the body into a state that is ready for primer and paint. There were sinks on the exterior of the body in every place where there were structural braces on the inside. I ended up thinning some green Squadron putty with some lacquer thinner and spreading that over these areas. After that, I worked my way through various grits of sandpaper, wet sanding until it was smooth enough to be primed. Below you can see the exterior has been sanded, but the rear tire area still needs to be cleaned up.
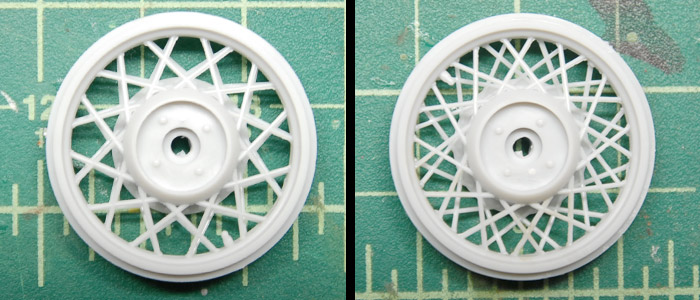
Also, while consulting some reference, I determined that the way the instructions wanted me to put the wheel halves together would have resulted in wheels that didn't really look like the real things. The 1:1 car's wire wheels look to have an offset pattern, making for a much more visually-dense criss-cross pattern. The way the parts aligned resulted in all the spokes lining up, making for a much simpler look. I wanted the more complex look, so I shaved off the locator pins and offset the halves a few degrees. Below you can see the stock and offset locations of the wheel halves.
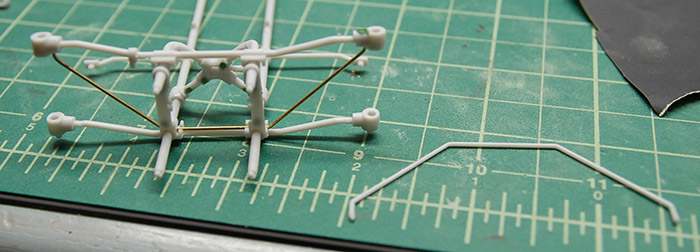
Some thing unusual about this kit is that it is constructed very much like the real car, with an underlying frame that the body sits on top of. While I'm not sure if this was the best idea, since the plastic that this kit is made of is pretty soft and not the best structural material, that is how it is made, so that is what I had to work with. While assembling the front end, I did notice that one of the bracing bars was cast out of scale, so I just replaced it with some extra brass rod that I had laying around, bent to match.
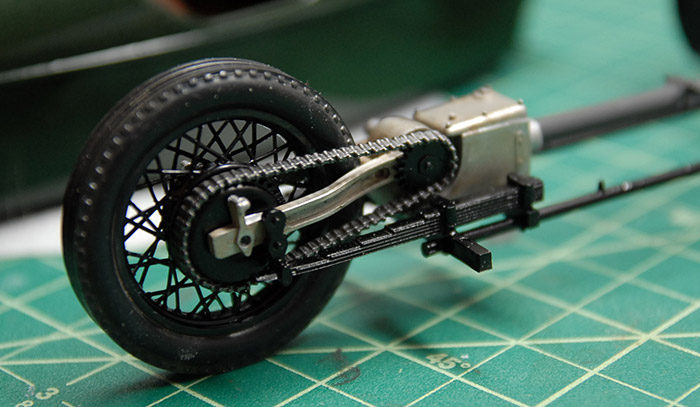
Below you can see a painted wheel, tire mounted, attached to the rear drive assembly. This whole assembly ends up being covered by the body, though, so there were some things here that I would usually fix, but decided not to bother with in this case. As a side note, to anyone else who may attempt this kit: The instructions mention dipping the tires in warm water in order to soften them before stretching them around the wheels. Use HOT water. It took me a few tries, with increasing warm/hot water to get the tires onto the wheels, and I managed to damage a few spokes. Using very hot water from the start would probably avoid any damage.
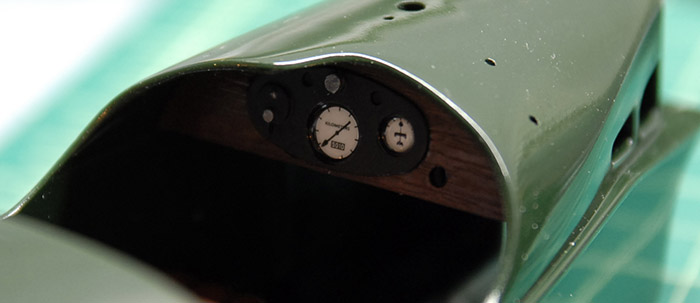
Below you can see the fairly simple dash board, with decals applied. The kit came with some very thick lenses for these gauges, but I decided to just use some clear parts cement to coat them instead, so that the graphics could still be seen.
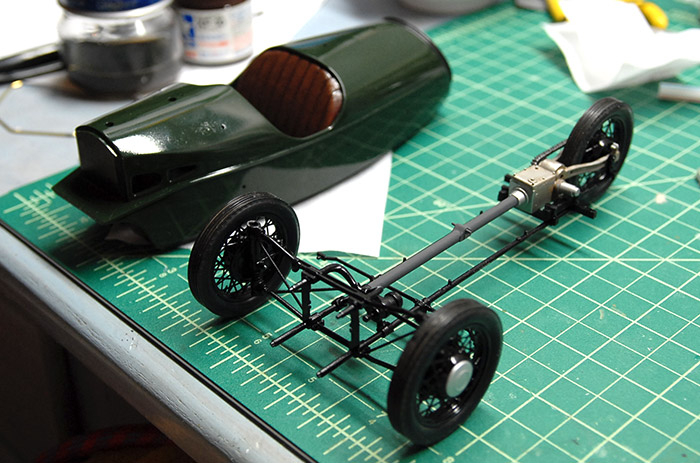
Below you can see the frame all together, and the body painted with the interior painted and attached.
Here I'll touch upon something that will be addressed more in the next blog post: conversion from an air-cooled engine to a water-cooled one. The first part of that involved reshaping the front cowl a bit. The model part also had a very large raised band where there should have been a barely sunken weld bead. I reshaped the front opening a bit to give some curve to the sides and then cut off the raised ridge and used a heated sewing pin to carve a bit of a weld bead. Below you can see the reshaped cowl along with a few other parts after getting a coat of primer, black gloss and Alclad chrome paint.
Finally, below you can see the rear rack mounted and a general indication of the quality of the paint job on this one. It's generally better than the SLS model, but still not quite what I was hoping for. This one is Tamiya british green and clear paints right from the can. I've decided that after this model is done, I'm just going to get a bunch of cheap car kits and just spend some time practicing my painting techniques on the bodies of those models.
Thanks for reading, and tune in for the next post, which will have some interesting new developments in model building!
Often, when I pick out kits to build, I do so because of the difficulty and complexity of the kit. I look for well-engineered kits, with lots of extras like photo-etch, metal parts, great decals, etc. This kit, on the other hand, I picked out because I really like the Morgan Three Wheeler. I've seen a few in person and always though that they were just really cool vehicles.
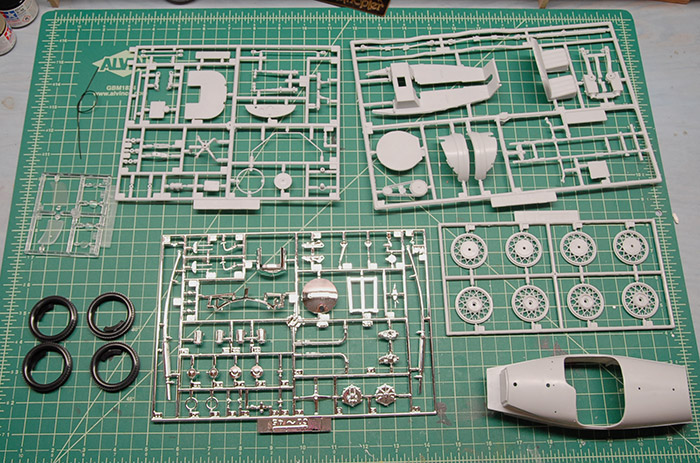
As a result of that method of kit selection, this one ended up taking quite a bit of extra work to make it acceptable. Below you can see the parts as they came out of the box: A few trees of a fairly soft grey plastic, some hard-ish rubber tires, some clear parts, a length of tubing for the engine and one tree of thickly-coated chrome parts.
First and foremost, I knew that the chrome parts were just not going to cut it. The varnish/primer that they use under the chrome was on there pretty thick, and in combination with the chrome paint, was filling in many of the details on the parts. That's not evening mentioning the fundamental problem with parts that are painted on the trees: The spots that are left unpainted on the parts once they are cut off the sprue. I decided to give a technique a try that I had read about online and in magazines: de-chroming the parts with Bleche-wite. Bleche-wite is a cleaner that is meant to whiten the whitewalls of tires. It's a pretty aggressive cleaner, so should be handled with care, in a well-ventilated area. I used a baking dish, with the bottle of cleaner emptied into it. I dropped the chrome sprue in there and covered it with plastic wrap. I found that it took a couple multi-hour sessions to get all the chrome off, but because this solvent isn't as aggressive as something like lacquer thinner, I didn't have to worry about the plastic itself dissolving. If you are going to try this yourself, I recommend giving it a few hours in the cleaner and then giving it a light scrubbing with a toothbrush (don't use the brush afterward, despite the tooth-whitening potential), and repeat that process until all the chrome and underlying varnish is all gone.
With that out of the way, I should probably mention something about this kit: It is a mess. Compared to many of the other kits that I have built, from the likes of Tamiya, Hobbyboss and Dragon, this one is of markedly lower quality. There is heaps of flash, the registration between the mold halves is not very good, there are ejector pin marks and sinks all over the place and it just requires a great deal of work to get into shape.
That said, I began by getting the body into a state that is ready for primer and paint. There were sinks on the exterior of the body in every place where there were structural braces on the inside. I ended up thinning some green Squadron putty with some lacquer thinner and spreading that over these areas. After that, I worked my way through various grits of sandpaper, wet sanding until it was smooth enough to be primed. Below you can see the exterior has been sanded, but the rear tire area still needs to be cleaned up.
Also, while consulting some reference, I determined that the way the instructions wanted me to put the wheel halves together would have resulted in wheels that didn't really look like the real things. The 1:1 car's wire wheels look to have an offset pattern, making for a much more visually-dense criss-cross pattern. The way the parts aligned resulted in all the spokes lining up, making for a much simpler look. I wanted the more complex look, so I shaved off the locator pins and offset the halves a few degrees. Below you can see the stock and offset locations of the wheel halves.
Some thing unusual about this kit is that it is constructed very much like the real car, with an underlying frame that the body sits on top of. While I'm not sure if this was the best idea, since the plastic that this kit is made of is pretty soft and not the best structural material, that is how it is made, so that is what I had to work with. While assembling the front end, I did notice that one of the bracing bars was cast out of scale, so I just replaced it with some extra brass rod that I had laying around, bent to match.
Below you can see a painted wheel, tire mounted, attached to the rear drive assembly. This whole assembly ends up being covered by the body, though, so there were some things here that I would usually fix, but decided not to bother with in this case. As a side note, to anyone else who may attempt this kit: The instructions mention dipping the tires in warm water in order to soften them before stretching them around the wheels. Use HOT water. It took me a few tries, with increasing warm/hot water to get the tires onto the wheels, and I managed to damage a few spokes. Using very hot water from the start would probably avoid any damage.
Below you can see the fairly simple dash board, with decals applied. The kit came with some very thick lenses for these gauges, but I decided to just use some clear parts cement to coat them instead, so that the graphics could still be seen.
Below you can see the frame all together, and the body painted with the interior painted and attached.
Here I'll touch upon something that will be addressed more in the next blog post: conversion from an air-cooled engine to a water-cooled one. The first part of that involved reshaping the front cowl a bit. The model part also had a very large raised band where there should have been a barely sunken weld bead. I reshaped the front opening a bit to give some curve to the sides and then cut off the raised ridge and used a heated sewing pin to carve a bit of a weld bead. Below you can see the reshaped cowl along with a few other parts after getting a coat of primer, black gloss and Alclad chrome paint.
Finally, below you can see the rear rack mounted and a general indication of the quality of the paint job on this one. It's generally better than the SLS model, but still not quite what I was hoping for. This one is Tamiya british green and clear paints right from the can. I've decided that after this model is done, I'm just going to get a bunch of cheap car kits and just spend some time practicing my painting techniques on the bodies of those models.
Thanks for reading, and tune in for the next post, which will have some interesting new developments in model building!
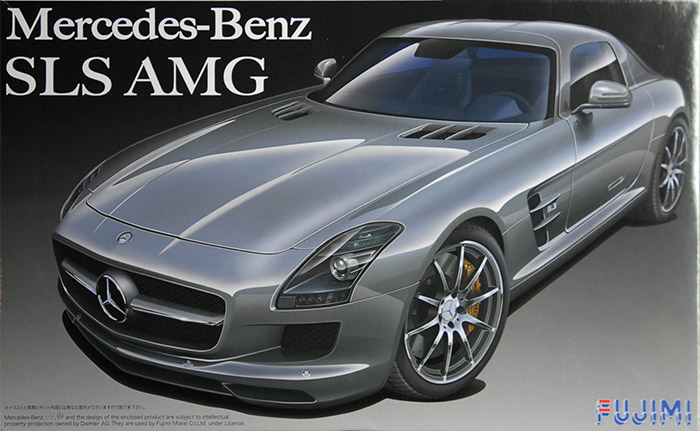
Mercedes-Benz SLS AMG
01 - December - 2013 - 12:14
In an effort to get better at shiny car paint finishes, I've decided to do a number of cars in a row. The first in this line of increasingly-shiny vehicles is this Mercedes-Benz SLS AMG.
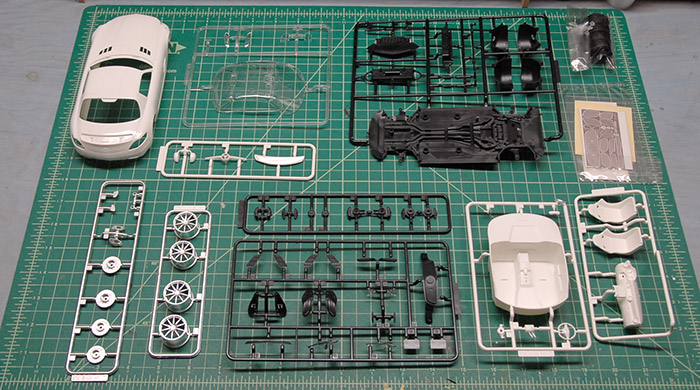
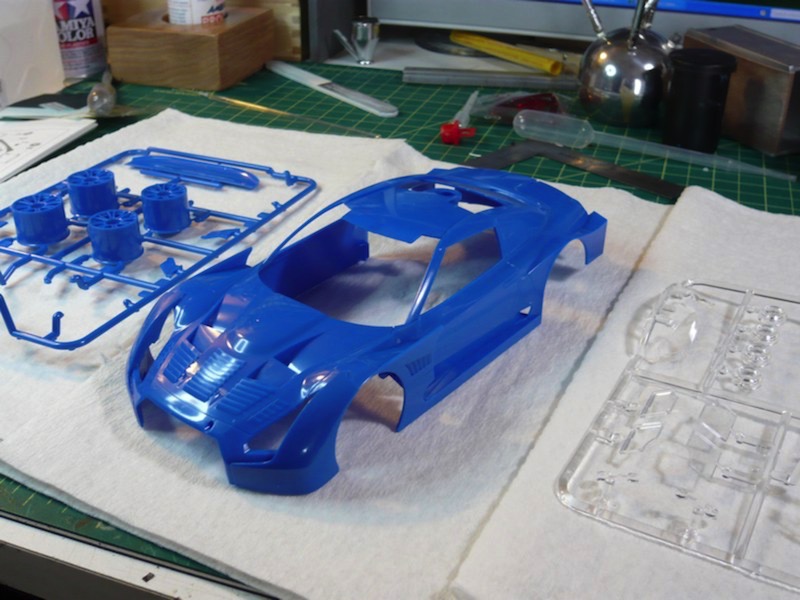
Below, you can see the various trees of parts. The body is a single piece, with no opening panels. There are a few parts (wheels, brakes, ducts) that are pre-painted in a satin metal that looks decent. There is also a bit of photo-etch that provide for replacing some of the plastic grills.
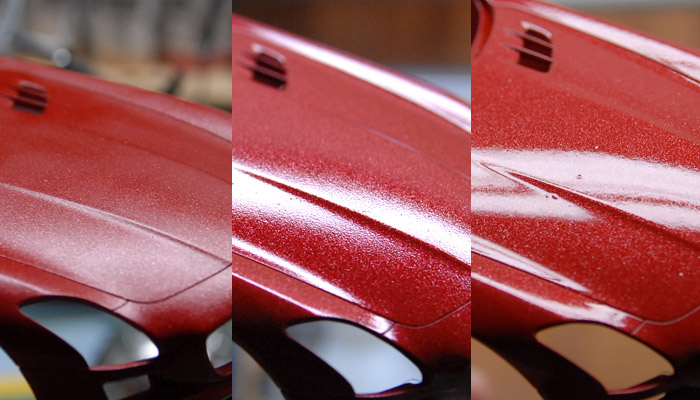
Since the goal of this project is practicing my car paint finishing, let's just right to that. I had been doing some reading on various scale modeling forums (Fine Scale Modeler forums, mostly) and had read good things about Testors one-coat lacquer, so I decided to give that a try. I bought one of their metallic red colors and some of their clear coat. After sanding out some seams and priming, the body and spoiler were ready for paint. In the image below, you can see how it looks after a few coats of the red paint (first image), after one coat of the clear coat (middle) and after two coats of the clear coat (third image). As you can see, I had a good deal of trouble trying to get the paint to go on glossy, always ending up with a pebbly finish. When the clear went over that, it smoothed it out a bit, but was still not the best.
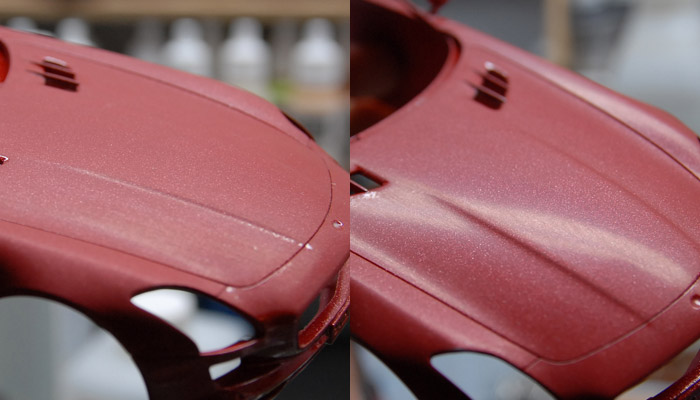
In an effort to get a better finish, I took a series of sanding pads to the surface, smoothing out the orange peel texture and trying to get a better surface to spray more clear coat on to. Below you can see a few stages in the sanding process.
The problem I was having with this metallic paint was that as I sanded it, the metal flakes would come to the surface, and be silver spots, instead of the red-tinted flakes that they were when deeper in the paint. I suppose that is the nature of metal flake paint, but it definitely made things a bit more difficult as far as getting a nice consistent look.
After some more clear coat, the paint finish was definitely better, as you can see in the final images, but still not as good as I would like, as it still had a little bit of orange peel.
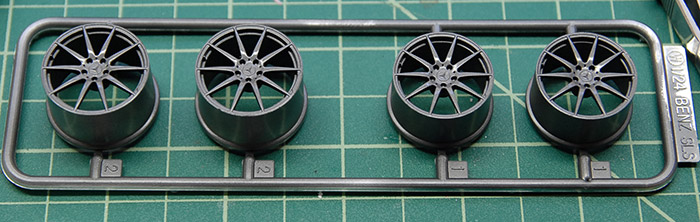
In reference that I found, the wheels also were available in a gunmetal color, which I think goes much better with the metallic red paint. Below you can see the wheels after being sprayed with some Alclad gunmetal paint and a couple coats of clear gloss.
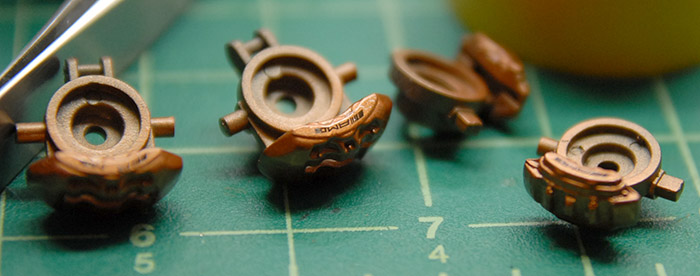
The brake calipers, after some paint, decals, and clear.
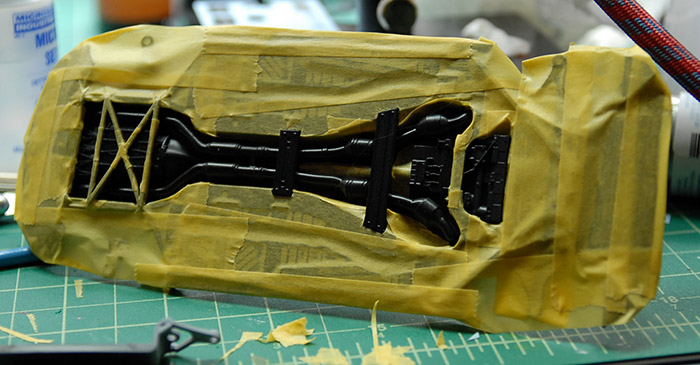
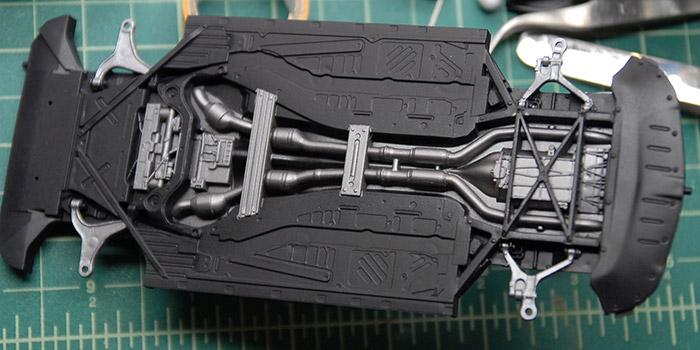
The chassis, after being painted black, masked for spraying of the various metal bits (exhaust, braces, engine, etc).
After the painting:
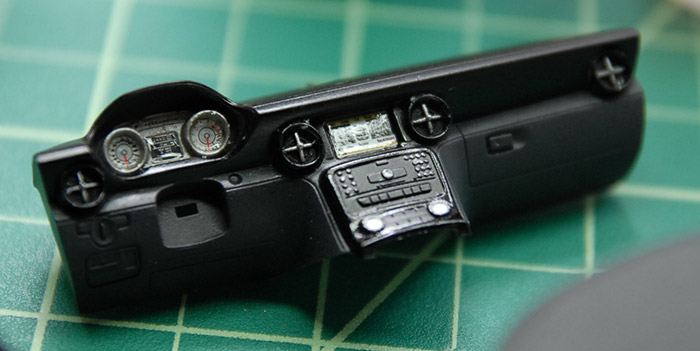
The interior of the real car looks to have a two-tone black/grey scheme (it may be black leather and Alcantara). I made an effort to replicate that scheme with black and grey paint and some selective application of some gloss varnish (from Vallejo). The dash after painting, and decals:
Since the kit didn't come with any seat belts, I used a bit of masking tape to make some, and added some buckles that I already had.
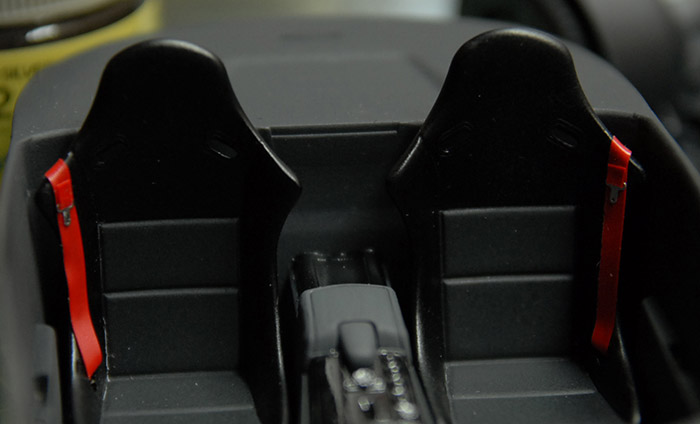
Below you can see the completed interior, before the top and bottom of the car was put together.
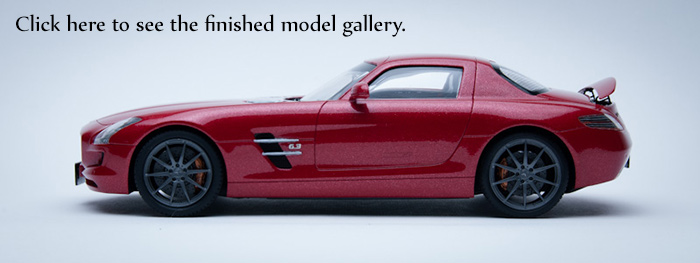
And finally, everything was put together and a bit of Tamiya model wax applied to clean and shine things up. Click on the image below to see the gallery of photos of the finished model:
Below, you can see the various trees of parts. The body is a single piece, with no opening panels. There are a few parts (wheels, brakes, ducts) that are pre-painted in a satin metal that looks decent. There is also a bit of photo-etch that provide for replacing some of the plastic grills.
Since the goal of this project is practicing my car paint finishing, let's just right to that. I had been doing some reading on various scale modeling forums (Fine Scale Modeler forums, mostly) and had read good things about Testors one-coat lacquer, so I decided to give that a try. I bought one of their metallic red colors and some of their clear coat. After sanding out some seams and priming, the body and spoiler were ready for paint. In the image below, you can see how it looks after a few coats of the red paint (first image), after one coat of the clear coat (middle) and after two coats of the clear coat (third image). As you can see, I had a good deal of trouble trying to get the paint to go on glossy, always ending up with a pebbly finish. When the clear went over that, it smoothed it out a bit, but was still not the best.
In an effort to get a better finish, I took a series of sanding pads to the surface, smoothing out the orange peel texture and trying to get a better surface to spray more clear coat on to. Below you can see a few stages in the sanding process.
The problem I was having with this metallic paint was that as I sanded it, the metal flakes would come to the surface, and be silver spots, instead of the red-tinted flakes that they were when deeper in the paint. I suppose that is the nature of metal flake paint, but it definitely made things a bit more difficult as far as getting a nice consistent look.
After some more clear coat, the paint finish was definitely better, as you can see in the final images, but still not as good as I would like, as it still had a little bit of orange peel.
In reference that I found, the wheels also were available in a gunmetal color, which I think goes much better with the metallic red paint. Below you can see the wheels after being sprayed with some Alclad gunmetal paint and a couple coats of clear gloss.
The brake calipers, after some paint, decals, and clear.
The chassis, after being painted black, masked for spraying of the various metal bits (exhaust, braces, engine, etc).
After the painting:
The interior of the real car looks to have a two-tone black/grey scheme (it may be black leather and Alcantara). I made an effort to replicate that scheme with black and grey paint and some selective application of some gloss varnish (from Vallejo). The dash after painting, and decals:
Since the kit didn't come with any seat belts, I used a bit of masking tape to make some, and added some buckles that I already had.
Below you can see the completed interior, before the top and bottom of the car was put together.
And finally, everything was put together and a bit of Tamiya model wax applied to clean and shine things up. Click on the image below to see the gallery of photos of the finished model:
GT-R Complete & Photos
08 - August - 2010 - 10:07
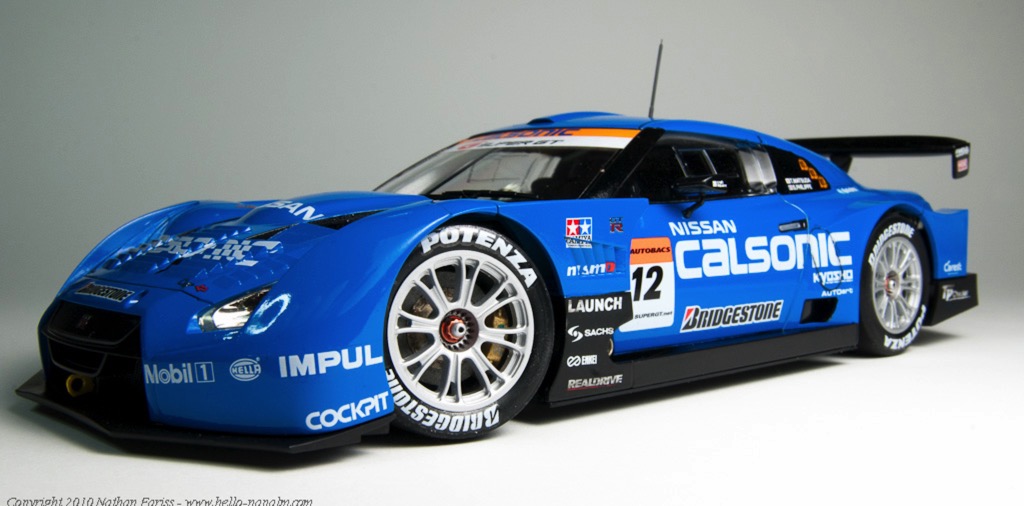
I've wrapped up the build of the Tamiya GT-R kit. By the time I was finishing up this kit, I was remembering why is was that I tried a wooden kit in the first place. I get worn out on all the painting, the frustrations of various paint types not agreeing with one another, and the fragility of decals. Although at least with this project, I took away a few valuable lessons that I can keep in mind for future similar projects. Here are a few tidbits to remember:
- If it is going to be shiny, use lacquer. Tamiya's gloss acrylics just never behave when airbrushed.
- Don't use the microSOL (aka Decal Melter) until the decal is in it's final place and already partly dry.
- If some of it will be painted over, remove the underlying chrome plating first, otherwise, the paint will just chip off, despite using primer.
- Give the aforementioned lacquer PLENTY of time to dry before putting masking tape on it. Probably should wait 24 hours before trying.
- One should probably order a second set of decals for a project like this, as some are sure to be damaged. Alternately, perhaps one could scan them, and buy a self-print decal sheet so one could make replacements (although I'm not sure about the quality difference here)
- Third party racing harness kits, while pretty cool, might not be worth the effort unless the car is an open wheel type.
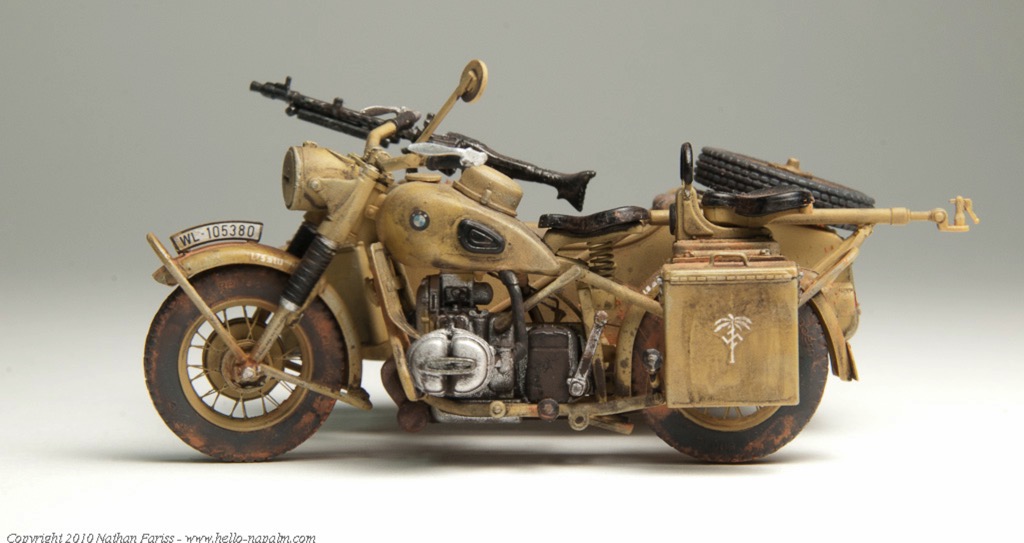
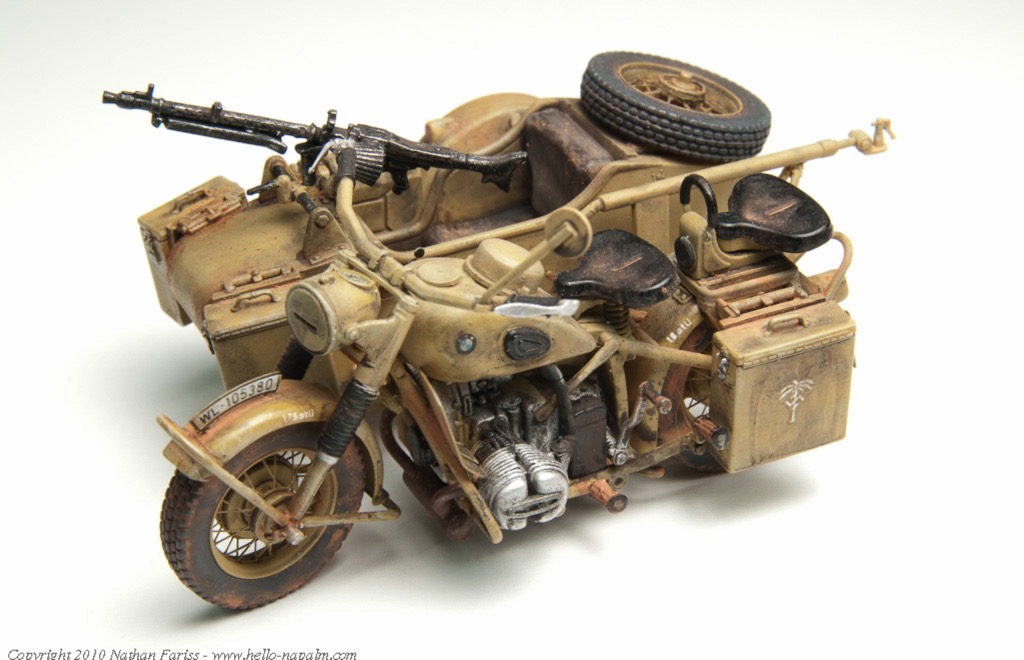
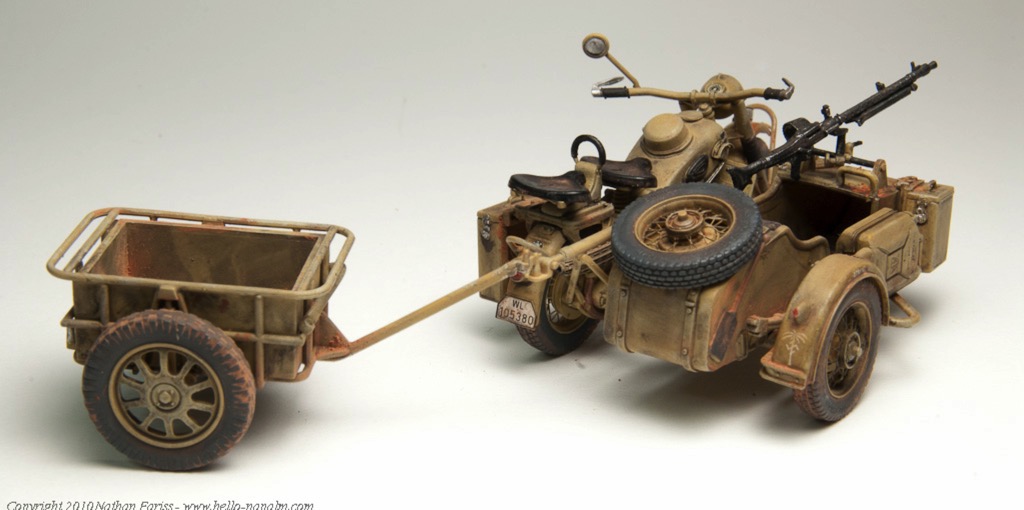
Anyhow, with this project completed, I spent a few minutes photographing but this car and the last project (WWII BMW r75 motorcycle). I recently purchased a new lens, which has some macro capabilities, and tried that out on this shoot. I am pretty pleased with the results. Here are a few images of the completed models:
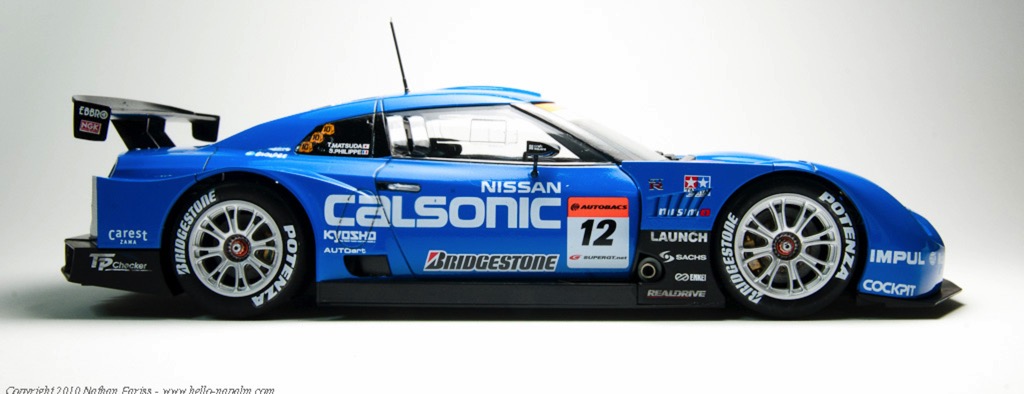
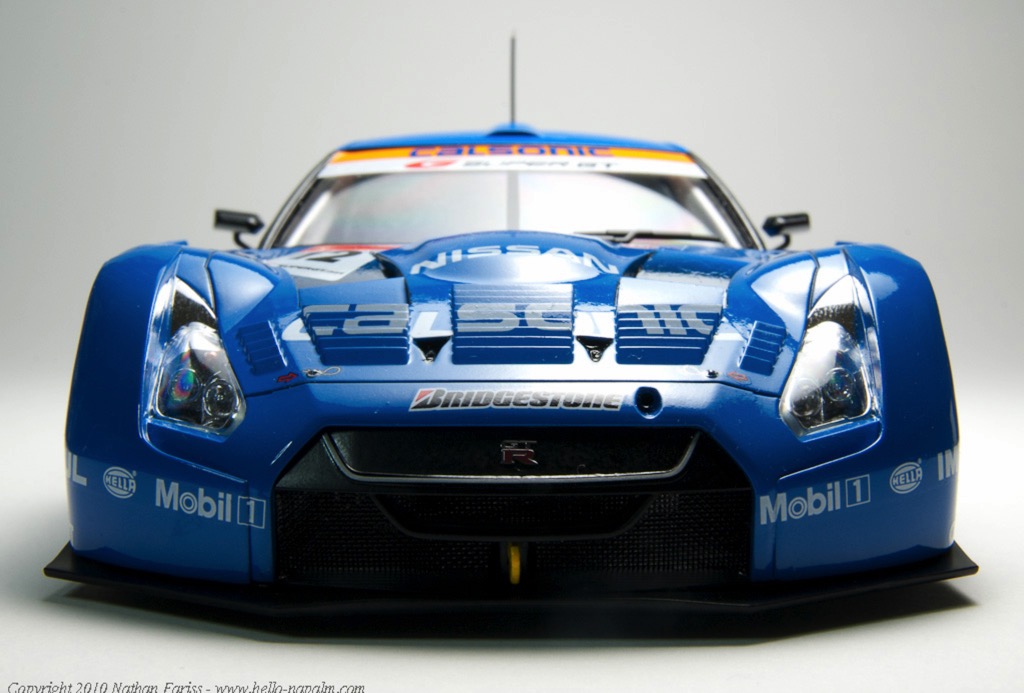
The full galleries are online and can be seen in the completed models section of this web site.
Next up: Model Airways' Curtis 'Jenny' wooden plane. Stay tuned for more model adventures!
- If it is going to be shiny, use lacquer. Tamiya's gloss acrylics just never behave when airbrushed.
- Don't use the microSOL (aka Decal Melter) until the decal is in it's final place and already partly dry.
- If some of it will be painted over, remove the underlying chrome plating first, otherwise, the paint will just chip off, despite using primer.
- Give the aforementioned lacquer PLENTY of time to dry before putting masking tape on it. Probably should wait 24 hours before trying.
- One should probably order a second set of decals for a project like this, as some are sure to be damaged. Alternately, perhaps one could scan them, and buy a self-print decal sheet so one could make replacements (although I'm not sure about the quality difference here)
- Third party racing harness kits, while pretty cool, might not be worth the effort unless the car is an open wheel type.
Anyhow, with this project completed, I spent a few minutes photographing but this car and the last project (WWII BMW r75 motorcycle). I recently purchased a new lens, which has some macro capabilities, and tried that out on this shoot. I am pretty pleased with the results. Here are a few images of the completed models:
The full galleries are online and can be seen in the completed models section of this web site.
Next up: Model Airways' Curtis 'Jenny' wooden plane. Stay tuned for more model adventures!
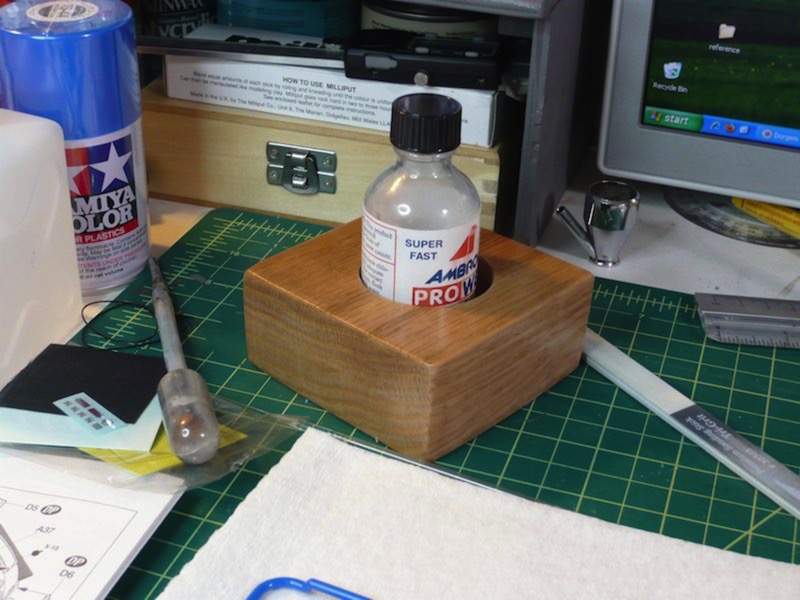
Model Desk Renovation & Tamiya GT-R
05 - July - 2010 - 17:18
Since the last post, I've done a few things to make my workspace a bit better.
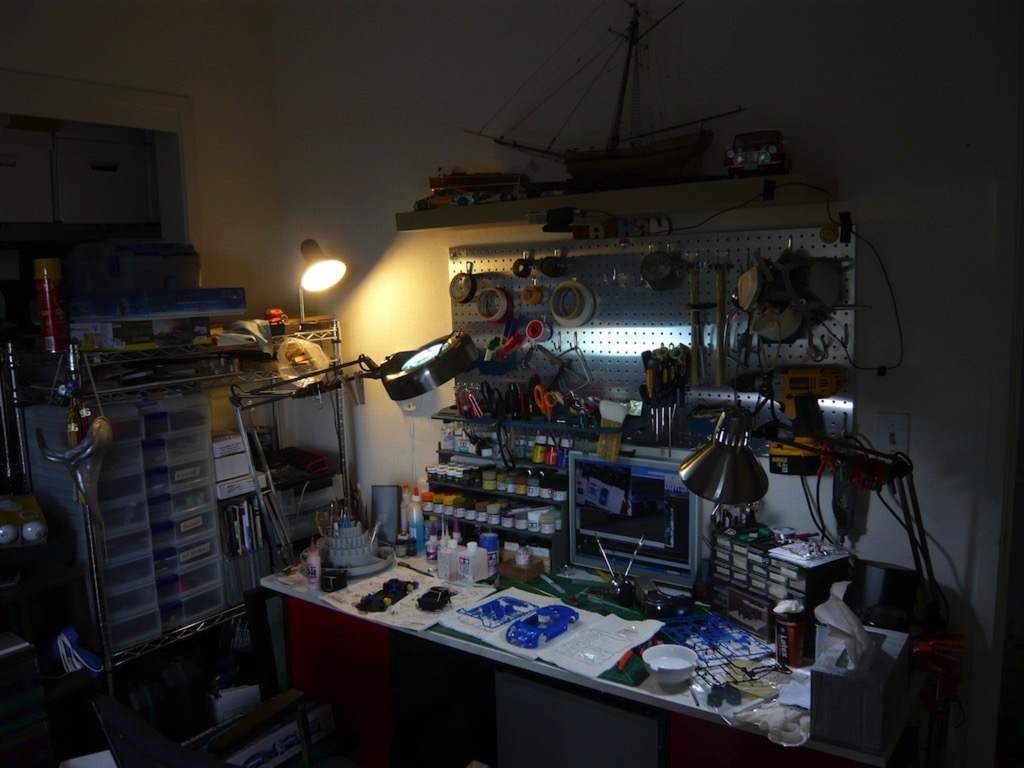
First I built myself a little shelf, so that I could have better access to my various paints, glues and other toxic chemicals. I just picked up a small sheet of thin plywood at Home Depot as well as some little 1"x1"x12" blocks of pine. I worked up some quick plans, drew them out onto the plywood, busted out the jigsaw and started cutting. After some gluing, drilling, a few wood screws, and a couple coats of gray spray paint, I now have a nice little shelf for my desk (you can also see here the monitor for the cam/computer setup I mentioned in the previous post):

Next, after knocking over my bottle of high-power plastic cement, and melting all the lines off the middle of my cutting mat, I thought it might be a good idea to make sure that doesn't happen again. Especially since this was not the first time I had knocked this same bottle over. After rummaging around a bit, I found some nice wood I had left over from the base I made for the Panzer project (red oak, I think). I cut a couple squares of this, glued them together, and then, using a hole saw, drilled a hole just a bit bigger than the glue bottle. A couple coats of polyurethane, and now I've got a little block that keeps my glue bottle from falling over and doesn't look too terrible.
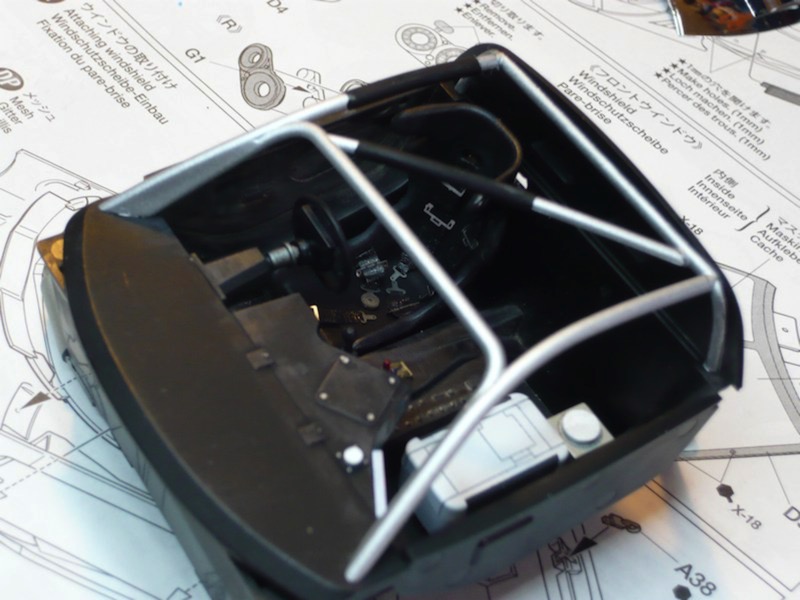
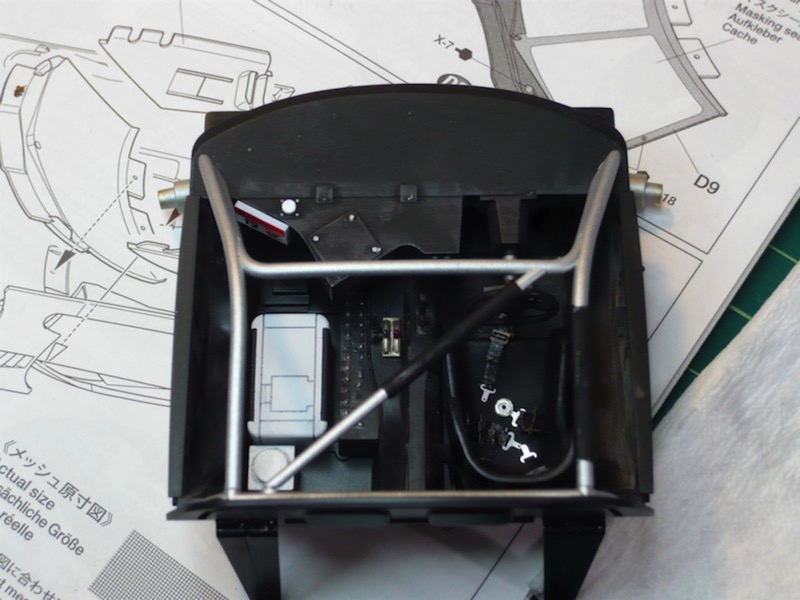
Before I jumped into another long-term wooden project, I decided to make one more plastic kit. I settled on the Tamiya Calsonic Impul GT-R kit that I bought a while back, thinking it would be fairly quick and easy, since it doesn't have an engine and only a rudimentary interior. I had intended to build it straight from the box, but I couldn't resist adding an third party racing harness kit. Here you can see the completed interior, as well as the mostly-built exterior shell:
I should wrap this project up in the next few weeks, and then I'll get some proper photographs of both this completed model and the motorcycle model that I finished before this one. Stay tuned!
First I built myself a little shelf, so that I could have better access to my various paints, glues and other toxic chemicals. I just picked up a small sheet of thin plywood at Home Depot as well as some little 1"x1"x12" blocks of pine. I worked up some quick plans, drew them out onto the plywood, busted out the jigsaw and started cutting. After some gluing, drilling, a few wood screws, and a couple coats of gray spray paint, I now have a nice little shelf for my desk (you can also see here the monitor for the cam/computer setup I mentioned in the previous post):
Next, after knocking over my bottle of high-power plastic cement, and melting all the lines off the middle of my cutting mat, I thought it might be a good idea to make sure that doesn't happen again. Especially since this was not the first time I had knocked this same bottle over. After rummaging around a bit, I found some nice wood I had left over from the base I made for the Panzer project (red oak, I think). I cut a couple squares of this, glued them together, and then, using a hole saw, drilled a hole just a bit bigger than the glue bottle. A couple coats of polyurethane, and now I've got a little block that keeps my glue bottle from falling over and doesn't look too terrible.
Before I jumped into another long-term wooden project, I decided to make one more plastic kit. I settled on the Tamiya Calsonic Impul GT-R kit that I bought a while back, thinking it would be fairly quick and easy, since it doesn't have an engine and only a rudimentary interior. I had intended to build it straight from the box, but I couldn't resist adding an third party racing harness kit. Here you can see the completed interior, as well as the mostly-built exterior shell:
I should wrap this project up in the next few weeks, and then I'll get some proper photographs of both this completed model and the motorcycle model that I finished before this one. Stay tuned!
Hobby Expo 2009
21 - February - 2009 - 22:20
I was up bright and early this morning in order to head north to Petaluma, California, and Hobby Expo 2009. I was hoping to see some well-built models, be introduced to some aspects of the hobby that I was not familiar with, and perhaps run across some hard-to-find items carried by vendors there.
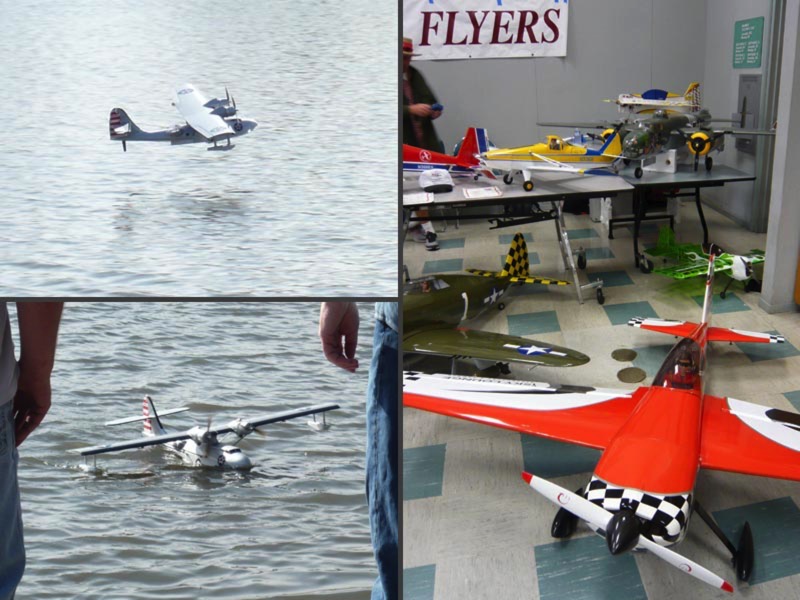
I arrived around 10:30 in the morning and upon entering the building, wandered past a few folding tables stacked high with plastic model kits, and then found myself in the r/c room. There was a little course set up on the floor and a few tables for r/c rock crawlers (something I didn't even know existed), and a small race track for tiny r/c cars. There were a few r/c airplane tables, a table with some r/c tanks (I had run across these at Maker Fair, as well), and a 'robot' table. As I wandered in, there was a fellow heading outside to the pond to fly his electric plane, so I followed along.
The plane that was flying and one of the r/c plane tables:
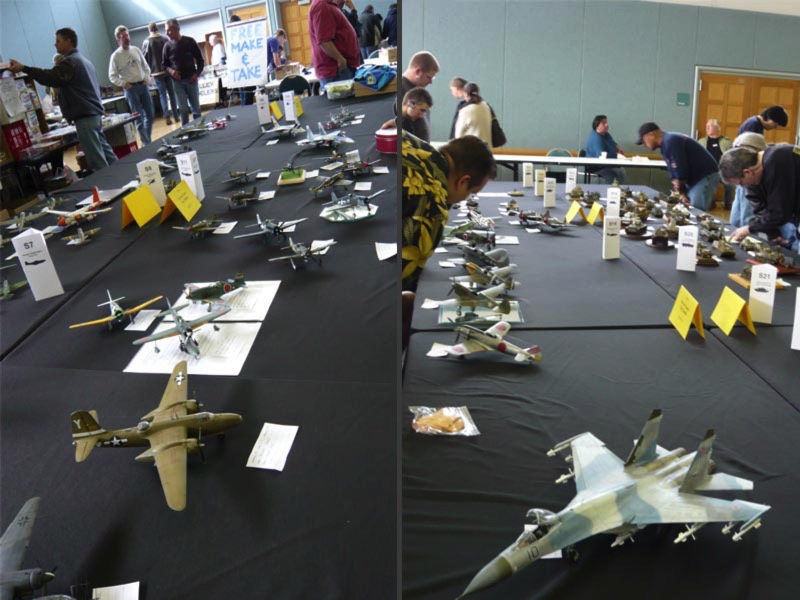
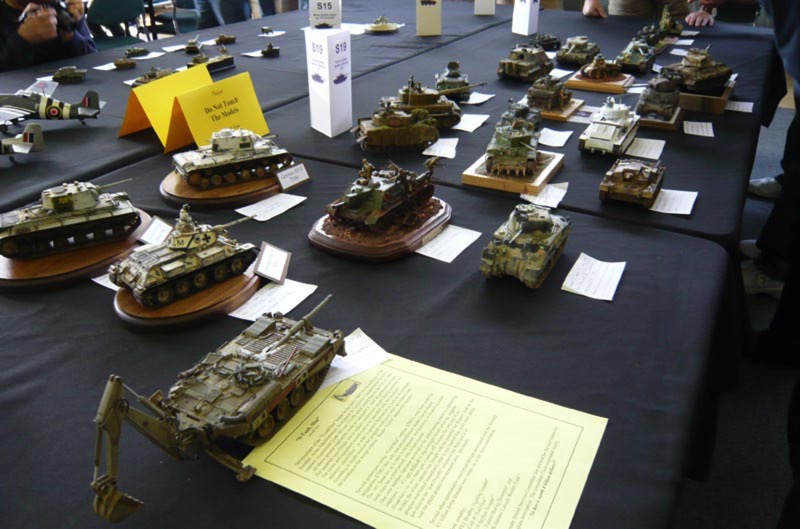
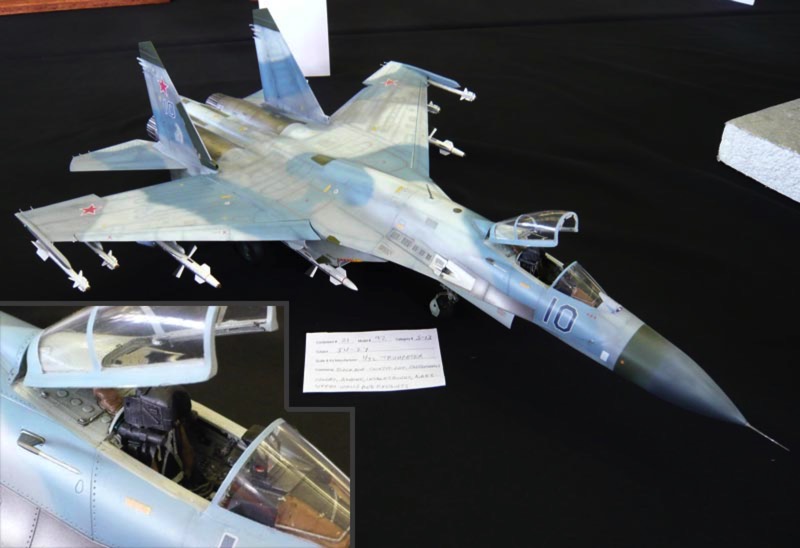
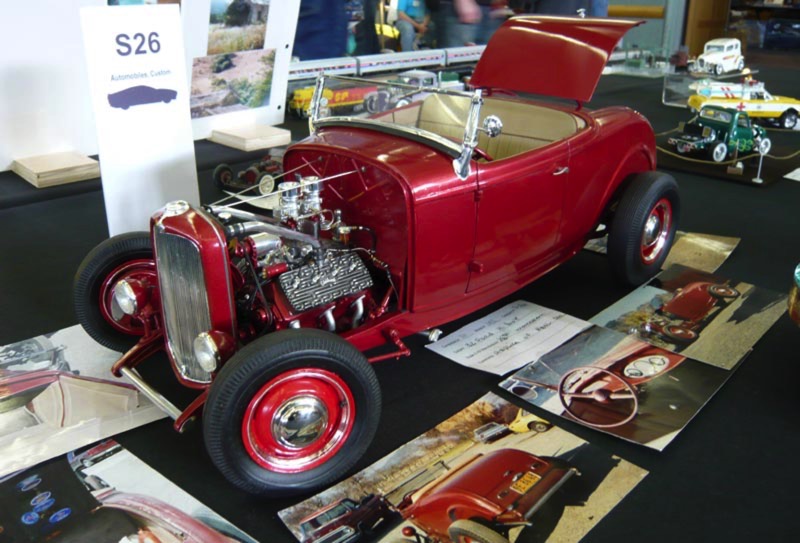
After that I found my way into the main room, where there were a few central tables, with models on display, and a ring of vendors around the outside. Here are some images of the models that were on display.
Besides the main room, there was also a room with a few wooden ship models, some model railroads, and quite a few maquettes. I also ran across what appeared to be a room full of model terrain and people playing table-top war games with little tanks and people. I didn't hang around long in there, as I've never been big on table-top games.
All in all, the event was larger that I had been expecting, but still not particularly huge. There was a vendor selling resin car kits and photo-etched detail sheets that were pretty impressive. I believe he also sells them from his website here: www.mshobbies.com (also there is a link on the right side of this page, now). Most of the kits and parts he was selling were Japanese imports made by a company called Studio 27.
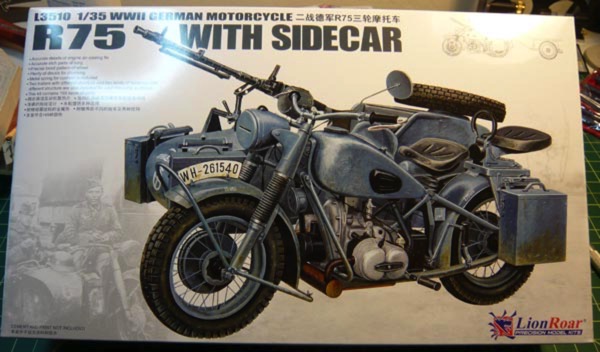
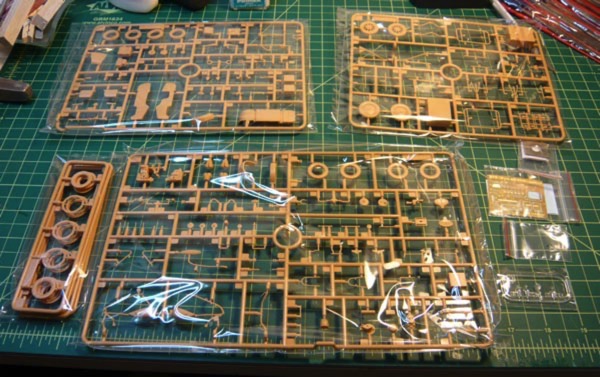
While I was checking out the model ships, I noticed the group exhibiting (Redwood Empire Model Shipwrights, I think), had their monthly meetings at a local hobby shop. Figuring that if the ship guys met there, the store might sell things that would be handy in my upcoming build, so I decided to go check it out. It turns out that this particular store had some of the best selection of any brick-and-morter hobby store that I have ever been to. If you are in the north bay, and are interested in a hobby store, be sure to check out Hobbytown USA in Petaluma (http://www.htupetaluma.com/). They were even having a sale on all plastic models (buy two, get the third free). I picked up two WWII German armor models (both of which were also discounted $20-25 each), both made by Dragon, and a WWII motorcycle model, along with various other odds and ends.
All three models have a pretty high level of detail, having some photoetched parts, very fine molding, etc. Here are a few images of the kits, although I'm planning on putting these aside for a while (probably until the summer, when I can open up the apartment for airbrushing, etc). I just couldn't pass up the great discounts at the hobby store :-)
The motorcycle:
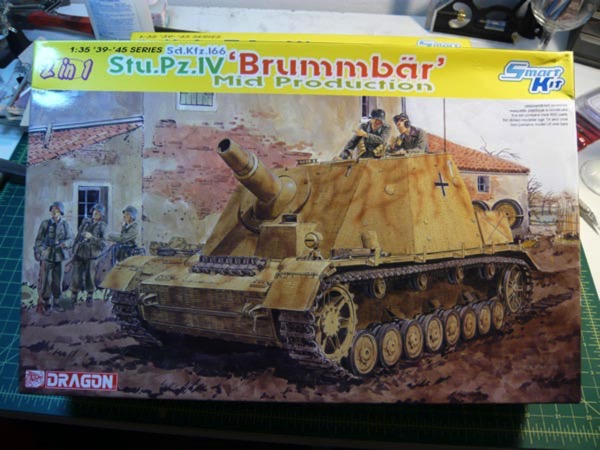
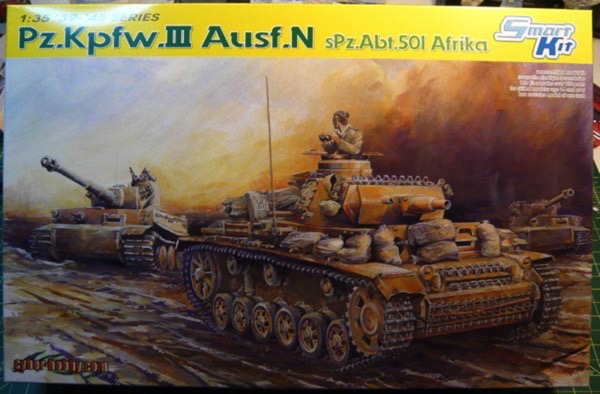
First tank model (this one came with a little booklet telling me all about how awesome the quality of the kit was):
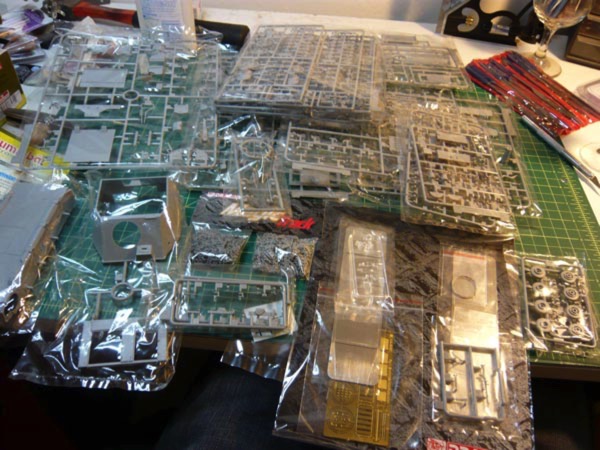
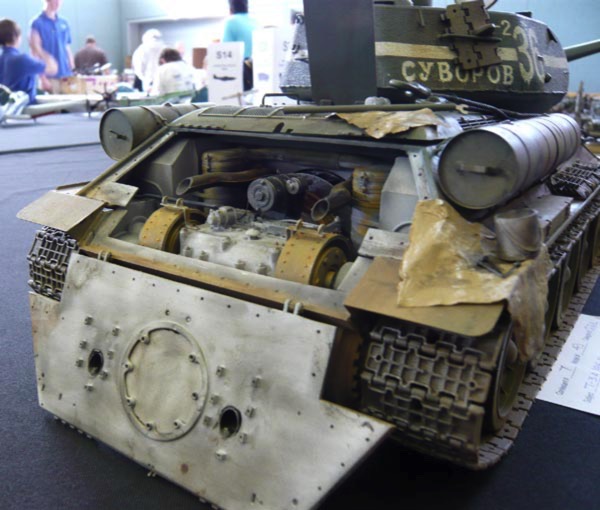
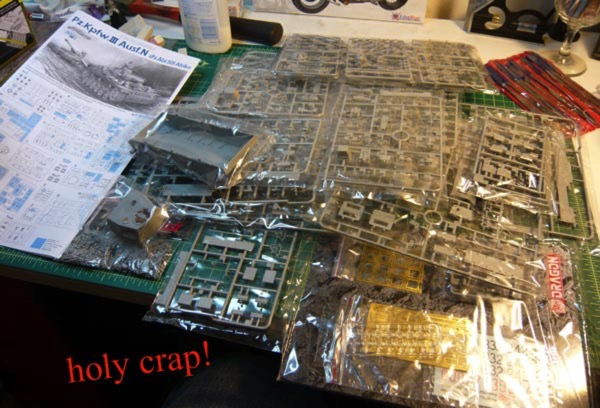
The other tank model. This one had an enormous amount of parts that formed a mountain of plastic on my desk, and were, frankly, a bit intimidating.
That's all from me for now. My next kit should arrive mid next week, so I'll post some pics when that arrives.
I arrived around 10:30 in the morning and upon entering the building, wandered past a few folding tables stacked high with plastic model kits, and then found myself in the r/c room. There was a little course set up on the floor and a few tables for r/c rock crawlers (something I didn't even know existed), and a small race track for tiny r/c cars. There were a few r/c airplane tables, a table with some r/c tanks (I had run across these at Maker Fair, as well), and a 'robot' table. As I wandered in, there was a fellow heading outside to the pond to fly his electric plane, so I followed along.
The plane that was flying and one of the r/c plane tables:
After that I found my way into the main room, where there were a few central tables, with models on display, and a ring of vendors around the outside. Here are some images of the models that were on display.
Besides the main room, there was also a room with a few wooden ship models, some model railroads, and quite a few maquettes. I also ran across what appeared to be a room full of model terrain and people playing table-top war games with little tanks and people. I didn't hang around long in there, as I've never been big on table-top games.
All in all, the event was larger that I had been expecting, but still not particularly huge. There was a vendor selling resin car kits and photo-etched detail sheets that were pretty impressive. I believe he also sells them from his website here: www.mshobbies.com (also there is a link on the right side of this page, now). Most of the kits and parts he was selling were Japanese imports made by a company called Studio 27.
While I was checking out the model ships, I noticed the group exhibiting (Redwood Empire Model Shipwrights, I think), had their monthly meetings at a local hobby shop. Figuring that if the ship guys met there, the store might sell things that would be handy in my upcoming build, so I decided to go check it out. It turns out that this particular store had some of the best selection of any brick-and-morter hobby store that I have ever been to. If you are in the north bay, and are interested in a hobby store, be sure to check out Hobbytown USA in Petaluma (http://www.htupetaluma.com/). They were even having a sale on all plastic models (buy two, get the third free). I picked up two WWII German armor models (both of which were also discounted $20-25 each), both made by Dragon, and a WWII motorcycle model, along with various other odds and ends.
All three models have a pretty high level of detail, having some photoetched parts, very fine molding, etc. Here are a few images of the kits, although I'm planning on putting these aside for a while (probably until the summer, when I can open up the apartment for airbrushing, etc). I just couldn't pass up the great discounts at the hobby store :-)
The motorcycle:
First tank model (this one came with a little booklet telling me all about how awesome the quality of the kit was):
The other tank model. This one had an enormous amount of parts that formed a mountain of plastic on my desk, and were, frankly, a bit intimidating.
That's all from me for now. My next kit should arrive mid next week, so I'll post some pics when that arrives.