
Hairspray and High Voltage!
13 - May - 2014 - 21:37
In this post, I'm going to cover just two things: a new (to me) weathering technique that uses hairspray and the construction of a DIY electrostatic grass tool. Both of these things were totally new to me, although I had read a good bit about the hairspray use and had watched a video about the grass tool.
First, the hairspray: The basic premise of hairspray weathering is to spray a base coat of paint in a color that you want to see when the top coat chips away. Then, once that is dry, you give your model a few coats of the cheapest hairspray you can find. Once that is totally dry, you spray on a your top coats. Then, you can wet areas of the model, the water will soak right through your top coat (I think this only works with acrylics) and will soften the hairspray. You can then poke at your paint with a toothpick, cotton swap, etc and the top coat will chip off, revealing the under coat. Magical paint chips!!
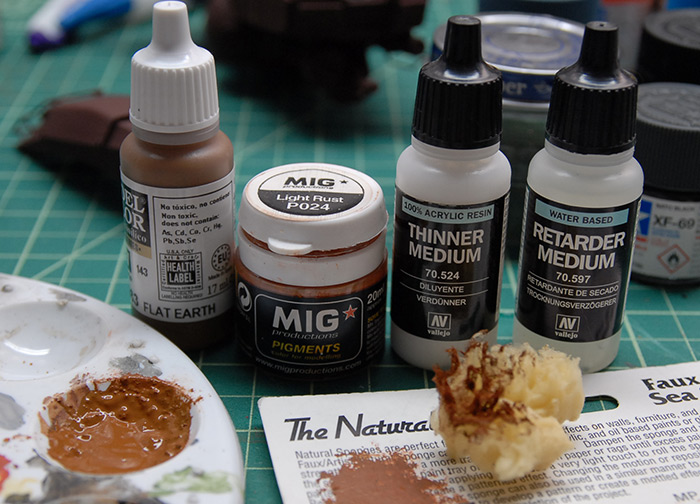
To start with, I sprayed my model with Tamiya Hull Red as the base coat. Next, to break up the paint, and add some dirt/rust details, I mixed up a batch of paint that consisted of mostly Vallejo Flat Earth, with some MIG pigment in Light Rust. In order to keep it from getting too thick and to keep with workable for longer, I added a small amount of Vallejo Retarder Medium (slows drying) and Thinner Medium (reduces thickness).
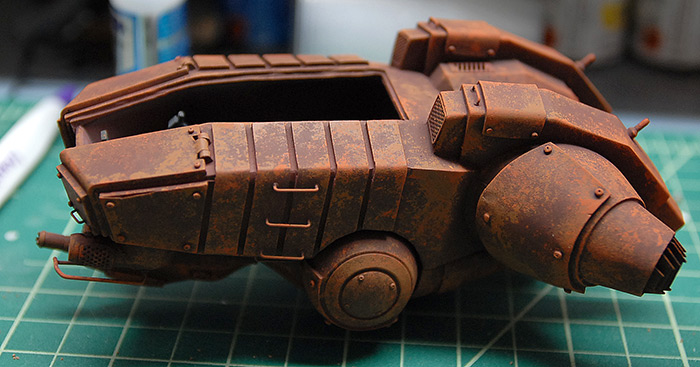
I used a small piece of natural sponge to dab it all over the model. After the first pass, I added a bit of Standard Rust pigment to the paint mix to get a redder shade and went back over the model again. Below you can see the model after all the under coat was applied.
Next I took it outside and gave it two or three coats of hairspray. Be generous, as it doesn't seem to bulk up and shouldn't add any strange texture. If you wanted to prevent some areas from chipping at all, I'm sure you could mask them. As far as what sort of hairspray to use, I don't think it matters much (I'm no hairspray expert), so I recommend just getting the biggest/cheapest can you can find. If there is such a thing as waterproof hairspray (Google says there is), you do NOT want that. The whole premise of this technique is that the water dissolves the hairspray later, so if you used waterproof hairspray, you'd be out of luck when it came time to chip the paint.
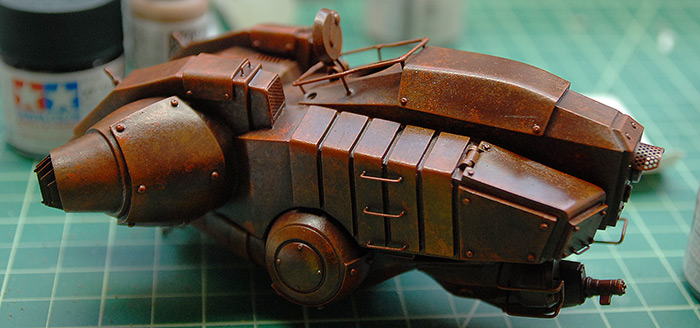
Below you can see my model with the hairspray applied and dry. It dried to a semigloss finish.
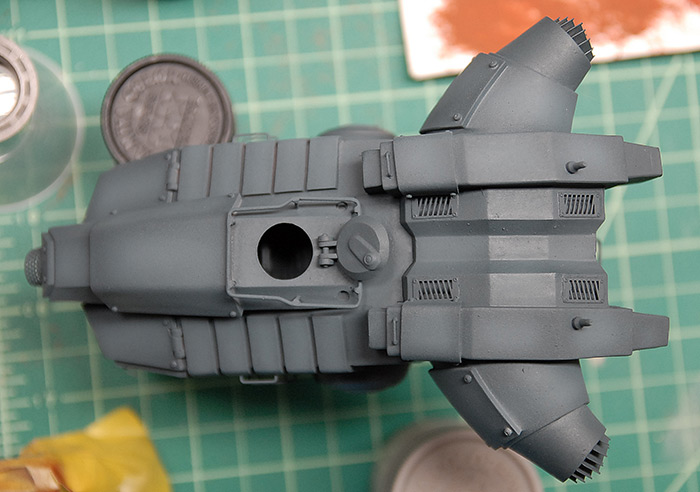
Next came the top coat. In my case, I first put down a coat of light grey, with the thought that it would make for more interesting chipping later as well as give me a more neutral base to paint over. Next I used Tamiya Field Blue as the main color, and then went back and lightened the panel centers with the same color mixed with a bit of light grey.
Then the fun began! For water application, I just used a cotton swab, and painted water on a small area at a time. I would swab on some water, wait a few minutes (the paint texture changes a bit once the water is soaked in) and then I scraped it a bit with a wooden toothpick that had been cut to a chisel point. I thought it worked great! In fact, I had to be careful not to take off too much of the top coat, as once the hairspray is wet, it is very easy to get the paint off.
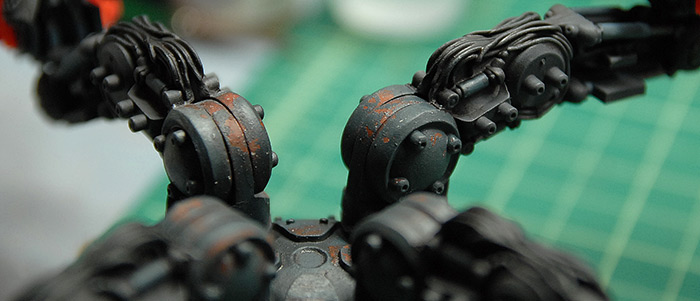
Below you can see some finished chipping on the tank legs.
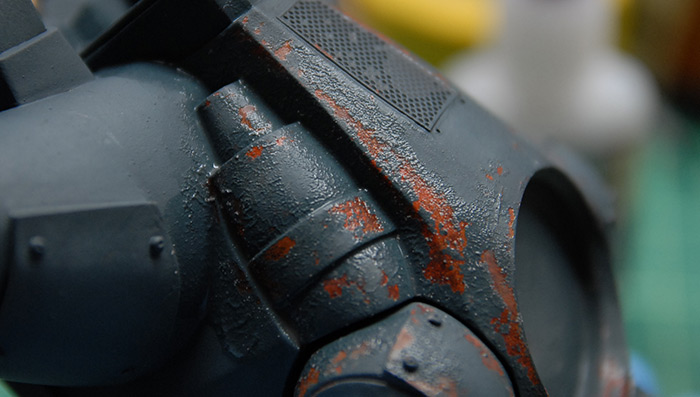
Below you can see how the paint texture changes once the hairspray is wet and the paint is ready to scrape. Fortunately, the paint does flatten back out once things dry. The only catch is that the hairspray does mix in with the water during the process and once things dry, some of the semi-gloss finish that we saw earlier will be present on top of the flat paint. Nothing a bit of Testors Dullcoat won't fix later.
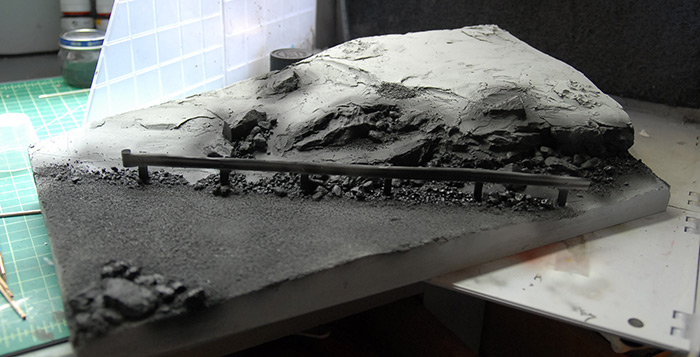
Next we turn back to the base. Before I could get to grass application, I needed to paint it. I was going to follow the standard order of preshade-with-dark, main color coat, sponge to break up some areas and dry brush to pull out details.
Below you can see the first pass of pre-shading.
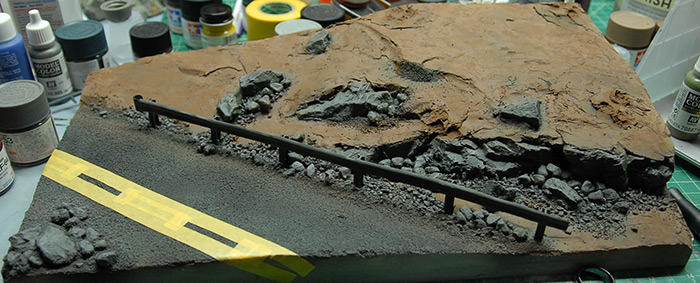
Next was the various color passes. My idea was to try to make this look like an old unused road, so I masked the road lines off and just dry brushed the lines on, so they were old and faded looking. Everything will get a good deal more dust and weathering later on, in order to blend it all together.
I was hoping to use electro static grass on this base, in order to get some nice grass on the upper area and in the nooks and crannies around the rocks. I knew there were various devices that one could buy in order to apply the grass and get it to stick up nicely. Once I actually went to BUY one of these tools, I was in for a bit of sticker shock. As much as I enjoy getting a good tool, I couldn't justify spending $150+ just to do my little diorama. With a bit of searching around, I ran across a video on youtube showing how to build your own grass applicator using a few cheap parts and a little bit of work. I decided to give it a try.
Here is the video I watched first, if you'd like to give it a try. Have a watch and then see what I did afterwards.
I'm no electrical engineer, but here's a little bit about how some of this stuff works, as I understand it. The bug zapper that I ended up with takes two AA batteries. If you touch both ends of a AA battery, you don't get shocked. The 1.5 volts that that battery puts out is not enough to get through your skin, bones, etc. Even stacking up the two batteries, giving you 3 volts, still doesn't result in a shock. So, in order to be able to zap bugs, the bug zapper has a small transformer in it that boosts that voltage up to something like 15000 volts. That ends up being enough to jump across small gaps and also fry bugs. The way the bug zapper works is that it then routes that current into the various layers of the racquet, which are spaced closely, but far enough apart that the current can't jump across. In the case of mine, the outer layers got the negative terminal and the inner layer got the positive. When you swing that thing as a bug, the bug passes through the holes and probably hits both layers or is close enough to both for the current to jump across the gap, through the bug, completing the circuit, and electrocuting the insect.
Our goal is not to electrocute anything, but instead use all the static electricity that is generated by that high voltage to make our grass all stand on end. With the ground of the zapper attached to the glue on the base of the diorama, and the positive current attached to the strainer, the static grass flocking should fall out of the strainer a few hairs at a time, stick to the glue on the base, and then stay standing up because they are attracted to the strainer's static charge, the same way your arm hairs stand up when you hold a statically charged balloon above them. So long as the glue is fairly thick and sticky, the hairs should just stay where ever they land, and you'll get a great looking patch of grass.
With that said, PLEASE BE CAREFUL. While I don't think this is strong enough to do any extreme damage, it is probably enough voltage to give you a good shock, a small burn, or some other unpleasant injury. If you decide to try this yourself, be very careful and don't leave any of this stuff laying about where a curious child could get ahold of it.
Okay, with the legal disclaimers out of the way, let's get down to business.
I was far lazier than the fellow in the video and just went to good ol Amazon for my parts. Since I've got Amazon Prime, I wasn't concerned about shipping cost, so I order up the following parts:
Zap Master Bug Zapper - $6.97
Stainless Steel Mesh Strainer - $6.71
Insulated Alligator Clips - $3.99
Insulated Solid Wire (lots) - $20
Obviously, I got way more wire than I needed, but it was time for me to stock up anyway, so you can ignore that one if you already have some wire laying about that you can use. Same with the alligator clips, as that $3.99 was for a pack of 10. Also, I bet you could find a cheaper mesh strainer at a local dollar store, if you were concerned about the budget or just wanted to keep it under $10. Below you can see the parts that I ended up with.
Taking the bug zapper apart (be sure there are no batteries in there!), you can see the circuit board that does the current transformation and that has the activation button on it. Unlike the zapper in the video, all the components on mine are under the board, so harder to see. The first order of business was to get rid of the old wires that came off the board and replace them with tougher and longer ones. This requires desoldering the old wires, and in the case of my zapper, melting and soaking up some protective wax that was over the various contacts. Below you can see the board with my replacement red wire coming off the left side of the board. This will be the wire that will contact the metal strainer.
Once the longer ground wire is attached (I made mine roughly a foot long), I had to figure out how to attach the strainer. I had a bit of scrap aluminum around (from my bag of scrap bits that I got at the hardware store ages ago), so I just made two little strips, and drilled holes in the strips and in the handle of the zapper. The strainer handle needed to be cut a bit shorter in order to fit, and then the whole thing could be bolted together. I was originally going to solder the red wire to the strainer handle, but it ended up being easier to just sandwich the wire between one of the plates and the handle.
Next, I put the other side of the handle back on, and attached one of the alligator clips to the ground wire and I was ready to flock!
How this works, step by step:
1) Mix up your flocking grass. I mixed roughly equal parts 'Medium Green' and 'Burnt Grass' from Woodland Scenics in order to get a more natural mix of color.
2) Spread some undiluted scenic cement (or maybe Elmers white glue, or PVA glue) on to whatever you want to flock. Apply it in such a way that all the glue is contiguous. The electrical current needs to be able to get to all the glue, so no glue islands!
3) Poke a small nail into the glue somewhere (preferably somewhere that the little hole won't be noticed) and clip your negative wire to the nail.
4) Put some of the grass mix into your strainer bowl.
5) Hold your strainer bowl over the glue (a couple inches above, don't let them touch!), press and hold the button on the zapper handle (red light should illuminate), and gently shake your strainer over the glue until it is all covered.
6) Err on the side of too much grass, as you can always shake off the stuff that doesn't stick later and it is really hard to put another coat of grass on later, since you'd have to paint the glue on over your first coat of grass.
Following those steps, here is what I ended up with on my test patch:
As you can see, I left the glue off of the rock and the toe divots. I was pretty happy with how the grass stood up, but still felt fairly natural. If you wanted patchier grass colors, you could mix your grass colors a bit less that I did, so you got clumps in the strainer, which should give you areas with a bit more of one color or another as you go.
Below is a side view of the same area as above.
And that is that! Next up for me is some weathering on the base, and painting on the other tank.
Thanks for reading!
First, the hairspray: The basic premise of hairspray weathering is to spray a base coat of paint in a color that you want to see when the top coat chips away. Then, once that is dry, you give your model a few coats of the cheapest hairspray you can find. Once that is totally dry, you spray on a your top coats. Then, you can wet areas of the model, the water will soak right through your top coat (I think this only works with acrylics) and will soften the hairspray. You can then poke at your paint with a toothpick, cotton swap, etc and the top coat will chip off, revealing the under coat. Magical paint chips!!
To start with, I sprayed my model with Tamiya Hull Red as the base coat. Next, to break up the paint, and add some dirt/rust details, I mixed up a batch of paint that consisted of mostly Vallejo Flat Earth, with some MIG pigment in Light Rust. In order to keep it from getting too thick and to keep with workable for longer, I added a small amount of Vallejo Retarder Medium (slows drying) and Thinner Medium (reduces thickness).
I used a small piece of natural sponge to dab it all over the model. After the first pass, I added a bit of Standard Rust pigment to the paint mix to get a redder shade and went back over the model again. Below you can see the model after all the under coat was applied.
Next I took it outside and gave it two or three coats of hairspray. Be generous, as it doesn't seem to bulk up and shouldn't add any strange texture. If you wanted to prevent some areas from chipping at all, I'm sure you could mask them. As far as what sort of hairspray to use, I don't think it matters much (I'm no hairspray expert), so I recommend just getting the biggest/cheapest can you can find. If there is such a thing as waterproof hairspray (Google says there is), you do NOT want that. The whole premise of this technique is that the water dissolves the hairspray later, so if you used waterproof hairspray, you'd be out of luck when it came time to chip the paint.
Below you can see my model with the hairspray applied and dry. It dried to a semigloss finish.
Next came the top coat. In my case, I first put down a coat of light grey, with the thought that it would make for more interesting chipping later as well as give me a more neutral base to paint over. Next I used Tamiya Field Blue as the main color, and then went back and lightened the panel centers with the same color mixed with a bit of light grey.
Then the fun began! For water application, I just used a cotton swab, and painted water on a small area at a time. I would swab on some water, wait a few minutes (the paint texture changes a bit once the water is soaked in) and then I scraped it a bit with a wooden toothpick that had been cut to a chisel point. I thought it worked great! In fact, I had to be careful not to take off too much of the top coat, as once the hairspray is wet, it is very easy to get the paint off.
Below you can see some finished chipping on the tank legs.
Below you can see how the paint texture changes once the hairspray is wet and the paint is ready to scrape. Fortunately, the paint does flatten back out once things dry. The only catch is that the hairspray does mix in with the water during the process and once things dry, some of the semi-gloss finish that we saw earlier will be present on top of the flat paint. Nothing a bit of Testors Dullcoat won't fix later.
Next we turn back to the base. Before I could get to grass application, I needed to paint it. I was going to follow the standard order of preshade-with-dark, main color coat, sponge to break up some areas and dry brush to pull out details.
Below you can see the first pass of pre-shading.
Next was the various color passes. My idea was to try to make this look like an old unused road, so I masked the road lines off and just dry brushed the lines on, so they were old and faded looking. Everything will get a good deal more dust and weathering later on, in order to blend it all together.
I was hoping to use electro static grass on this base, in order to get some nice grass on the upper area and in the nooks and crannies around the rocks. I knew there were various devices that one could buy in order to apply the grass and get it to stick up nicely. Once I actually went to BUY one of these tools, I was in for a bit of sticker shock. As much as I enjoy getting a good tool, I couldn't justify spending $150+ just to do my little diorama. With a bit of searching around, I ran across a video on youtube showing how to build your own grass applicator using a few cheap parts and a little bit of work. I decided to give it a try.
Here is the video I watched first, if you'd like to give it a try. Have a watch and then see what I did afterwards.
I'm no electrical engineer, but here's a little bit about how some of this stuff works, as I understand it. The bug zapper that I ended up with takes two AA batteries. If you touch both ends of a AA battery, you don't get shocked. The 1.5 volts that that battery puts out is not enough to get through your skin, bones, etc. Even stacking up the two batteries, giving you 3 volts, still doesn't result in a shock. So, in order to be able to zap bugs, the bug zapper has a small transformer in it that boosts that voltage up to something like 15000 volts. That ends up being enough to jump across small gaps and also fry bugs. The way the bug zapper works is that it then routes that current into the various layers of the racquet, which are spaced closely, but far enough apart that the current can't jump across. In the case of mine, the outer layers got the negative terminal and the inner layer got the positive. When you swing that thing as a bug, the bug passes through the holes and probably hits both layers or is close enough to both for the current to jump across the gap, through the bug, completing the circuit, and electrocuting the insect.
Our goal is not to electrocute anything, but instead use all the static electricity that is generated by that high voltage to make our grass all stand on end. With the ground of the zapper attached to the glue on the base of the diorama, and the positive current attached to the strainer, the static grass flocking should fall out of the strainer a few hairs at a time, stick to the glue on the base, and then stay standing up because they are attracted to the strainer's static charge, the same way your arm hairs stand up when you hold a statically charged balloon above them. So long as the glue is fairly thick and sticky, the hairs should just stay where ever they land, and you'll get a great looking patch of grass.
With that said, PLEASE BE CAREFUL. While I don't think this is strong enough to do any extreme damage, it is probably enough voltage to give you a good shock, a small burn, or some other unpleasant injury. If you decide to try this yourself, be very careful and don't leave any of this stuff laying about where a curious child could get ahold of it.
Okay, with the legal disclaimers out of the way, let's get down to business.
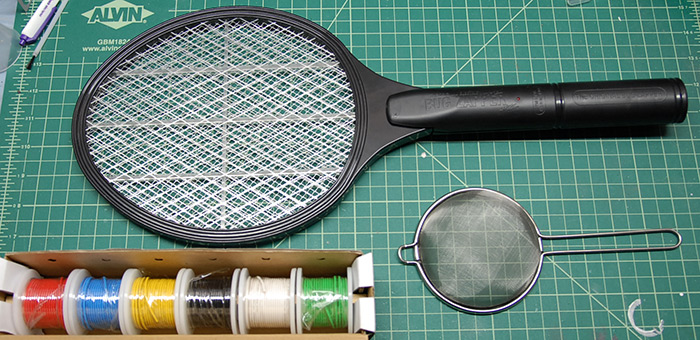
I was far lazier than the fellow in the video and just went to good ol Amazon for my parts. Since I've got Amazon Prime, I wasn't concerned about shipping cost, so I order up the following parts:
Zap Master Bug Zapper - $6.97
Stainless Steel Mesh Strainer - $6.71
Insulated Alligator Clips - $3.99
Insulated Solid Wire (lots) - $20
Obviously, I got way more wire than I needed, but it was time for me to stock up anyway, so you can ignore that one if you already have some wire laying about that you can use. Same with the alligator clips, as that $3.99 was for a pack of 10. Also, I bet you could find a cheaper mesh strainer at a local dollar store, if you were concerned about the budget or just wanted to keep it under $10. Below you can see the parts that I ended up with.
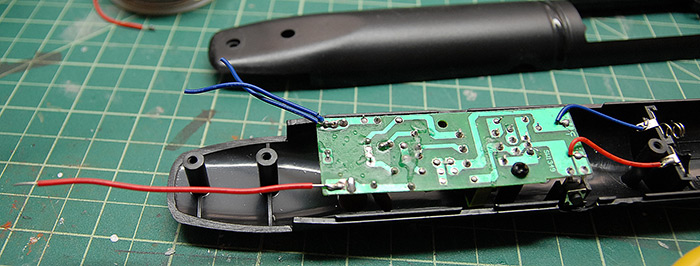
Taking the bug zapper apart (be sure there are no batteries in there!), you can see the circuit board that does the current transformation and that has the activation button on it. Unlike the zapper in the video, all the components on mine are under the board, so harder to see. The first order of business was to get rid of the old wires that came off the board and replace them with tougher and longer ones. This requires desoldering the old wires, and in the case of my zapper, melting and soaking up some protective wax that was over the various contacts. Below you can see the board with my replacement red wire coming off the left side of the board. This will be the wire that will contact the metal strainer.
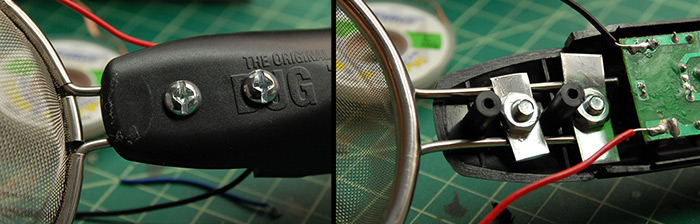
Once the longer ground wire is attached (I made mine roughly a foot long), I had to figure out how to attach the strainer. I had a bit of scrap aluminum around (from my bag of scrap bits that I got at the hardware store ages ago), so I just made two little strips, and drilled holes in the strips and in the handle of the zapper. The strainer handle needed to be cut a bit shorter in order to fit, and then the whole thing could be bolted together. I was originally going to solder the red wire to the strainer handle, but it ended up being easier to just sandwich the wire between one of the plates and the handle.
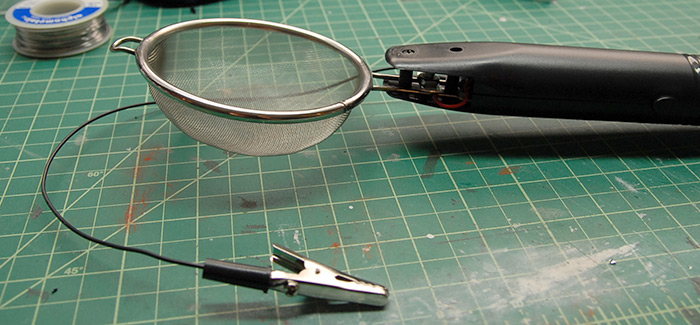
Next, I put the other side of the handle back on, and attached one of the alligator clips to the ground wire and I was ready to flock!
How this works, step by step:
1) Mix up your flocking grass. I mixed roughly equal parts 'Medium Green' and 'Burnt Grass' from Woodland Scenics in order to get a more natural mix of color.
2) Spread some undiluted scenic cement (or maybe Elmers white glue, or PVA glue) on to whatever you want to flock. Apply it in such a way that all the glue is contiguous. The electrical current needs to be able to get to all the glue, so no glue islands!
3) Poke a small nail into the glue somewhere (preferably somewhere that the little hole won't be noticed) and clip your negative wire to the nail.
4) Put some of the grass mix into your strainer bowl.
5) Hold your strainer bowl over the glue (a couple inches above, don't let them touch!), press and hold the button on the zapper handle (red light should illuminate), and gently shake your strainer over the glue until it is all covered.
6) Err on the side of too much grass, as you can always shake off the stuff that doesn't stick later and it is really hard to put another coat of grass on later, since you'd have to paint the glue on over your first coat of grass.
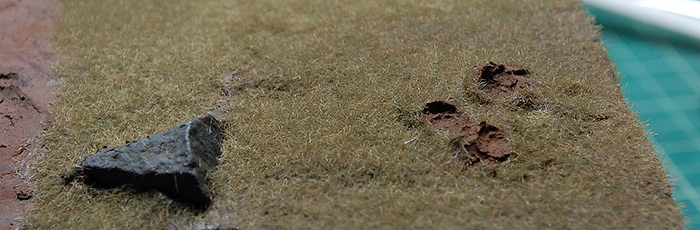
Following those steps, here is what I ended up with on my test patch:
As you can see, I left the glue off of the rock and the toe divots. I was pretty happy with how the grass stood up, but still felt fairly natural. If you wanted patchier grass colors, you could mix your grass colors a bit less that I did, so you got clumps in the strainer, which should give you areas with a bit more of one color or another as you go.
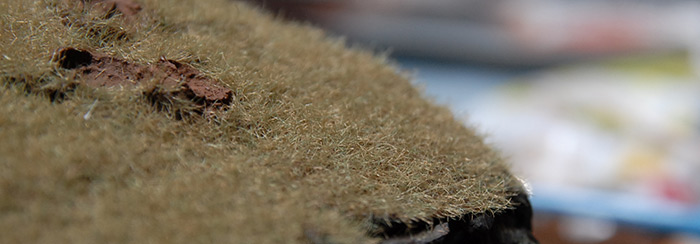
Below is a side view of the same area as above.
And that is that! Next up for me is some weathering on the base, and painting on the other tank.
Thanks for reading!