
Panzer
Repairing a few Older Projects
01 - December - 2013 - 13:55
Before I move on to the next model build, I wanted to put up a quick post that had some updates from previous projects.
Repair #1:
So, after I completed the Panzer and BMW motorcycle models, I put them together into one display case, and took them to my office at work for display. I was bringing various other models in at the same time, in various other display cases. Some of those cases had the plastic tops that snapped to the bases and some had the tops that just sat on the bases. Unfortunately, when I picked up the case that held the tank and motorcycle, I THOUGHT it was one that snapped together, but it wasn't. This resulted in the lower half of the case dropping to the table and then bouncing onto the floor, doing a bit of damage to both models, which were wired to the base.
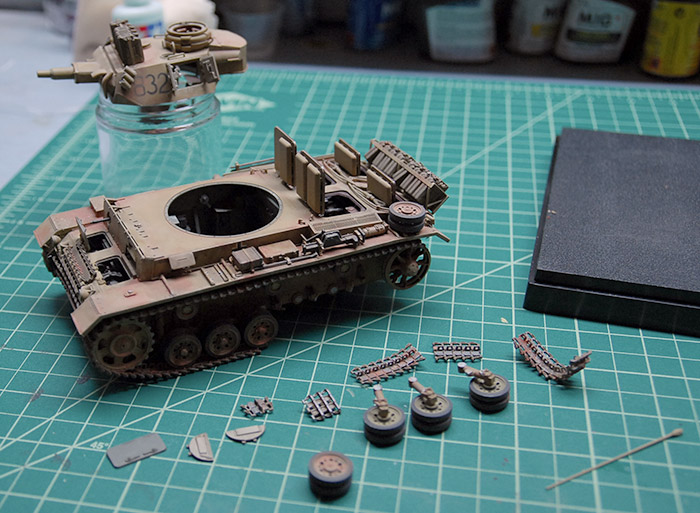
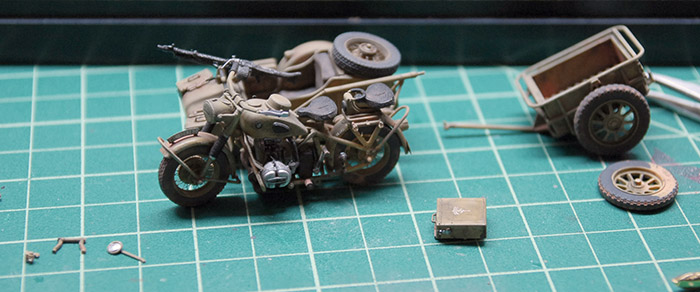
I was pretty mad at myself for making such a mistake and, after a great deal of cursing, decided to put the models and all the broken pieces back in the case, and the case back into its box, to be fixed later. Fast forward a year or two and I finally felt like I was able to open the box up and see how hard it would be to repair the models. Fortunately, it turned out to be pretty easy! Below you can see the two models and their detached parts all spread out, ready for fixing.
The tank lost a few hatches, some road wheels and some chunks of track. A bit of time with some plastic cement and it was good as new. I also took the opportunity to repose some of the hatches into a more natural position, but forgot to take a picture of the finished project. Just imagine that those engine hatches are no longer sticking straight up :)
The motorcycle just needed a few small parts reattached.
Repair #2:
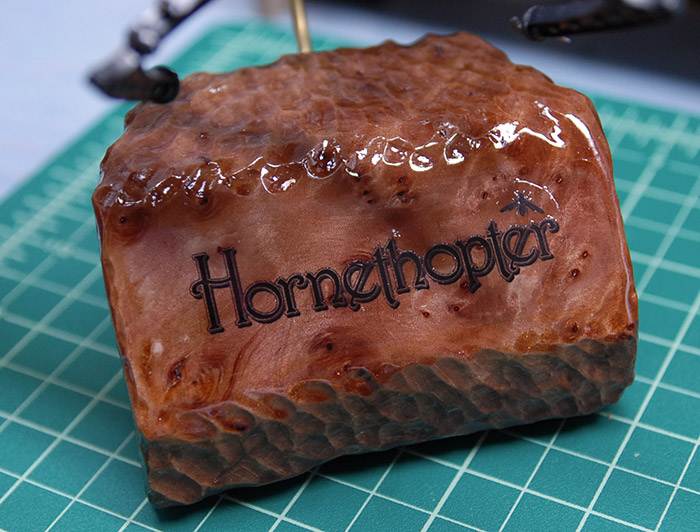
The Hornethopter model itself wasn't damaged, but the base that I built for it ended up throwing me for a loop. I have since learned that the chunk of wood that I bought for the base, which was a 'turning block', was actually pretty wet wood. The turning blocks come with a wax coating, which keeps the moisture in the wood, presumably making it better for turning on a lathe. When I prepared the block, I burned off the wax, cut the shape that I needed and carved it a bit. I put some polyurethane on there, attached the brass name plate, tube for the model and some felt dots on the bottom and called it done.
Fast forward a few months, after the model had been sitting under a bell jar at work, and the moisture had all evaporated from the block of wood. As the wood lost its moisture, it also shrunk. It shrunk enough to significantly buckle the brass name plate. I brought the model home, thinking that I could pop the plate off, and re-glue it into place. Unfortunately, the plate didn't really want to flatten out properly, so I decided to go a different route. I scanned the hornethopter logo and printed it out onto clear decal sheet. I sanded the glue off of the front of the wood block, made it smooth again and gave it a coat of gloss polyurethane. Then I put the decal on there, where the plate used to be, and gave it a few more coats of gloss polyurethane. Good as new!
Repair #1:
So, after I completed the Panzer and BMW motorcycle models, I put them together into one display case, and took them to my office at work for display. I was bringing various other models in at the same time, in various other display cases. Some of those cases had the plastic tops that snapped to the bases and some had the tops that just sat on the bases. Unfortunately, when I picked up the case that held the tank and motorcycle, I THOUGHT it was one that snapped together, but it wasn't. This resulted in the lower half of the case dropping to the table and then bouncing onto the floor, doing a bit of damage to both models, which were wired to the base.
I was pretty mad at myself for making such a mistake and, after a great deal of cursing, decided to put the models and all the broken pieces back in the case, and the case back into its box, to be fixed later. Fast forward a year or two and I finally felt like I was able to open the box up and see how hard it would be to repair the models. Fortunately, it turned out to be pretty easy! Below you can see the two models and their detached parts all spread out, ready for fixing.
The tank lost a few hatches, some road wheels and some chunks of track. A bit of time with some plastic cement and it was good as new. I also took the opportunity to repose some of the hatches into a more natural position, but forgot to take a picture of the finished project. Just imagine that those engine hatches are no longer sticking straight up :)
The motorcycle just needed a few small parts reattached.
Repair #2:
The Hornethopter model itself wasn't damaged, but the base that I built for it ended up throwing me for a loop. I have since learned that the chunk of wood that I bought for the base, which was a 'turning block', was actually pretty wet wood. The turning blocks come with a wax coating, which keeps the moisture in the wood, presumably making it better for turning on a lathe. When I prepared the block, I burned off the wax, cut the shape that I needed and carved it a bit. I put some polyurethane on there, attached the brass name plate, tube for the model and some felt dots on the bottom and called it done.
Fast forward a few months, after the model had been sitting under a bell jar at work, and the moisture had all evaporated from the block of wood. As the wood lost its moisture, it also shrunk. It shrunk enough to significantly buckle the brass name plate. I brought the model home, thinking that I could pop the plate off, and re-glue it into place. Unfortunately, the plate didn't really want to flatten out properly, so I decided to go a different route. I scanned the hornethopter logo and printed it out onto clear decal sheet. I sanded the glue off of the front of the wood block, made it smooth again and gave it a coat of gloss polyurethane. Then I put the decal on there, where the plate used to be, and gave it a few more coats of gloss polyurethane. Good as new!
Looooooong Overdue Update...
19 - June - 2010 - 07:28
So, yes, I realize I became one of those people that starts up a blog with all the intentions of keeping it updated, and then fell behind. But now I'm back and I've got a bunch of updates!
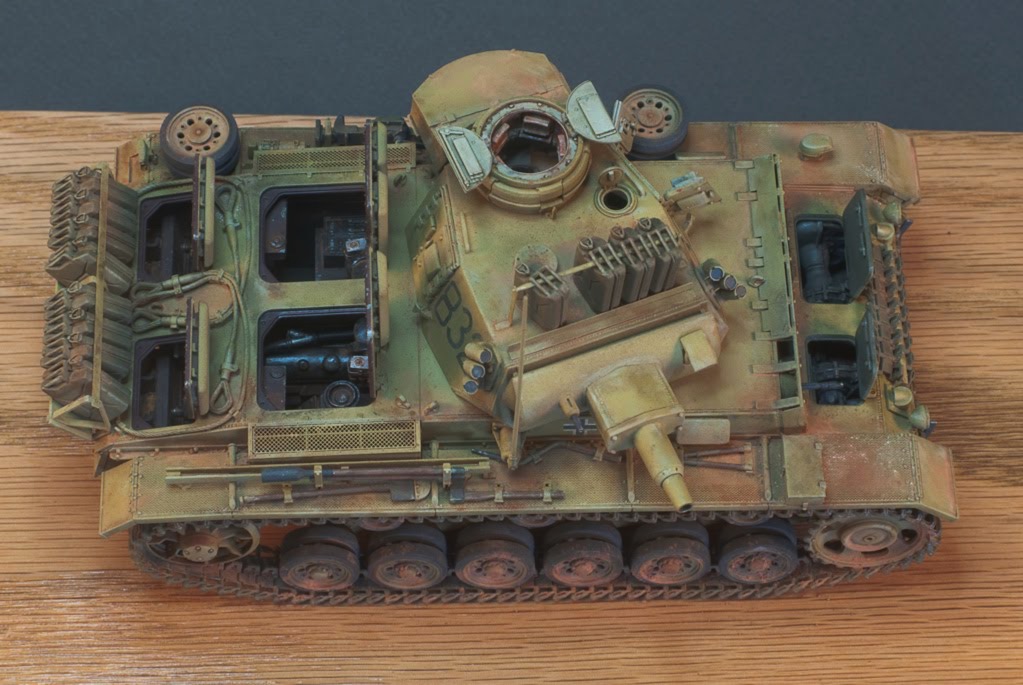
First and foremost, I've finished the Panzer III and have some photos of the finished project. I forgot to take photos of the outside, as I was putting everything together, so I really just have the images of the finished model. Everything on the outside was pretty straight forward, without all the complicated resin construction that the interior had.
The difficult bits of the exterior were really just the assembly of the individual-link plastic tracks and then the final assembly and weathering of the whole tank. I managed to get the tracks assembled by sticking the track links to a strip of thin masking tape, then draping that over the various wheels, and once in place, dabbing glue to where the tracks touch one another. I found that I could make each side in four or so sections, which still allowed me to take the tracks back off, paint them, and then, once the rest of the tank was painted, put the tracks back on again.
The painting was simply an airbrushed coat of dark yellow on most of the exterior, with a few of the detail parts picked out in other colors by hand. The road wheels were originally painted in German Grey, and then, using a plastic circle template as a mask, the centers were sprayed the same dark yellow as the rest of the tank. After the base coats were complete, I sprayed a slightly darker yellow into the nooks, crannies and corners to get a bit of shading. This was followed by a pass of drybrushing with a light tan to help pick out corners, details and texture.
Next came an extensive application of Mig Pigments. These are just colored powders, that get dusted onto the surface and then a bit of thinner is touched to the powder, and that helps it stick to the surface and flow into the texture of the surface and in between details. This serves to both further pick out detail when using a darker color pigment, and also to add dirt and grime when using lighter tones.
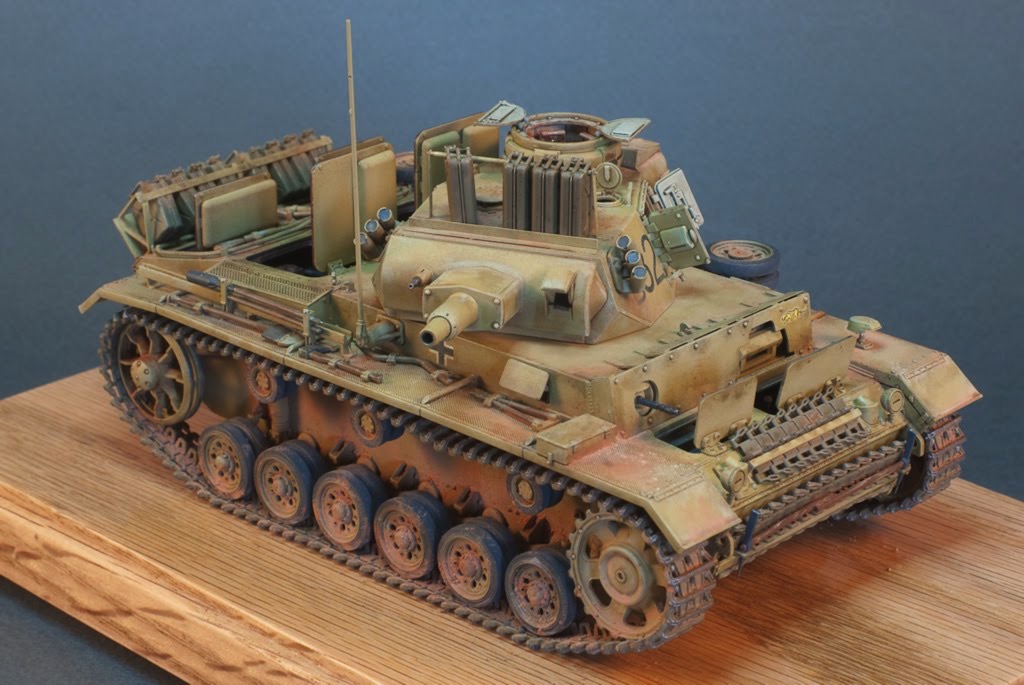
Once that was done, I cut a chunk of red oak for a base, put a few coats polyurethane on that and called it done! Since then, I have grown less happy with the base, feeling that it needed to better contrast with the model, so stay tuned for an update on that.
Here are a few images of the completed model, but see the completed models section of this web site for more.

First and foremost, I've finished the Panzer III and have some photos of the finished project. I forgot to take photos of the outside, as I was putting everything together, so I really just have the images of the finished model. Everything on the outside was pretty straight forward, without all the complicated resin construction that the interior had.
The difficult bits of the exterior were really just the assembly of the individual-link plastic tracks and then the final assembly and weathering of the whole tank. I managed to get the tracks assembled by sticking the track links to a strip of thin masking tape, then draping that over the various wheels, and once in place, dabbing glue to where the tracks touch one another. I found that I could make each side in four or so sections, which still allowed me to take the tracks back off, paint them, and then, once the rest of the tank was painted, put the tracks back on again.
The painting was simply an airbrushed coat of dark yellow on most of the exterior, with a few of the detail parts picked out in other colors by hand. The road wheels were originally painted in German Grey, and then, using a plastic circle template as a mask, the centers were sprayed the same dark yellow as the rest of the tank. After the base coats were complete, I sprayed a slightly darker yellow into the nooks, crannies and corners to get a bit of shading. This was followed by a pass of drybrushing with a light tan to help pick out corners, details and texture.
Next came an extensive application of Mig Pigments. These are just colored powders, that get dusted onto the surface and then a bit of thinner is touched to the powder, and that helps it stick to the surface and flow into the texture of the surface and in between details. This serves to both further pick out detail when using a darker color pigment, and also to add dirt and grime when using lighter tones.
Once that was done, I cut a chunk of red oak for a base, put a few coats polyurethane on that and called it done! Since then, I have grown less happy with the base, feeling that it needed to better contrast with the model, so stay tuned for an update on that.
Here are a few images of the completed model, but see the completed models section of this web site for more.
Panzer III Interior Paint
13 - February - 2010 - 09:10
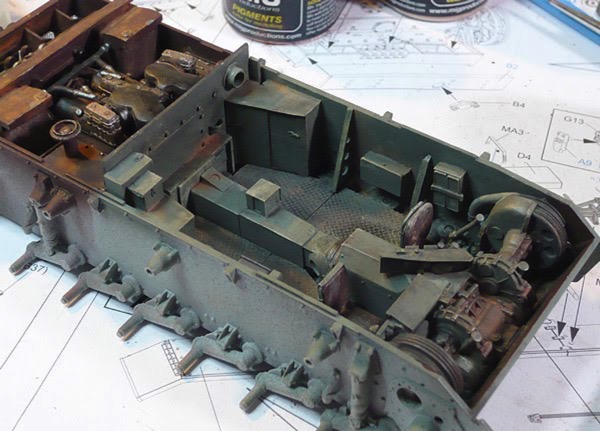
With the interior build pretty much complete, I moved on to added a bit of paint. From what I could gather, the Germans painted everything in a red primer and left it that way for non-crew areas and painted all the crew areas in a dull grey-green.
I began by airbrushing the whole interior with Mr Surfacer 1200 as a primer and to give it all a uniform color. Next I sprayed the red-brown color onto the engine compartment and onto the engine and radiator assemblies. I decided to leave the engine and radiator parts separate during the painting and weathering process to make things easier. Finally, I masked the engine area and sprayed the crew cabin in the grey green.
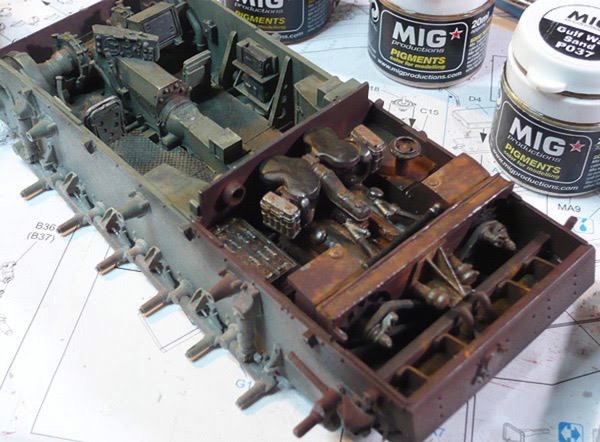
Next I spent a bit of time picking out a few details by hand and adding metallic spots on corners to simulate paint chips. Here you can see a little of that in progress:
I followed that with a bit of dry brushing using a lighter tone to help pick out the details and raised bits. Next I tried out a technique that is new to me: the use of pigments. Pigment is the raw color component of many paints (although in a non-toxic version). I ordered a few sets of Mig Pigments from an online hobby store (since I have never seen more than a few jars locally), and now I've got 12 shades of rust, dirt, smoke and ash to choose from.
The jist of the pigments is that you sort of just use a dry brush to apply a variety of colors here and there, and then wet everything down with a thinner and use that to blend between colors and get the solution into all the cracks and crevices. I started out with a wash of black to help add contrast and pick out the details, and then followed up with various dirt and rust colors. I generally found it very easy to work with and I am quite pleased with the results.
A few images of paint and weathering (with the pigments):

That pretty much wraps up the interior. There are a few odds and ends to take care of, like cementing the engine parts in place and connecting a few things with pipes. I'm sure there will also be a bit of work going into the upper hull build as well, but that is all for a later post.
Next: Onward with the construction!
I began by airbrushing the whole interior with Mr Surfacer 1200 as a primer and to give it all a uniform color. Next I sprayed the red-brown color onto the engine compartment and onto the engine and radiator assemblies. I decided to leave the engine and radiator parts separate during the painting and weathering process to make things easier. Finally, I masked the engine area and sprayed the crew cabin in the grey green.
Next I spent a bit of time picking out a few details by hand and adding metallic spots on corners to simulate paint chips. Here you can see a little of that in progress:
I followed that with a bit of dry brushing using a lighter tone to help pick out the details and raised bits. Next I tried out a technique that is new to me: the use of pigments. Pigment is the raw color component of many paints (although in a non-toxic version). I ordered a few sets of Mig Pigments from an online hobby store (since I have never seen more than a few jars locally), and now I've got 12 shades of rust, dirt, smoke and ash to choose from.
The jist of the pigments is that you sort of just use a dry brush to apply a variety of colors here and there, and then wet everything down with a thinner and use that to blend between colors and get the solution into all the cracks and crevices. I started out with a wash of black to help add contrast and pick out the details, and then followed up with various dirt and rust colors. I generally found it very easy to work with and I am quite pleased with the results.
A few images of paint and weathering (with the pigments):
That pretty much wraps up the interior. There are a few odds and ends to take care of, like cementing the engine parts in place and connecting a few things with pipes. I'm sure there will also be a bit of work going into the upper hull build as well, but that is all for a later post.
Next: Onward with the construction!
Panzer III Interior Build
13 - February - 2010 - 08:50
So, it's been quite a while since I've updated so I've going to break this into two posts: one on the build and one about painting and weathering. First, the build:
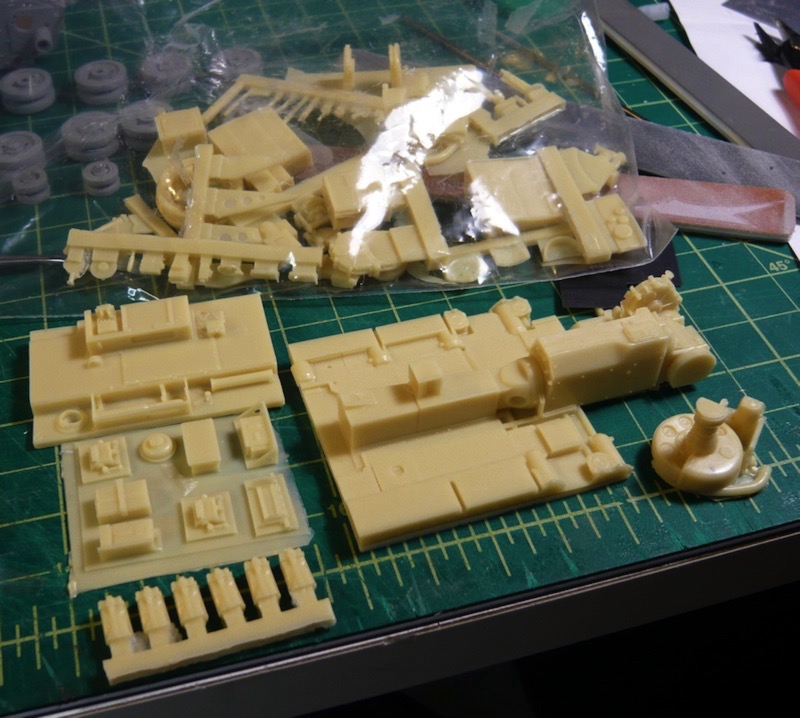
I purchased resin interior and engine kits made by Verlinden. The interior kit was designed for a Tamiya version of the same tank, while the engine claimed it would fit both Tamiya and Dragon kits. When I got in there and slowly started piecing things together I discovered a few things:
First off, I'm not that crazy about working with large resin parts. There seems to be a ton of work to do just to get the part somewhere close to where it should be, since one needs to sand off a great deal of the overpour. There also seems to be a tendency of the large flat resin parts to warp a bit with the heat of sanding. I suppose these are things to learn about working with resin, and they will inform my future projects, but I just came away with the impression that resin is just plain less fun to work with compared to plastic or wood.
Next thing I learned was that the Tamiya version of the kit must not have all of the interior suspension parts that the Dragon kit does, as the resin parts had all of the same part cast into the floor of the interior. This gave me two options: cut away all the Dragon interior parts or cut away the resin parts. Since I thought the kit parts looked better than the resin parts, I opted for what was probably the hardest route, and decided to cut away the whole floor of the resin parts and replace it with a new version.
In retrospect, a closer inspection of some reference photos could have saved me some trouble. I started with the impression that the floor inside the tank was a metal mesh, similar to what one would find on catwalks and other industrial settings. So I cut away all the floor, and found some fine screen, with the intention of using the screen for the floor to simulate the grating. This would allow the fancy suspension bit to be seen through the floor just a little bit. Later on, in my quest for find proper paint colors, I ran across some photos of a restored Panzer and it had flooring made of diamond plate, which is quite opaque. So, instead of the screen idea and instead of trying to find some scale diamond plate, I took some styrene sheet, heated it with a cooking torch (like for making creme brulee) and pressed the screen from a cooking splatter guard into it to form a criss-cross pattern that is similar to diamond plate.
Finally, I learned that the interior and engine kits both came with a firewall to go between. Once all the parts for the interior and exterior are in place, without any firewalls, they take up pretty much the whole interior, leaving not enough room for EITHER firewall. So, what I ended up having to do is to build a new firewall from scratch from styrene. I tried to get the general shape from both of the resin parts and even clipped off a few of the resin details and added them to the new version. I also found that I had to cut quite a bit off of the bottom of the engine in order to get it to sit low enough in the chassis for the upper hull pieces to be able to attach. This, of course, caused all the pipes to mis-align, so there are still a few things that will need tweaking once paint is done and I am cementing things into the hull.
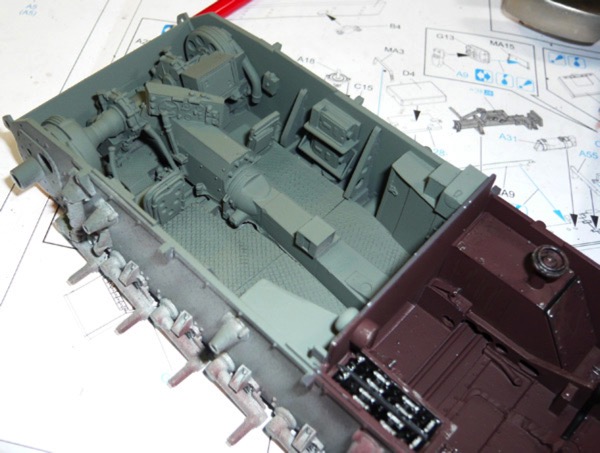
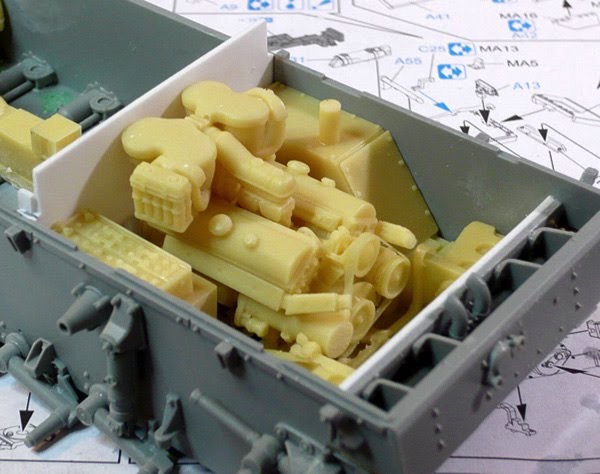
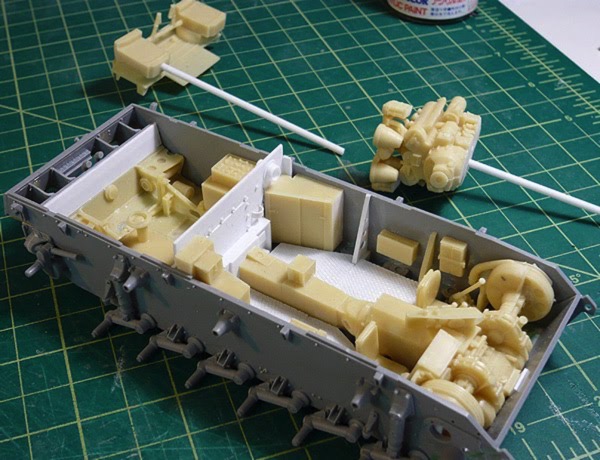
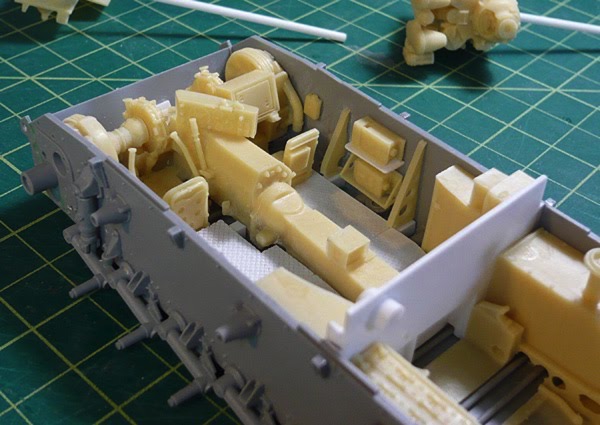
Some images of the built-up interior and engine:
And finally, with a coat of Mr Surfacer 1200 as a primer:
Next: some paint!
I purchased resin interior and engine kits made by Verlinden. The interior kit was designed for a Tamiya version of the same tank, while the engine claimed it would fit both Tamiya and Dragon kits. When I got in there and slowly started piecing things together I discovered a few things:
First off, I'm not that crazy about working with large resin parts. There seems to be a ton of work to do just to get the part somewhere close to where it should be, since one needs to sand off a great deal of the overpour. There also seems to be a tendency of the large flat resin parts to warp a bit with the heat of sanding. I suppose these are things to learn about working with resin, and they will inform my future projects, but I just came away with the impression that resin is just plain less fun to work with compared to plastic or wood.
Next thing I learned was that the Tamiya version of the kit must not have all of the interior suspension parts that the Dragon kit does, as the resin parts had all of the same part cast into the floor of the interior. This gave me two options: cut away all the Dragon interior parts or cut away the resin parts. Since I thought the kit parts looked better than the resin parts, I opted for what was probably the hardest route, and decided to cut away the whole floor of the resin parts and replace it with a new version.
In retrospect, a closer inspection of some reference photos could have saved me some trouble. I started with the impression that the floor inside the tank was a metal mesh, similar to what one would find on catwalks and other industrial settings. So I cut away all the floor, and found some fine screen, with the intention of using the screen for the floor to simulate the grating. This would allow the fancy suspension bit to be seen through the floor just a little bit. Later on, in my quest for find proper paint colors, I ran across some photos of a restored Panzer and it had flooring made of diamond plate, which is quite opaque. So, instead of the screen idea and instead of trying to find some scale diamond plate, I took some styrene sheet, heated it with a cooking torch (like for making creme brulee) and pressed the screen from a cooking splatter guard into it to form a criss-cross pattern that is similar to diamond plate.
Finally, I learned that the interior and engine kits both came with a firewall to go between. Once all the parts for the interior and exterior are in place, without any firewalls, they take up pretty much the whole interior, leaving not enough room for EITHER firewall. So, what I ended up having to do is to build a new firewall from scratch from styrene. I tried to get the general shape from both of the resin parts and even clipped off a few of the resin details and added them to the new version. I also found that I had to cut quite a bit off of the bottom of the engine in order to get it to sit low enough in the chassis for the upper hull pieces to be able to attach. This, of course, caused all the pipes to mis-align, so there are still a few things that will need tweaking once paint is done and I am cementing things into the hull.
Some images of the built-up interior and engine:
And finally, with a coat of Mr Surfacer 1200 as a primer:
Next: some paint!
Next Project! Dragon Panzer III Ausf.N Tank
13 - December - 2009 - 20:21
And now for something completely different...
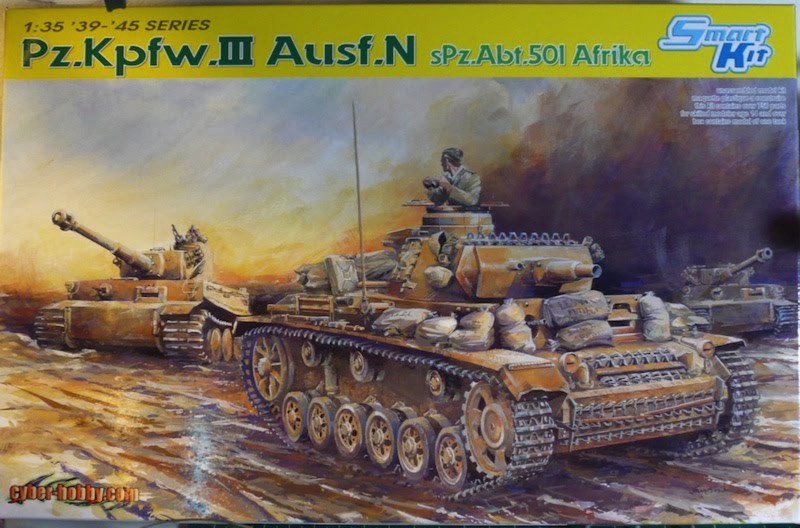
So, I've begun my next project. I picked a few plastic armor kits up last February, when I stumbled upon a new hobby shop (which has since become my main hobby shop), and found that they were having a sale. I had done a little bit of reading and looked for kits that came with individual-link tracks, and some photo-etched metal parts, in hopes of finding the kits challenging. The one that I am starting with is a German Panzer tank, of a fairly late revision, with markings from their African campaign. This kit is made by Dragon, and they look to have gone above and beyond when it comes to the quality of the plastic molding and overall level of detail.
I've also decided to try quite a few new things on this project. Since I haven't really done any sort of armor model since I was a little kid, I figured I could try lots of new things, based on recent reading and get much of the learning going all at once. First off, I am trying some new paints, primers, and glues. I've picked up some Mr Surfacer products for priming and filling, some Pro Weld plastic welder to replace the Testors cement I've always used, some Milliput epoxy putty, and various super glues, sanding devices, etc, all that I have not tried before. Later in the project, I also hope to experiment with some new airbrushing techniques, and to try out some weathering techniques using pigments and some artist oils.
Here is the kit that I am working with.
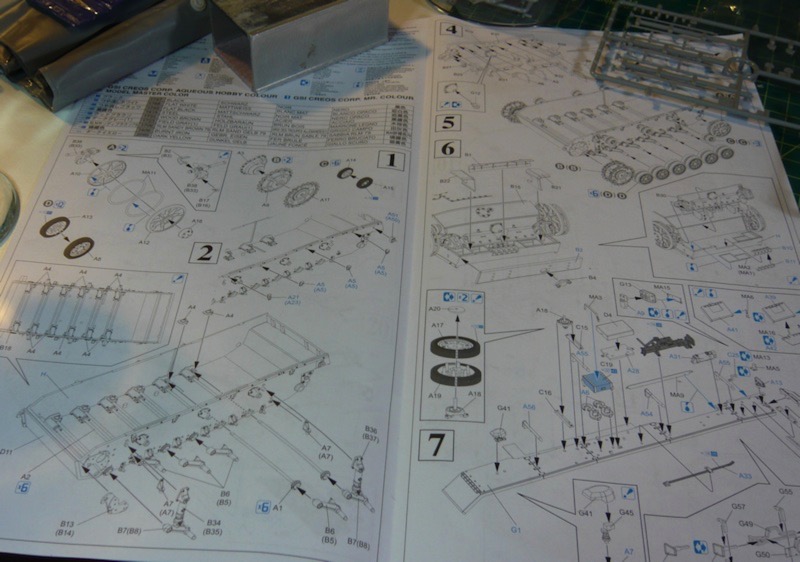
Here's an example of the instructions. They don't seem to be real big on the step-by-step sort of approach and instead seem to go for more of a put-all-this-stuff-together-at-once sorta thing.
I've started putting a few pieces together. Mostly this has just involved a great deal of sanding and a little filling. I've been trying out filling tiny seams with Mr Surfacer 500, which is somewhere in between primer and filler. It seems to be working pretty well so far, although I've only used it to smooth over some seams on the drive wheels.

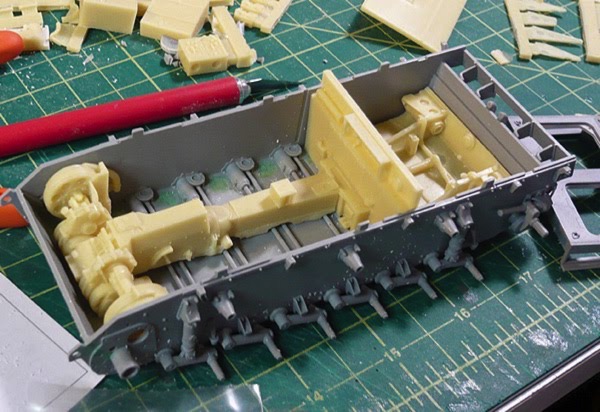
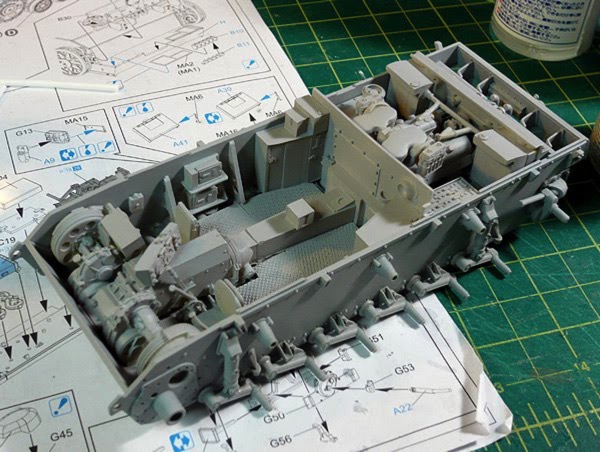
Another in the list of new things I am trying on this kit is the addition of a third-party resin interior kit. The model did not come with any interior parts beyond a few gun parts that go inside the turret. But, the kit DOES allow for all of the hatches and portals to be assembled in an open position. So, with a little scrounging and some sanity checks on the Fine Scale Modeler forums, I decided on an interior kit and an engine bay kit, both from Verlinden. The interior kit adds the various crew-related parts as well as a floor, transmission tunnel and various other transmission parts. The engine bay adds the bits on the other side of the firewall, which is mostly just the engine and some fans and things.
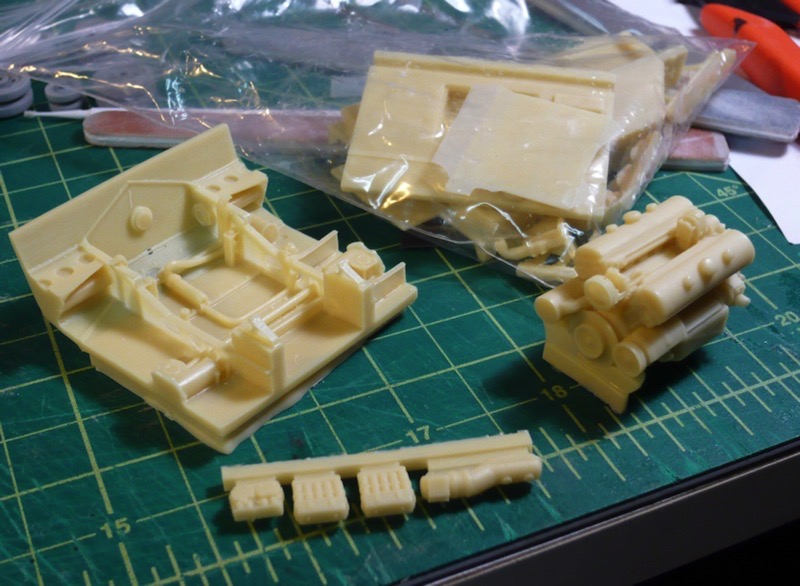
Here is how they roughly fit into the lower hull piece.
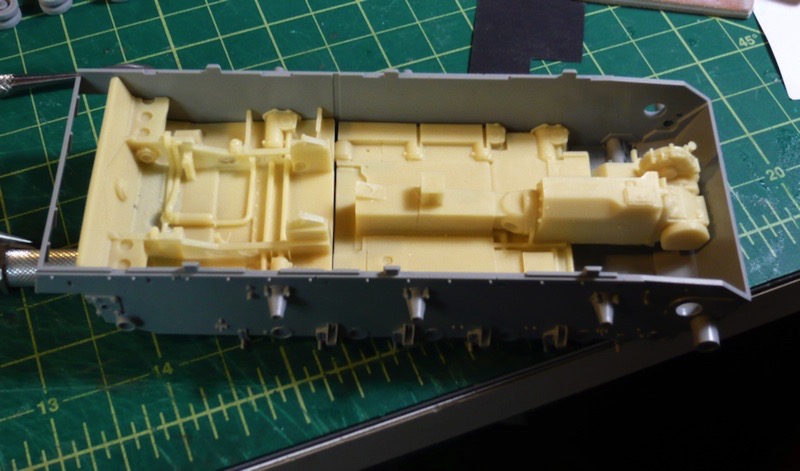
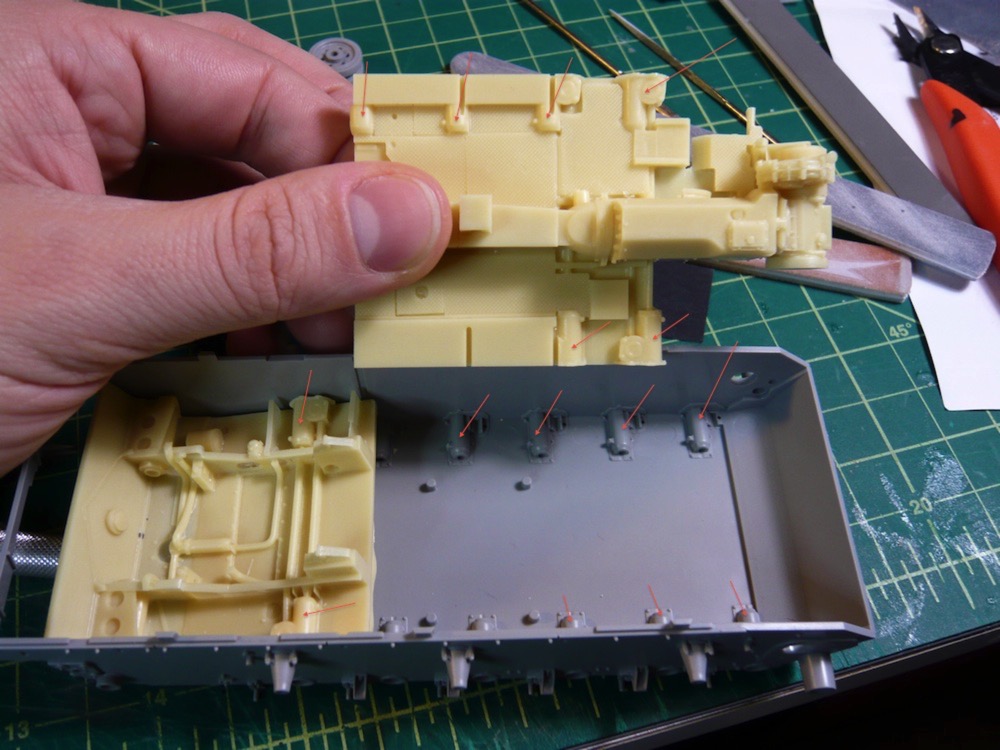
The big catch here, is that these resin bits were not made for this Dragon kit, but rather for a Tamiya kit, which has less internal detail. As a result, there is some duplication in details between the lower hull part of the plastic kit and the detail in the resin kit. This means that this will take a bit of figuring and some quality time with the Dremel in order to get everything to play nicely with one another. Below is an image, with tiny red arrows, illustrating the duplicated details.
All in all, I am pretty excited about this project, as it is really nice to have a bit of a change of pace after all that time with wood and string and superglue. Stay tuned for further updates as this one progresses, hopefully at a slightly faster pace than the last project. If all goes well, I'm hoping to have this one completed in time to enter into the Hobby Expo 2010 on February 20th, in Petaluma.
So, I've begun my next project. I picked a few plastic armor kits up last February, when I stumbled upon a new hobby shop (which has since become my main hobby shop), and found that they were having a sale. I had done a little bit of reading and looked for kits that came with individual-link tracks, and some photo-etched metal parts, in hopes of finding the kits challenging. The one that I am starting with is a German Panzer tank, of a fairly late revision, with markings from their African campaign. This kit is made by Dragon, and they look to have gone above and beyond when it comes to the quality of the plastic molding and overall level of detail.
I've also decided to try quite a few new things on this project. Since I haven't really done any sort of armor model since I was a little kid, I figured I could try lots of new things, based on recent reading and get much of the learning going all at once. First off, I am trying some new paints, primers, and glues. I've picked up some Mr Surfacer products for priming and filling, some Pro Weld plastic welder to replace the Testors cement I've always used, some Milliput epoxy putty, and various super glues, sanding devices, etc, all that I have not tried before. Later in the project, I also hope to experiment with some new airbrushing techniques, and to try out some weathering techniques using pigments and some artist oils.
Here is the kit that I am working with.
Here's an example of the instructions. They don't seem to be real big on the step-by-step sort of approach and instead seem to go for more of a put-all-this-stuff-together-at-once sorta thing.
I've started putting a few pieces together. Mostly this has just involved a great deal of sanding and a little filling. I've been trying out filling tiny seams with Mr Surfacer 500, which is somewhere in between primer and filler. It seems to be working pretty well so far, although I've only used it to smooth over some seams on the drive wheels.
Another in the list of new things I am trying on this kit is the addition of a third-party resin interior kit. The model did not come with any interior parts beyond a few gun parts that go inside the turret. But, the kit DOES allow for all of the hatches and portals to be assembled in an open position. So, with a little scrounging and some sanity checks on the Fine Scale Modeler forums, I decided on an interior kit and an engine bay kit, both from Verlinden. The interior kit adds the various crew-related parts as well as a floor, transmission tunnel and various other transmission parts. The engine bay adds the bits on the other side of the firewall, which is mostly just the engine and some fans and things.
Here is how they roughly fit into the lower hull piece.
The big catch here, is that these resin bits were not made for this Dragon kit, but rather for a Tamiya kit, which has less internal detail. As a result, there is some duplication in details between the lower hull part of the plastic kit and the detail in the resin kit. This means that this will take a bit of figuring and some quality time with the Dremel in order to get everything to play nicely with one another. Below is an image, with tiny red arrows, illustrating the duplicated details.
All in all, I am pretty excited about this project, as it is really nice to have a bit of a change of pace after all that time with wood and string and superglue. Stay tuned for further updates as this one progresses, hopefully at a slightly faster pace than the last project. If all goes well, I'm hoping to have this one completed in time to enter into the Hobby Expo 2010 on February 20th, in Petaluma.