
Panzer III Interior Paint
13 - February - 2010 - 09:10
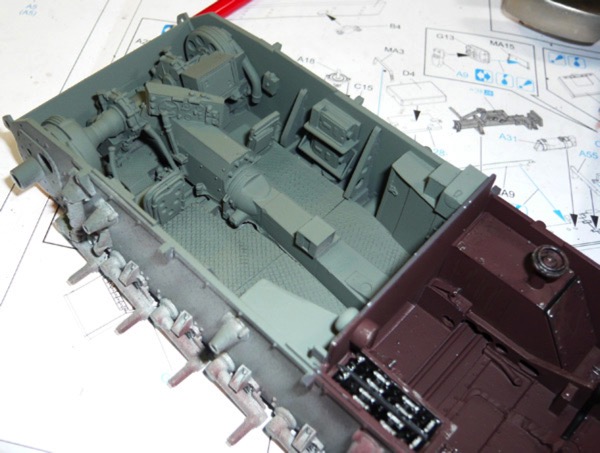
With the interior build pretty much complete, I moved on to added a bit of paint. From what I could gather, the Germans painted everything in a red primer and left it that way for non-crew areas and painted all the crew areas in a dull grey-green.
I began by airbrushing the whole interior with Mr Surfacer 1200 as a primer and to give it all a uniform color. Next I sprayed the red-brown color onto the engine compartment and onto the engine and radiator assemblies. I decided to leave the engine and radiator parts separate during the painting and weathering process to make things easier. Finally, I masked the engine area and sprayed the crew cabin in the grey green.
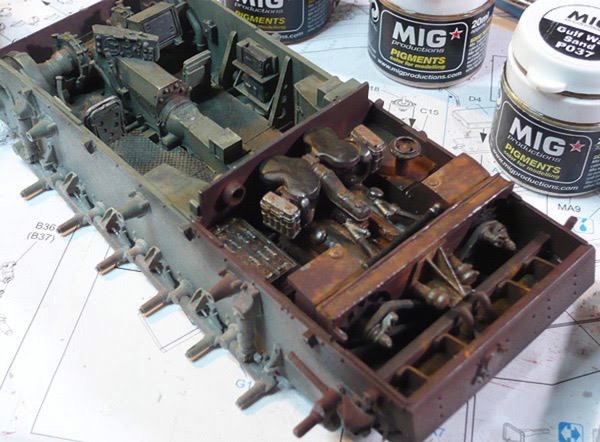
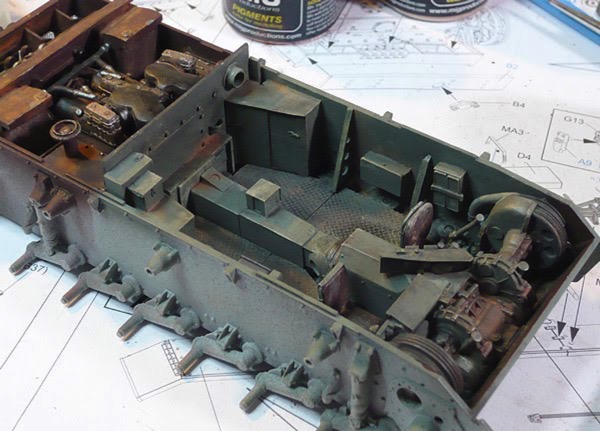
Next I spent a bit of time picking out a few details by hand and adding metallic spots on corners to simulate paint chips. Here you can see a little of that in progress:
I followed that with a bit of dry brushing using a lighter tone to help pick out the details and raised bits. Next I tried out a technique that is new to me: the use of pigments. Pigment is the raw color component of many paints (although in a non-toxic version). I ordered a few sets of Mig Pigments from an online hobby store (since I have never seen more than a few jars locally), and now I've got 12 shades of rust, dirt, smoke and ash to choose from.
The jist of the pigments is that you sort of just use a dry brush to apply a variety of colors here and there, and then wet everything down with a thinner and use that to blend between colors and get the solution into all the cracks and crevices. I started out with a wash of black to help add contrast and pick out the details, and then followed up with various dirt and rust colors. I generally found it very easy to work with and I am quite pleased with the results.
A few images of paint and weathering (with the pigments):

That pretty much wraps up the interior. There are a few odds and ends to take care of, like cementing the engine parts in place and connecting a few things with pipes. I'm sure there will also be a bit of work going into the upper hull build as well, but that is all for a later post.
Next: Onward with the construction!
I began by airbrushing the whole interior with Mr Surfacer 1200 as a primer and to give it all a uniform color. Next I sprayed the red-brown color onto the engine compartment and onto the engine and radiator assemblies. I decided to leave the engine and radiator parts separate during the painting and weathering process to make things easier. Finally, I masked the engine area and sprayed the crew cabin in the grey green.
Next I spent a bit of time picking out a few details by hand and adding metallic spots on corners to simulate paint chips. Here you can see a little of that in progress:
I followed that with a bit of dry brushing using a lighter tone to help pick out the details and raised bits. Next I tried out a technique that is new to me: the use of pigments. Pigment is the raw color component of many paints (although in a non-toxic version). I ordered a few sets of Mig Pigments from an online hobby store (since I have never seen more than a few jars locally), and now I've got 12 shades of rust, dirt, smoke and ash to choose from.
The jist of the pigments is that you sort of just use a dry brush to apply a variety of colors here and there, and then wet everything down with a thinner and use that to blend between colors and get the solution into all the cracks and crevices. I started out with a wash of black to help add contrast and pick out the details, and then followed up with various dirt and rust colors. I generally found it very easy to work with and I am quite pleased with the results.
A few images of paint and weathering (with the pigments):
That pretty much wraps up the interior. There are a few odds and ends to take care of, like cementing the engine parts in place and connecting a few things with pipes. I'm sure there will also be a bit of work going into the upper hull build as well, but that is all for a later post.
Next: Onward with the construction!
blog comments powered by Disqus