
Hornethopter
Repairing a few Older Projects
01 - December - 2013 - 13:55
Before I move on to the next model build, I wanted to put up a quick post that had some updates from previous projects.
Repair #1:
So, after I completed the Panzer and BMW motorcycle models, I put them together into one display case, and took them to my office at work for display. I was bringing various other models in at the same time, in various other display cases. Some of those cases had the plastic tops that snapped to the bases and some had the tops that just sat on the bases. Unfortunately, when I picked up the case that held the tank and motorcycle, I THOUGHT it was one that snapped together, but it wasn't. This resulted in the lower half of the case dropping to the table and then bouncing onto the floor, doing a bit of damage to both models, which were wired to the base.
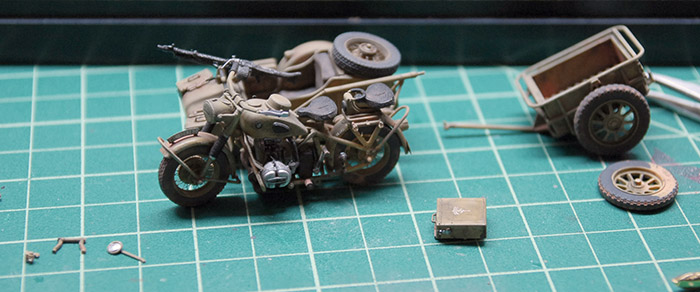
I was pretty mad at myself for making such a mistake and, after a great deal of cursing, decided to put the models and all the broken pieces back in the case, and the case back into its box, to be fixed later. Fast forward a year or two and I finally felt like I was able to open the box up and see how hard it would be to repair the models. Fortunately, it turned out to be pretty easy! Below you can see the two models and their detached parts all spread out, ready for fixing.
The tank lost a few hatches, some road wheels and some chunks of track. A bit of time with some plastic cement and it was good as new. I also took the opportunity to repose some of the hatches into a more natural position, but forgot to take a picture of the finished project. Just imagine that those engine hatches are no longer sticking straight up :)
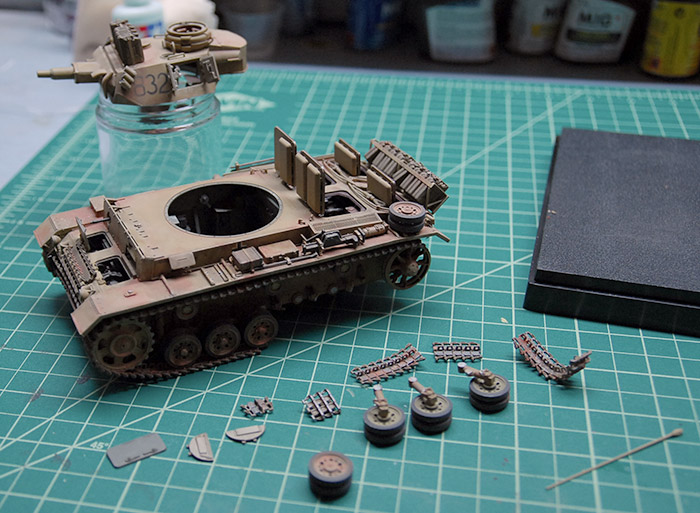
The motorcycle just needed a few small parts reattached.
Repair #2:
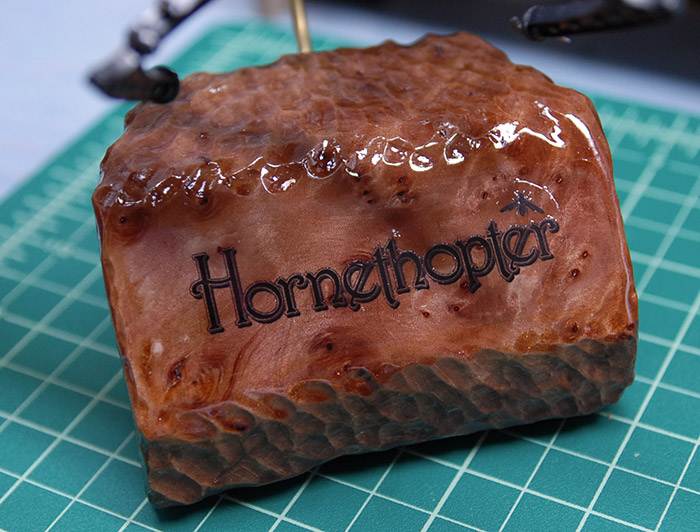
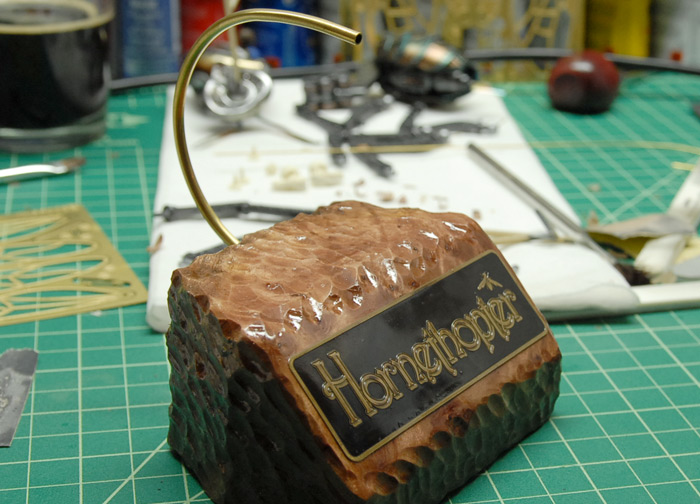
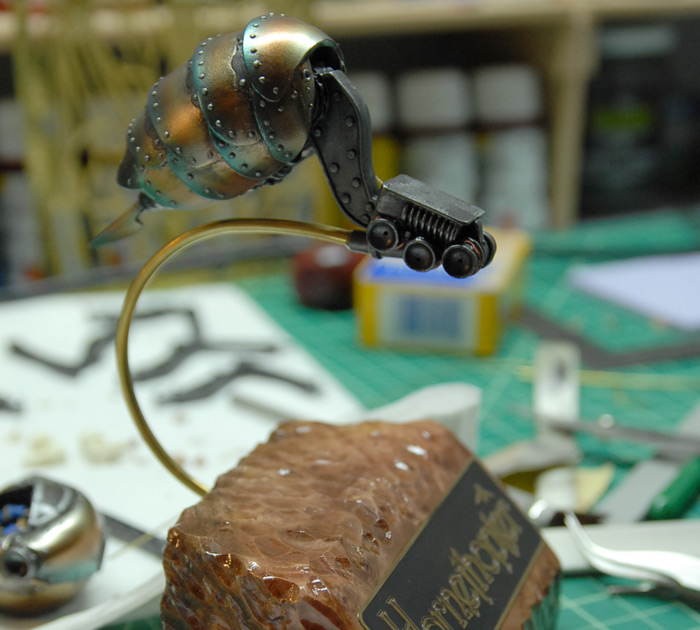
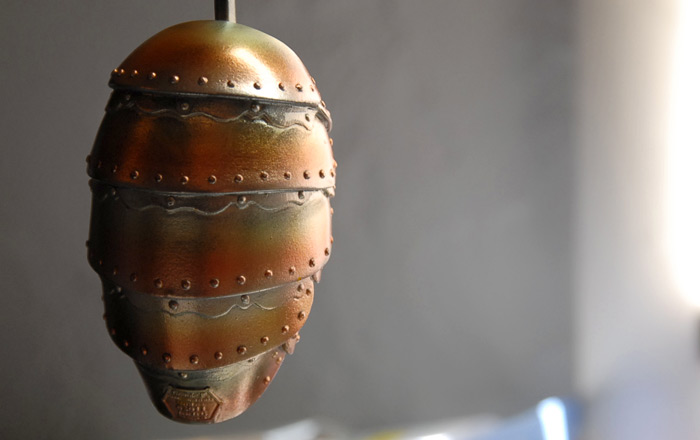
The Hornethopter model itself wasn't damaged, but the base that I built for it ended up throwing me for a loop. I have since learned that the chunk of wood that I bought for the base, which was a 'turning block', was actually pretty wet wood. The turning blocks come with a wax coating, which keeps the moisture in the wood, presumably making it better for turning on a lathe. When I prepared the block, I burned off the wax, cut the shape that I needed and carved it a bit. I put some polyurethane on there, attached the brass name plate, tube for the model and some felt dots on the bottom and called it done.
Fast forward a few months, after the model had been sitting under a bell jar at work, and the moisture had all evaporated from the block of wood. As the wood lost its moisture, it also shrunk. It shrunk enough to significantly buckle the brass name plate. I brought the model home, thinking that I could pop the plate off, and re-glue it into place. Unfortunately, the plate didn't really want to flatten out properly, so I decided to go a different route. I scanned the hornethopter logo and printed it out onto clear decal sheet. I sanded the glue off of the front of the wood block, made it smooth again and gave it a coat of gloss polyurethane. Then I put the decal on there, where the plate used to be, and gave it a few more coats of gloss polyurethane. Good as new!
Repair #1:
So, after I completed the Panzer and BMW motorcycle models, I put them together into one display case, and took them to my office at work for display. I was bringing various other models in at the same time, in various other display cases. Some of those cases had the plastic tops that snapped to the bases and some had the tops that just sat on the bases. Unfortunately, when I picked up the case that held the tank and motorcycle, I THOUGHT it was one that snapped together, but it wasn't. This resulted in the lower half of the case dropping to the table and then bouncing onto the floor, doing a bit of damage to both models, which were wired to the base.
I was pretty mad at myself for making such a mistake and, after a great deal of cursing, decided to put the models and all the broken pieces back in the case, and the case back into its box, to be fixed later. Fast forward a year or two and I finally felt like I was able to open the box up and see how hard it would be to repair the models. Fortunately, it turned out to be pretty easy! Below you can see the two models and their detached parts all spread out, ready for fixing.
The tank lost a few hatches, some road wheels and some chunks of track. A bit of time with some plastic cement and it was good as new. I also took the opportunity to repose some of the hatches into a more natural position, but forgot to take a picture of the finished project. Just imagine that those engine hatches are no longer sticking straight up :)
The motorcycle just needed a few small parts reattached.
Repair #2:
The Hornethopter model itself wasn't damaged, but the base that I built for it ended up throwing me for a loop. I have since learned that the chunk of wood that I bought for the base, which was a 'turning block', was actually pretty wet wood. The turning blocks come with a wax coating, which keeps the moisture in the wood, presumably making it better for turning on a lathe. When I prepared the block, I burned off the wax, cut the shape that I needed and carved it a bit. I put some polyurethane on there, attached the brass name plate, tube for the model and some felt dots on the bottom and called it done.
Fast forward a few months, after the model had been sitting under a bell jar at work, and the moisture had all evaporated from the block of wood. As the wood lost its moisture, it also shrunk. It shrunk enough to significantly buckle the brass name plate. I brought the model home, thinking that I could pop the plate off, and re-glue it into place. Unfortunately, the plate didn't really want to flatten out properly, so I decided to go a different route. I scanned the hornethopter logo and printed it out onto clear decal sheet. I sanded the glue off of the front of the wood block, made it smooth again and gave it a coat of gloss polyurethane. Then I put the decal on there, where the plate used to be, and gave it a few more coats of gloss polyurethane. Good as new!
Hornethopter Completion
18 - November - 2012 - 09:08
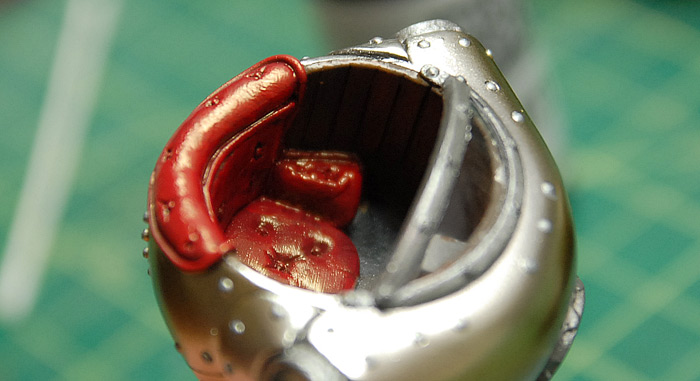
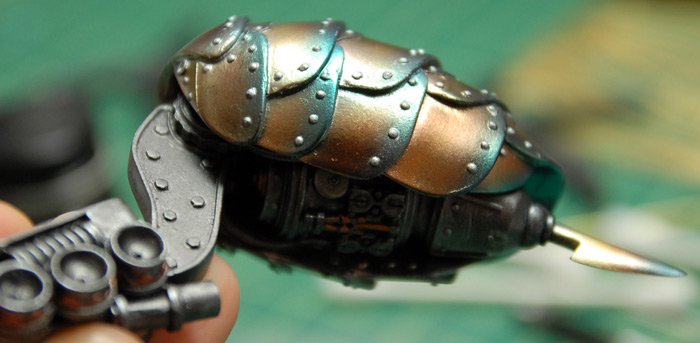
Painting continued on the Hornethopter. Once the exterior surfaces were generally complete, I moved on to the cockpit. I aimed to have a red velvet seat, wood panelling and misc metal and gray control surfaces. After I got most of it painted, I found that the red paint that I used had a bit more of a sheen than I had expected, and instead of a flat velvet-like red, it was more of a red leather. But, since I wasn't too married to the idea of red velvet and I actually like the way the red leather looked, I decided to just stick with that and leave it as-is.
At this point I was ready to start general assembly. Below you can see the two major structure parts joined together.
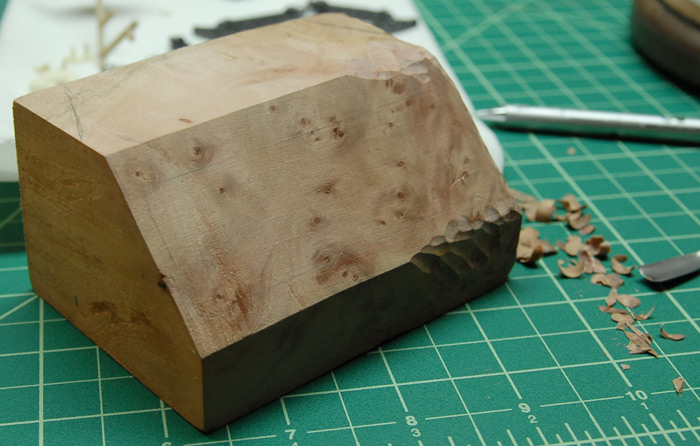
The catch was that I couldn't really do much more assembly until I could get the model up off of the ground, since the legs hang down and were likely to just get broken or scratched up if I attached them too early. With that in mind, I headed over to a local hardwood store and picked up a block of wood that was intended for turning on a latch. This meant that it came in large blocks, and was dipped in wax (presumably to keep it an even moisture level). I found a fairly small and inexpensive chunk that had a nice burl look to it and brought it home. It required cutting down a bit in order to get a proper sized piece as well as some quality time with a blow torch in order to melt off the bulk of the wax coating. So, with a hand saw/mitre box combo and lots of elbow grease, I ended up with the piece you see below.
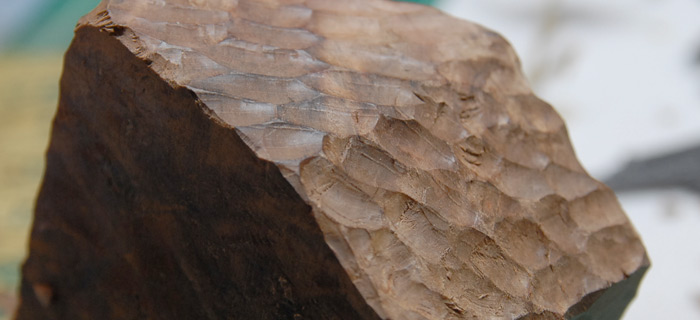
As you can see, the flat surfaces are a bit plain, and I wanted something that went with the steampunk theme a little better. I opted for a more organic hand-carved look for the block. This meant that I had to spend a bit of time going over the whole thing, breaking up the smooth surfaces and making it all look a bit more rustic.
After that, the block spent some quality time with gloss polyurethane and a brush, getting it all nice and shiny. I painted the name plate black and then gave it a light sanding to bring the raised text out. It then got a few coats of spray clear and was mounted to the flat front of the block. Finally, I ran some 1/8" brass tubing through a tube bender to get it curved nicely and attached that to the block as well.
Below you can see the frame of the Hornethopter mounted to the base.
With that done, construction could precede, with the other parts being mounted and the wings finally being started on. I realized that it probably would have been a bit better to figure out the wing mounting techniques a bit earlier, before painting, since it was going to be tricky to not damage the paint now. I settled on a little trick that worked pretty well: I drilled holes into the wing sockets on the body of the model, and the set brass rod in there that was the exact depth of the hole. I put a tiny dab of super glue on the end of the rod and then pressed the wing base into the socket at the angle that I wanted it to stay at. This caused the bit of rod to stick to the wing in the exact spot and at the exact angle that I needed. I then gently removed both and drew a bunch of reference lines in pencil on the wing base. Then I could remove the brass rod and drill a hole at just the right angle to make it all fit back together perfectly (except stronger).
Below you can see the wing bases with their brass rods glued it, and with the reference marks still in place.
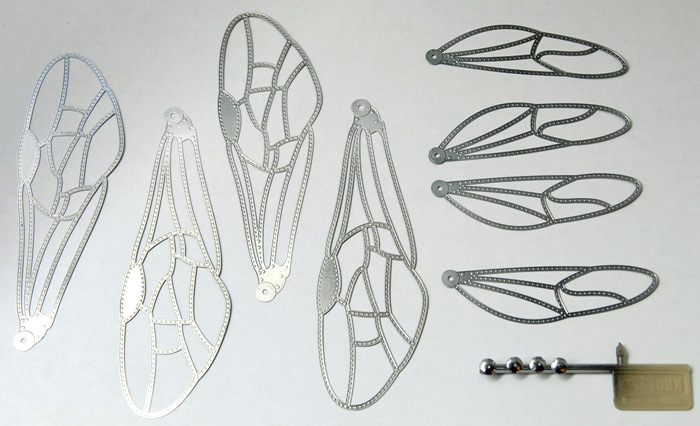
The wing frames after their coats of black gloss paint and a few coats of the same chrome paint that the rest of the body got.
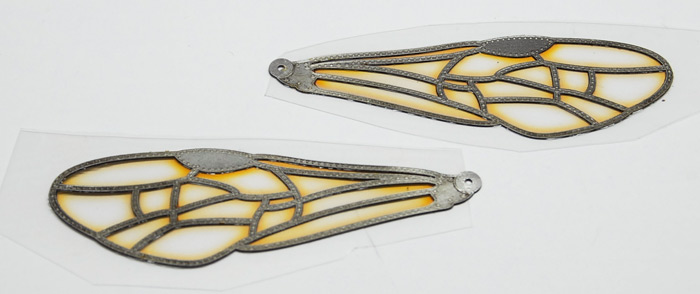
Using the wing template available from the manufacturer's web site, I designed some wing film inserts that had the same general color scheme as the rest of the model. These were printed out on ink-jet-friendly transparency film and glued in between the layers of photo-etch wing. Here you can see them before the excess was trimmed off.
Finally, the wings were attached, any paint chips were touched up, and a little bit of grease/oil/rust was added here and there.
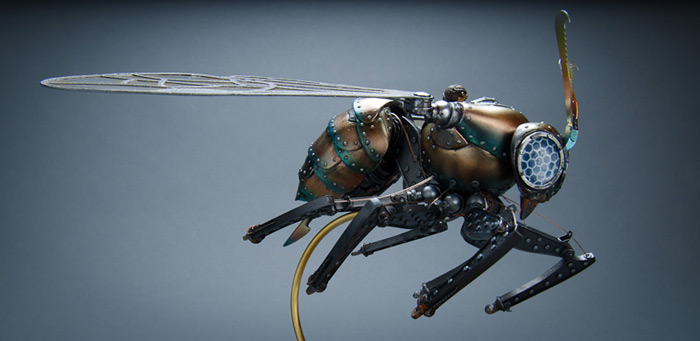
Click HERE or on the image below to see the galley of the completed model.
At this point I was ready to start general assembly. Below you can see the two major structure parts joined together.
The catch was that I couldn't really do much more assembly until I could get the model up off of the ground, since the legs hang down and were likely to just get broken or scratched up if I attached them too early. With that in mind, I headed over to a local hardwood store and picked up a block of wood that was intended for turning on a latch. This meant that it came in large blocks, and was dipped in wax (presumably to keep it an even moisture level). I found a fairly small and inexpensive chunk that had a nice burl look to it and brought it home. It required cutting down a bit in order to get a proper sized piece as well as some quality time with a blow torch in order to melt off the bulk of the wax coating. So, with a hand saw/mitre box combo and lots of elbow grease, I ended up with the piece you see below.
As you can see, the flat surfaces are a bit plain, and I wanted something that went with the steampunk theme a little better. I opted for a more organic hand-carved look for the block. This meant that I had to spend a bit of time going over the whole thing, breaking up the smooth surfaces and making it all look a bit more rustic.
After that, the block spent some quality time with gloss polyurethane and a brush, getting it all nice and shiny. I painted the name plate black and then gave it a light sanding to bring the raised text out. It then got a few coats of spray clear and was mounted to the flat front of the block. Finally, I ran some 1/8" brass tubing through a tube bender to get it curved nicely and attached that to the block as well.
Below you can see the frame of the Hornethopter mounted to the base.
With that done, construction could precede, with the other parts being mounted and the wings finally being started on. I realized that it probably would have been a bit better to figure out the wing mounting techniques a bit earlier, before painting, since it was going to be tricky to not damage the paint now. I settled on a little trick that worked pretty well: I drilled holes into the wing sockets on the body of the model, and the set brass rod in there that was the exact depth of the hole. I put a tiny dab of super glue on the end of the rod and then pressed the wing base into the socket at the angle that I wanted it to stay at. This caused the bit of rod to stick to the wing in the exact spot and at the exact angle that I needed. I then gently removed both and drew a bunch of reference lines in pencil on the wing base. Then I could remove the brass rod and drill a hole at just the right angle to make it all fit back together perfectly (except stronger).
Below you can see the wing bases with their brass rods glued it, and with the reference marks still in place.
The wing frames after their coats of black gloss paint and a few coats of the same chrome paint that the rest of the body got.
Using the wing template available from the manufacturer's web site, I designed some wing film inserts that had the same general color scheme as the rest of the model. These were printed out on ink-jet-friendly transparency film and glued in between the layers of photo-etch wing. Here you can see them before the excess was trimmed off.
Finally, the wings were attached, any paint chips were touched up, and a little bit of grease/oil/rust was added here and there.
Click HERE or on the image below to see the galley of the completed model.
Hornethopter Painting
25 - September - 2012 - 20:42
Hi there! Just a quick post today to show a bit of progress on the painting of the Hornethopter. In the last post, I showed my inspiration sheet, with the heat-treated titanium images on it. Also shown were the various parts that had been sprayed with the chrome paint. This post aims to show a few of the steps in going from chrome to heat-treated.
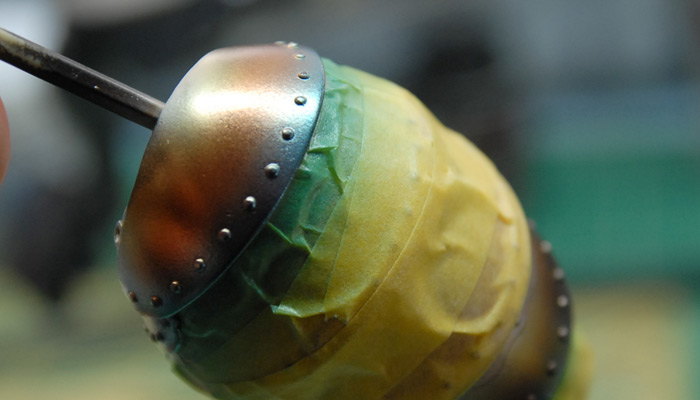
I switched the airbrush to the super-fine tip and needle and loaded it up with just a tiny bit of diluted Tamiya clear yellow. With the pressure set to about 15-20lbs, I freehanded some soft bands of yellow across the abdomen sections. Once I had bands of yellow on all the parts, I followed up with similarly-diluted clear red. Soft bands of clear red gave me something like so:
Below you can see the yellow and red in place and the part masked before applying the clear blue.
And the abdomen masked and painted with the first pass of blue:
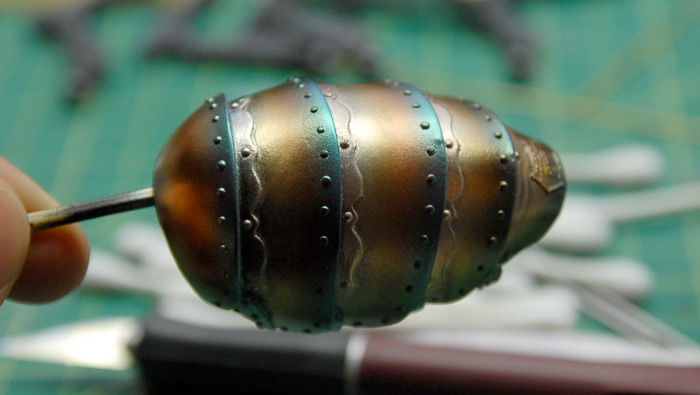
Thorax fully sprayed with all three colors:

The abdomen was tricky, because it had to be painted in three steps. This was required in order to give each section plenty of space to blend the blue in, but still get a clean line against the section below. Below you can see the abdomen with all three colors applied.
Next up is putting a contrasting dark steel color on the filigree-like metal strips between the sections as well as the casting plate right at the tail. That will be following by the beginning of hand painting the cockpit and picking out all the rivets with a contrasting paint. Thanks for reading!
I switched the airbrush to the super-fine tip and needle and loaded it up with just a tiny bit of diluted Tamiya clear yellow. With the pressure set to about 15-20lbs, I freehanded some soft bands of yellow across the abdomen sections. Once I had bands of yellow on all the parts, I followed up with similarly-diluted clear red. Soft bands of clear red gave me something like so:
Below you can see the yellow and red in place and the part masked before applying the clear blue.
And the abdomen masked and painted with the first pass of blue:
Thorax fully sprayed with all three colors:
The abdomen was tricky, because it had to be painted in three steps. This was required in order to give each section plenty of space to blend the blue in, but still get a clean line against the section below. Below you can see the abdomen with all three colors applied.
Next up is putting a contrasting dark steel color on the filigree-like metal strips between the sections as well as the casting plate right at the tail. That will be following by the beginning of hand painting the cockpit and picking out all the rivets with a contrasting paint. Thanks for reading!
Hornethopter Continued
09 - September - 2012 - 20:00
I should never have claimed that the build was moving quickly and wouldn't take very long, as that pretty much ensured that it would grind to a halt almost instantly.
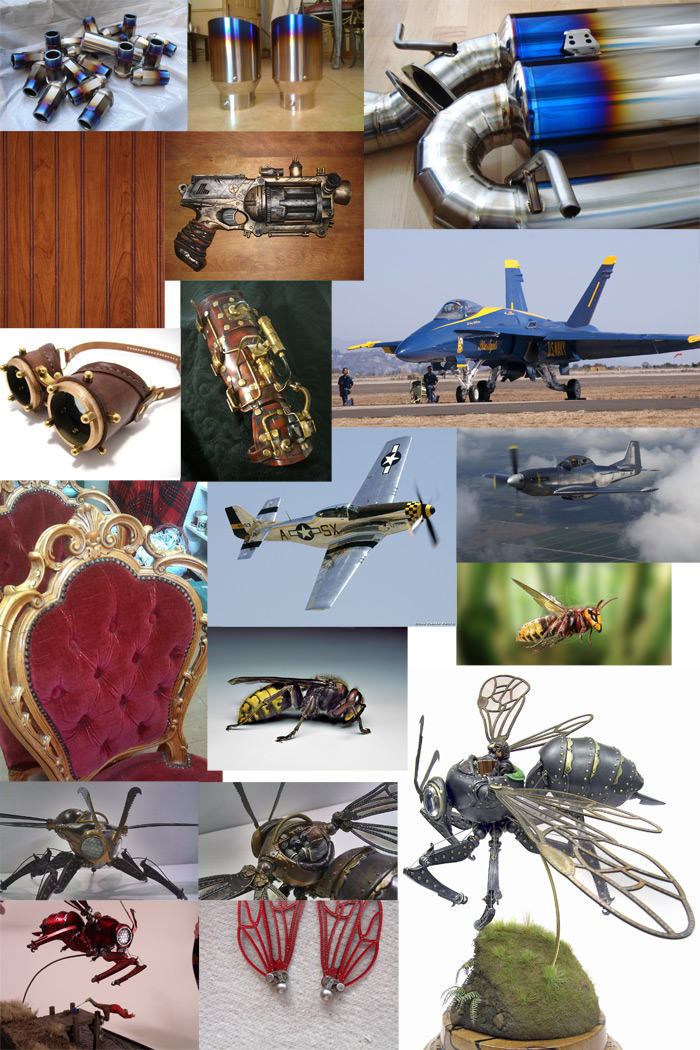
So, the problem that I had with this one was that I didn't have a clear idea of exactly how I was going to paint and mount it. I hit the point where I needed to start assembly and drilling/pinning parts together, but I didn't have a mental picture of how the legs should be posed. After stewing on it for a few weeks I finally just started searching the interwebs for inspiration. I really liked the ideas of having some of the parts look like heat-treated titanium. I also wanted to embrace some of the kits steam punk look while also incorporating some modern military cues and some elements from real wasps. At the same time I did't want to repeat what I had already seen online, but I wanted to draw some inspiration from good looking models that others had built.
With all that in mind, I collected images, put them all together into a 13" x 19" format and printed myself out a big ol inspiration sheet. Below is the fun-sized internet version. Please note that this is a collection of other peoples photos, so the copyrights generally belong to them, so hopefully they won't sue me or anything ;)
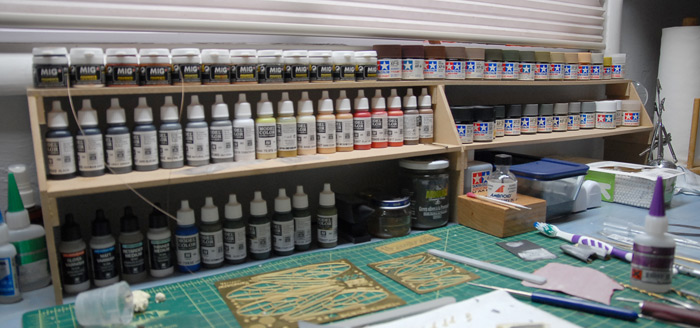
Also, I have recently purchased quite a few new paints (mentioned in a previous post), but didn't really have a good way to organize them. I was finding that these taller skinny bottle were just lurking about my model desk in a group, often falling over, and generally being difficult to deal with. It was hard to quickly find the color that I wanted and it was easy to bump them so they all fell over. After a bit of consideration, I decided it was time to build a new little paint shelf, better suited to my new model desk and the differently-sized bottles. On my way home from work, I swung by Home Depot, picked up a $5 sheet of 1/4" thick MDF board and got to work. I settled on a shelf that was about 4ft long and about 7.5" tall, and 4" deep. I just sketched it out quickly, marked the board and cut out a bunch of pieces. I then realized I had cut the slot in two of the upright parts in the wrong place and called it a day ;)
The next day, I cut two new parts and glued the whole thing together. Below you can see the end result, putting most of my paints and pigments within arms reach.
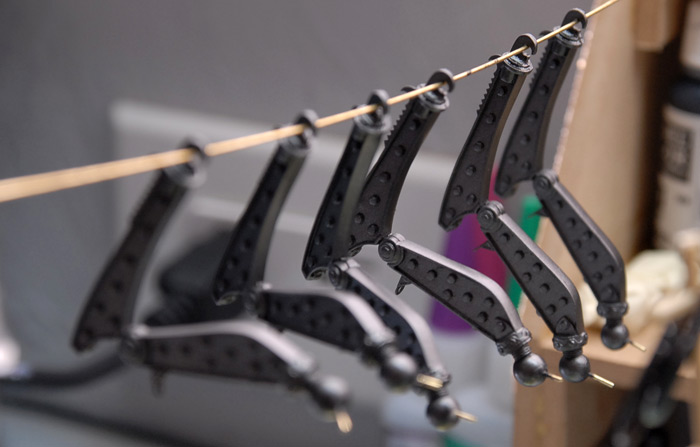
With some inspiration gained, and the model desk freshly organized, I began gluing things together. Below you can see the legs put together. I glued the upper and lower sections together first and then drilled through the joint with a pin vice and glued some brass rod into the hole in order to strengthen the joint. The leg pose that I decided on was one that hopefully mimics the legs of a real hornet, when in flight. The image above of the flying hornet is what I was aiming for. While I can't hit the pose exactly, since the kit legs can't fold up against the body quite that far, I'm hoping that the general feel will be similar.
With a coat of primer sprayed onto these parts, I began the rough assembly. This consisted of marking, taping and sticking (with museum tack) the various parts together, so that I could drill holes and glue in brass pins where needed. The legs, for example, were posed and then held by one hand, while the other hand used the Dremel (with the flexi-wand attachment thing), fitted with a tiny drill bit, to drill through the ball joint into the body. Then, I could fit an appropriately-sized length of brass rod through this hole. I glued the rod just to the leg, making it so I could take the whole thing apart, but once painting is done, it can be easily reassembled just as intended. Below you can see the first three legs pinned in place.
Once I had all the pins installed in the legs, I prepped all of the sprayable parts for painting by attaching various handles to them.
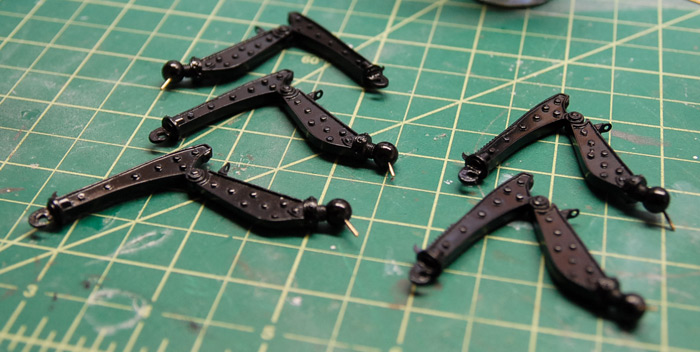
As I alluded to earlier, I decided to go with a metal finish for most of the model. I decided to use Alclad lacquer on this model, which is not something I have tried before. For the finishes I am using, it is a two step process. First, a gloss black paint is sprayed over the parts, and then, after drying for a day, the metallic paint is lightly sprayed over the black. Below you can see the legs with their gloss black coat.
The abdomen with its gloss black:
For the legs and connecting frame, I used Alclad Steel paint, which is a darker, semi-gloss finish. Below you can see the legs hanging to dry.
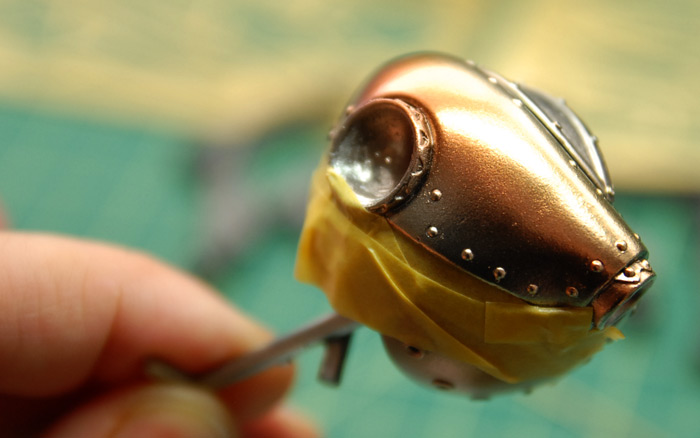
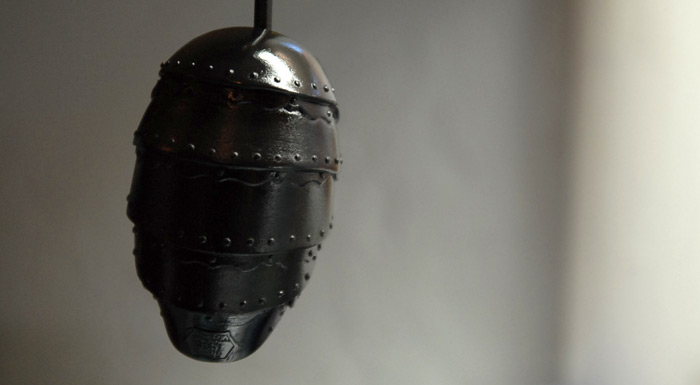
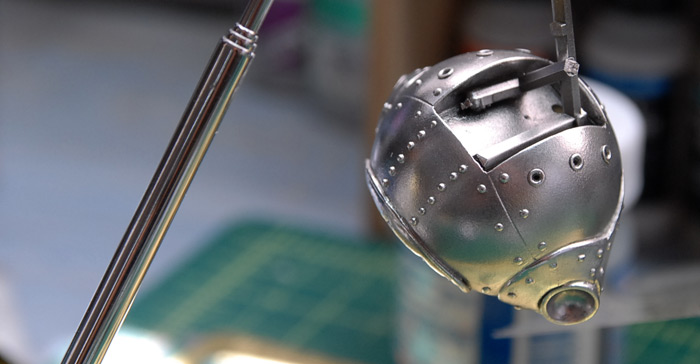
The rest of the parts were painted with Alclad Chrome. This is a nice bright, high-gloss paint, although a bit trickier to apply well than the steel color was. The plans is to get these parts nice and bright and then go back over them with a few colors of clear yellow, red and blue paint, hopefully getting the rainbow looks of heat treated titanium. Depending on how that turns out, I may then dull it all down a bit with some weathering and dirt, but I'll play that by ear.
Below is the thorax drying.
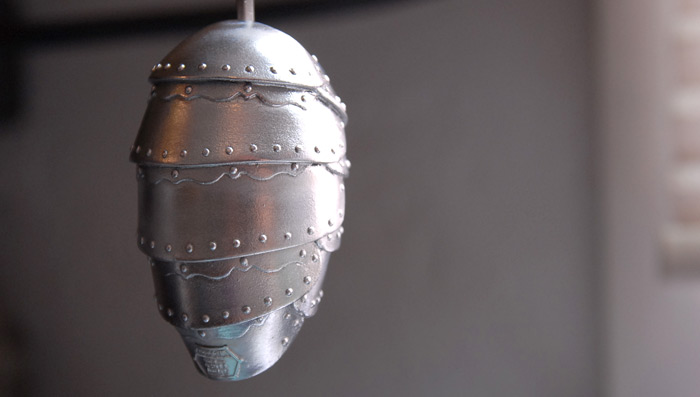
And the abdomen after its chrome treatment. This one ended up with a few duller areas, and may need another coat to even it out.
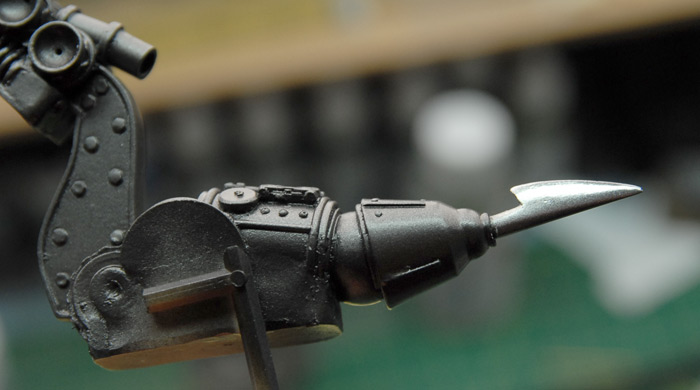
Below you can see the main connecting structure painted in steel, with the stinger painted chrome.
That's where I am as of this evening. Next up is a bit of repainting on the abdomen and then a shot at the multi-color clear treatment. Also, as soon as the cockpit section is done with airbrushing, I can begin hand painting the wood and seat in there as well as the pilot and control panel.
So, the problem that I had with this one was that I didn't have a clear idea of exactly how I was going to paint and mount it. I hit the point where I needed to start assembly and drilling/pinning parts together, but I didn't have a mental picture of how the legs should be posed. After stewing on it for a few weeks I finally just started searching the interwebs for inspiration. I really liked the ideas of having some of the parts look like heat-treated titanium. I also wanted to embrace some of the kits steam punk look while also incorporating some modern military cues and some elements from real wasps. At the same time I did't want to repeat what I had already seen online, but I wanted to draw some inspiration from good looking models that others had built.
With all that in mind, I collected images, put them all together into a 13" x 19" format and printed myself out a big ol inspiration sheet. Below is the fun-sized internet version. Please note that this is a collection of other peoples photos, so the copyrights generally belong to them, so hopefully they won't sue me or anything ;)
Also, I have recently purchased quite a few new paints (mentioned in a previous post), but didn't really have a good way to organize them. I was finding that these taller skinny bottle were just lurking about my model desk in a group, often falling over, and generally being difficult to deal with. It was hard to quickly find the color that I wanted and it was easy to bump them so they all fell over. After a bit of consideration, I decided it was time to build a new little paint shelf, better suited to my new model desk and the differently-sized bottles. On my way home from work, I swung by Home Depot, picked up a $5 sheet of 1/4" thick MDF board and got to work. I settled on a shelf that was about 4ft long and about 7.5" tall, and 4" deep. I just sketched it out quickly, marked the board and cut out a bunch of pieces. I then realized I had cut the slot in two of the upright parts in the wrong place and called it a day ;)
The next day, I cut two new parts and glued the whole thing together. Below you can see the end result, putting most of my paints and pigments within arms reach.
With some inspiration gained, and the model desk freshly organized, I began gluing things together. Below you can see the legs put together. I glued the upper and lower sections together first and then drilled through the joint with a pin vice and glued some brass rod into the hole in order to strengthen the joint. The leg pose that I decided on was one that hopefully mimics the legs of a real hornet, when in flight. The image above of the flying hornet is what I was aiming for. While I can't hit the pose exactly, since the kit legs can't fold up against the body quite that far, I'm hoping that the general feel will be similar.
With a coat of primer sprayed onto these parts, I began the rough assembly. This consisted of marking, taping and sticking (with museum tack) the various parts together, so that I could drill holes and glue in brass pins where needed. The legs, for example, were posed and then held by one hand, while the other hand used the Dremel (with the flexi-wand attachment thing), fitted with a tiny drill bit, to drill through the ball joint into the body. Then, I could fit an appropriately-sized length of brass rod through this hole. I glued the rod just to the leg, making it so I could take the whole thing apart, but once painting is done, it can be easily reassembled just as intended. Below you can see the first three legs pinned in place.
Once I had all the pins installed in the legs, I prepped all of the sprayable parts for painting by attaching various handles to them.
As I alluded to earlier, I decided to go with a metal finish for most of the model. I decided to use Alclad lacquer on this model, which is not something I have tried before. For the finishes I am using, it is a two step process. First, a gloss black paint is sprayed over the parts, and then, after drying for a day, the metallic paint is lightly sprayed over the black. Below you can see the legs with their gloss black coat.
The abdomen with its gloss black:
For the legs and connecting frame, I used Alclad Steel paint, which is a darker, semi-gloss finish. Below you can see the legs hanging to dry.
The rest of the parts were painted with Alclad Chrome. This is a nice bright, high-gloss paint, although a bit trickier to apply well than the steel color was. The plans is to get these parts nice and bright and then go back over them with a few colors of clear yellow, red and blue paint, hopefully getting the rainbow looks of heat treated titanium. Depending on how that turns out, I may then dull it all down a bit with some weathering and dirt, but I'll play that by ear.
Below is the thorax drying.
And the abdomen after its chrome treatment. This one ended up with a few duller areas, and may need another coat to even it out.
Below you can see the main connecting structure painted in steel, with the stinger painted chrome.
That's where I am as of this evening. Next up is a bit of repainting on the abdomen and then a shot at the multi-color clear treatment. Also, as soon as the cockpit section is done with airbrushing, I can begin hand painting the wood and seat in there as well as the pilot and control panel.
Next Up: Hornethopter
14 - July - 2012 - 19:23
Moving right along, I've decided to try something new for my next project. While I worked with resin castings a bit during the Panzer build, I have never done a full resin model before. A little while back, my good friend, Neil Blevins, pointed me towards the Industria Mechanika web site. Industria Mechanika does both resin kit design as well as coordinating other artists and their designs. They bring the designs together with the production means and end up selling limited-run resin kits in a variety of themes. Finding their designs, and the premise of trying out a resin kit, interesting, I ordered up one of the smaller kits just as they were running the third edition of it.
That brings me to the next model:
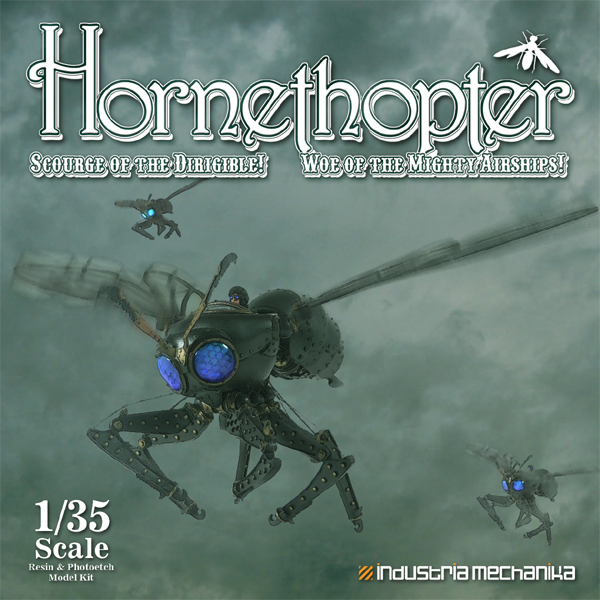
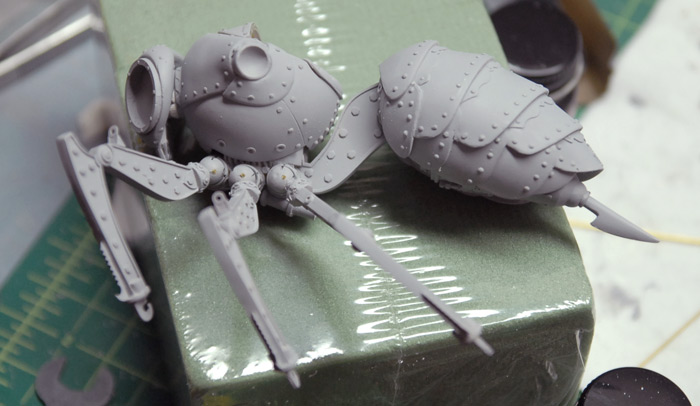
This one is a steampunk-styled Hornet-shaped ornithopter.
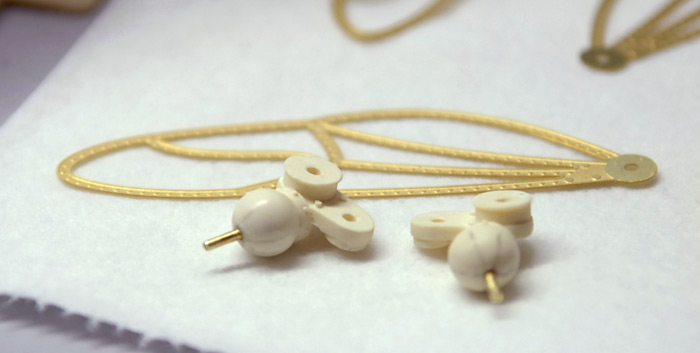
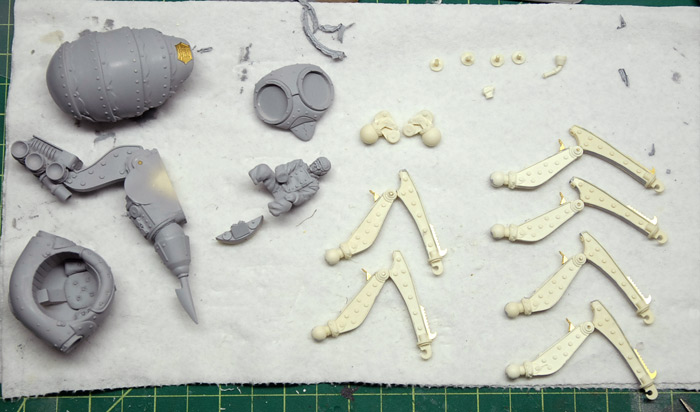
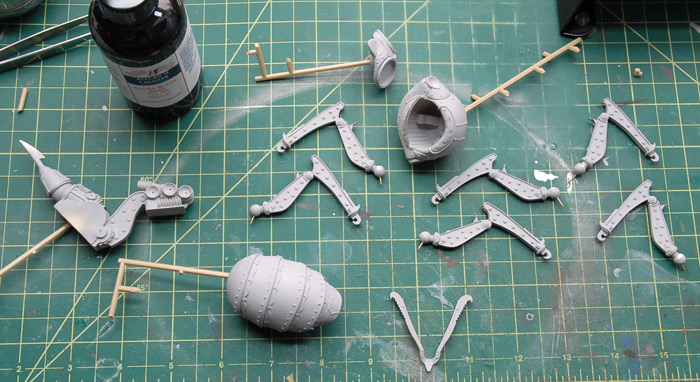
As you can see below, this kit is mostly resin castings, but also has a few photo-etch sheets (which are impressively thick), a clear windshield and two glass eye lenses. It also comes with a bit of coated wire for the leg rigging, but I don't think it i visible in the image below.
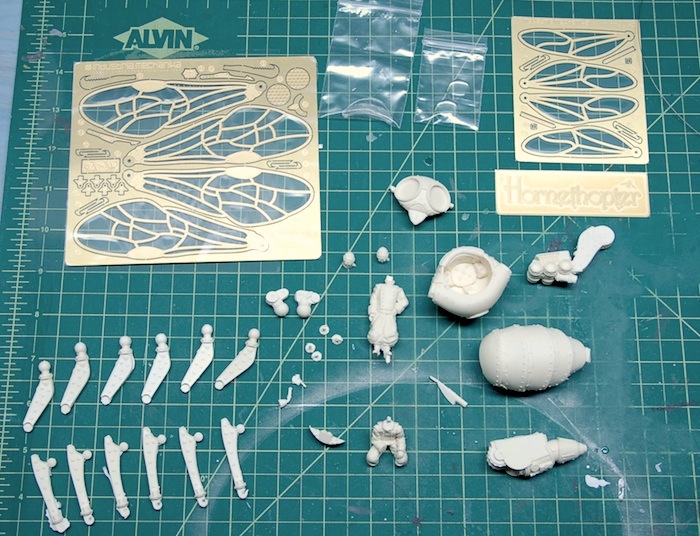
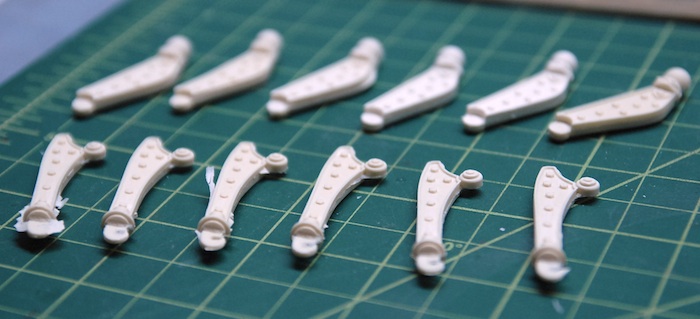
Here is a close-up on the straight-from-the-box leg segments. These will require a bit of clean up, a bit of filling and things of that nature, but overall, the castings look good and have lots of detail.
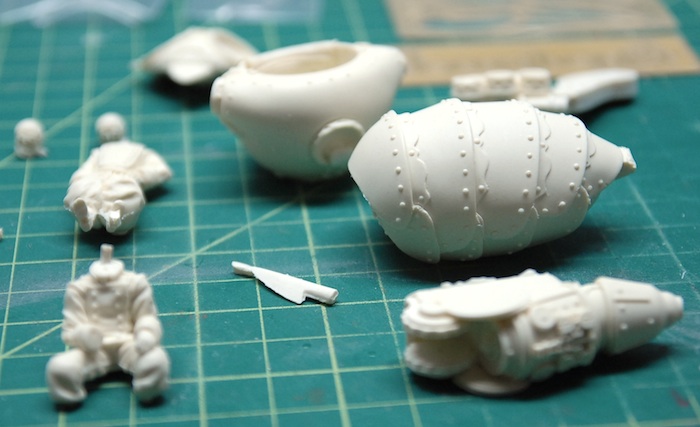
Below, you can see the main parts of the wasp body and the bodies of the figures that come with the kit.
This build is moving fairly quickly, since the overall parts count is much lower than the average plastic model. I expect to complete this one within a month or so, so watch out for more updates!
That brings me to the next model:
This one is a steampunk-styled Hornet-shaped ornithopter.
As you can see below, this kit is mostly resin castings, but also has a few photo-etch sheets (which are impressively thick), a clear windshield and two glass eye lenses. It also comes with a bit of coated wire for the leg rigging, but I don't think it i visible in the image below.
Here is a close-up on the straight-from-the-box leg segments. These will require a bit of clean up, a bit of filling and things of that nature, but overall, the castings look good and have lots of detail.
Below, you can see the main parts of the wasp body and the bodies of the figures that come with the kit.
This build is moving fairly quickly, since the overall parts count is much lower than the average plastic model. I expect to complete this one within a month or so, so watch out for more updates!