
February 2010
Panzer III Interior Paint
13 - February - 2010 - 09:10
With the interior build pretty much complete, I moved on to added a bit of paint. From what I could gather, the Germans painted everything in a red primer and left it that way for non-crew areas and painted all the crew areas in a dull grey-green.
I began by airbrushing the whole interior with Mr Surfacer 1200 as a primer and to give it all a uniform color. Next I sprayed the red-brown color onto the engine compartment and onto the engine and radiator assemblies. I decided to leave the engine and radiator parts separate during the painting and weathering process to make things easier. Finally, I masked the engine area and sprayed the crew cabin in the grey green.
Next I spent a bit of time picking out a few details by hand and adding metallic spots on corners to simulate paint chips. Here you can see a little of that in progress:
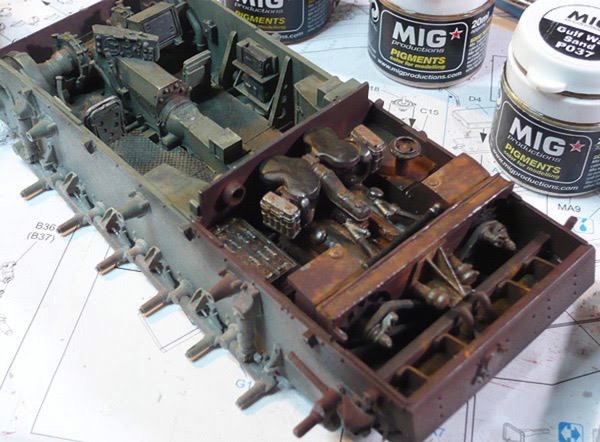
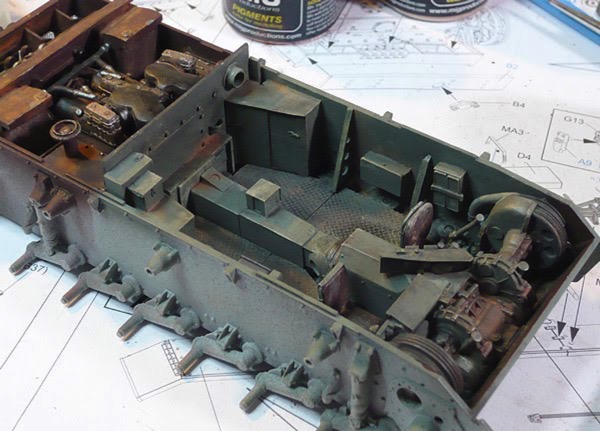
I followed that with a bit of dry brushing using a lighter tone to help pick out the details and raised bits. Next I tried out a technique that is new to me: the use of pigments. Pigment is the raw color component of many paints (although in a non-toxic version). I ordered a few sets of Mig Pigments from an online hobby store (since I have never seen more than a few jars locally), and now I've got 12 shades of rust, dirt, smoke and ash to choose from.
The jist of the pigments is that you sort of just use a dry brush to apply a variety of colors here and there, and then wet everything down with a thinner and use that to blend between colors and get the solution into all the cracks and crevices. I started out with a wash of black to help add contrast and pick out the details, and then followed up with various dirt and rust colors. I generally found it very easy to work with and I am quite pleased with the results.
A few images of paint and weathering (with the pigments):

That pretty much wraps up the interior. There are a few odds and ends to take care of, like cementing the engine parts in place and connecting a few things with pipes. I'm sure there will also be a bit of work going into the upper hull build as well, but that is all for a later post.
Next: Onward with the construction!
I began by airbrushing the whole interior with Mr Surfacer 1200 as a primer and to give it all a uniform color. Next I sprayed the red-brown color onto the engine compartment and onto the engine and radiator assemblies. I decided to leave the engine and radiator parts separate during the painting and weathering process to make things easier. Finally, I masked the engine area and sprayed the crew cabin in the grey green.
Next I spent a bit of time picking out a few details by hand and adding metallic spots on corners to simulate paint chips. Here you can see a little of that in progress:
I followed that with a bit of dry brushing using a lighter tone to help pick out the details and raised bits. Next I tried out a technique that is new to me: the use of pigments. Pigment is the raw color component of many paints (although in a non-toxic version). I ordered a few sets of Mig Pigments from an online hobby store (since I have never seen more than a few jars locally), and now I've got 12 shades of rust, dirt, smoke and ash to choose from.
The jist of the pigments is that you sort of just use a dry brush to apply a variety of colors here and there, and then wet everything down with a thinner and use that to blend between colors and get the solution into all the cracks and crevices. I started out with a wash of black to help add contrast and pick out the details, and then followed up with various dirt and rust colors. I generally found it very easy to work with and I am quite pleased with the results.
A few images of paint and weathering (with the pigments):
That pretty much wraps up the interior. There are a few odds and ends to take care of, like cementing the engine parts in place and connecting a few things with pipes. I'm sure there will also be a bit of work going into the upper hull build as well, but that is all for a later post.
Next: Onward with the construction!
Panzer III Interior Build
13 - February - 2010 - 08:50
So, it's been quite a while since I've updated so I've going to break this into two posts: one on the build and one about painting and weathering. First, the build:
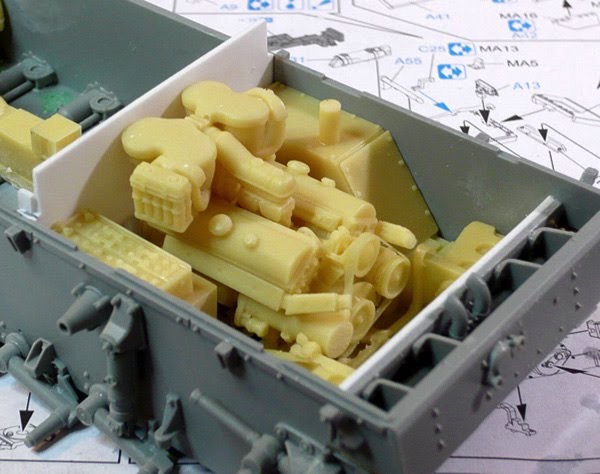
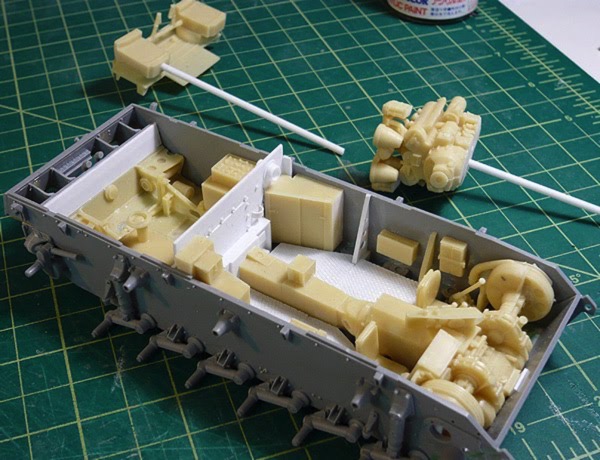
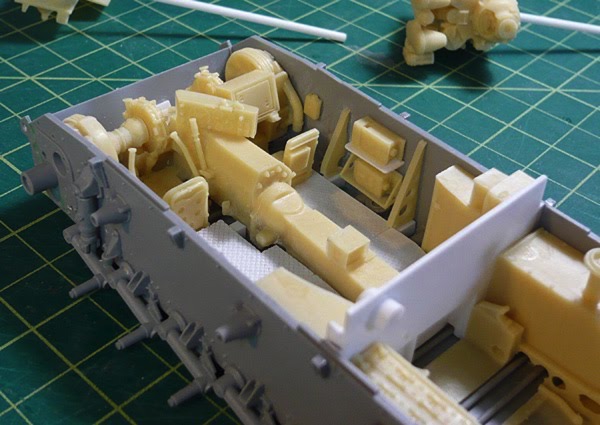
I purchased resin interior and engine kits made by Verlinden. The interior kit was designed for a Tamiya version of the same tank, while the engine claimed it would fit both Tamiya and Dragon kits. When I got in there and slowly started piecing things together I discovered a few things:
First off, I'm not that crazy about working with large resin parts. There seems to be a ton of work to do just to get the part somewhere close to where it should be, since one needs to sand off a great deal of the overpour. There also seems to be a tendency of the large flat resin parts to warp a bit with the heat of sanding. I suppose these are things to learn about working with resin, and they will inform my future projects, but I just came away with the impression that resin is just plain less fun to work with compared to plastic or wood.
Next thing I learned was that the Tamiya version of the kit must not have all of the interior suspension parts that the Dragon kit does, as the resin parts had all of the same part cast into the floor of the interior. This gave me two options: cut away all the Dragon interior parts or cut away the resin parts. Since I thought the kit parts looked better than the resin parts, I opted for what was probably the hardest route, and decided to cut away the whole floor of the resin parts and replace it with a new version.
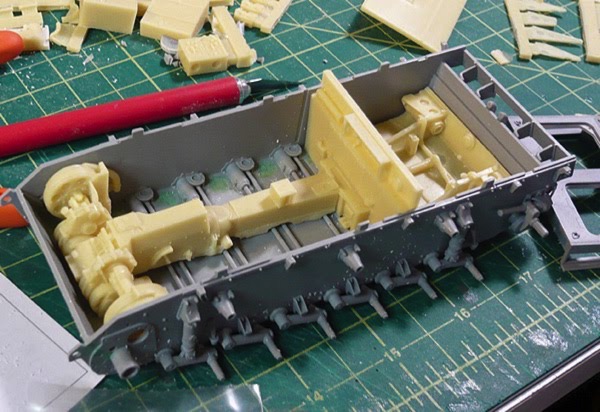
In retrospect, a closer inspection of some reference photos could have saved me some trouble. I started with the impression that the floor inside the tank was a metal mesh, similar to what one would find on catwalks and other industrial settings. So I cut away all the floor, and found some fine screen, with the intention of using the screen for the floor to simulate the grating. This would allow the fancy suspension bit to be seen through the floor just a little bit. Later on, in my quest for find proper paint colors, I ran across some photos of a restored Panzer and it had flooring made of diamond plate, which is quite opaque. So, instead of the screen idea and instead of trying to find some scale diamond plate, I took some styrene sheet, heated it with a cooking torch (like for making creme brulee) and pressed the screen from a cooking splatter guard into it to form a criss-cross pattern that is similar to diamond plate.
Finally, I learned that the interior and engine kits both came with a firewall to go between. Once all the parts for the interior and exterior are in place, without any firewalls, they take up pretty much the whole interior, leaving not enough room for EITHER firewall. So, what I ended up having to do is to build a new firewall from scratch from styrene. I tried to get the general shape from both of the resin parts and even clipped off a few of the resin details and added them to the new version. I also found that I had to cut quite a bit off of the bottom of the engine in order to get it to sit low enough in the chassis for the upper hull pieces to be able to attach. This, of course, caused all the pipes to mis-align, so there are still a few things that will need tweaking once paint is done and I am cementing things into the hull.
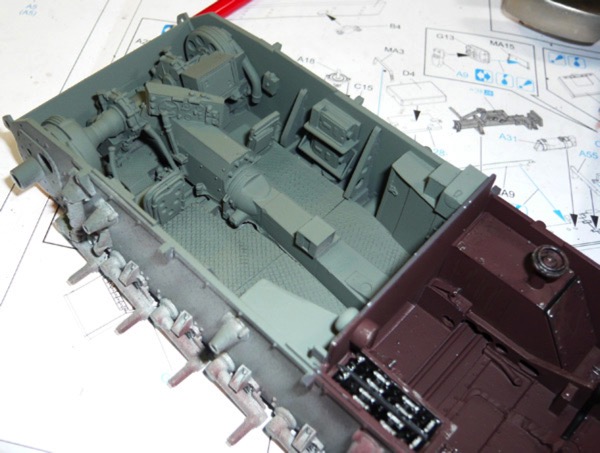
Some images of the built-up interior and engine:
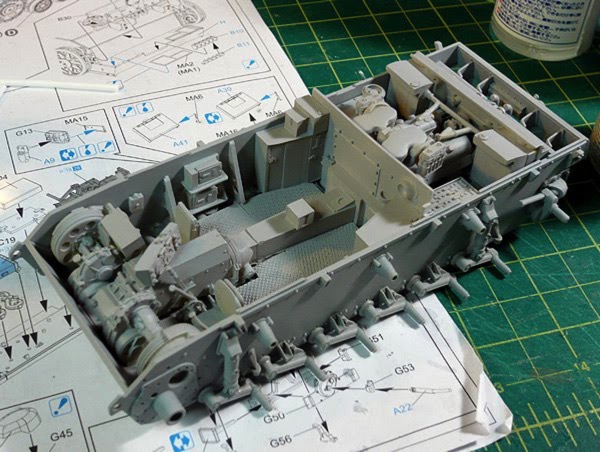
And finally, with a coat of Mr Surfacer 1200 as a primer:
Next: some paint!
I purchased resin interior and engine kits made by Verlinden. The interior kit was designed for a Tamiya version of the same tank, while the engine claimed it would fit both Tamiya and Dragon kits. When I got in there and slowly started piecing things together I discovered a few things:
First off, I'm not that crazy about working with large resin parts. There seems to be a ton of work to do just to get the part somewhere close to where it should be, since one needs to sand off a great deal of the overpour. There also seems to be a tendency of the large flat resin parts to warp a bit with the heat of sanding. I suppose these are things to learn about working with resin, and they will inform my future projects, but I just came away with the impression that resin is just plain less fun to work with compared to plastic or wood.
Next thing I learned was that the Tamiya version of the kit must not have all of the interior suspension parts that the Dragon kit does, as the resin parts had all of the same part cast into the floor of the interior. This gave me two options: cut away all the Dragon interior parts or cut away the resin parts. Since I thought the kit parts looked better than the resin parts, I opted for what was probably the hardest route, and decided to cut away the whole floor of the resin parts and replace it with a new version.
In retrospect, a closer inspection of some reference photos could have saved me some trouble. I started with the impression that the floor inside the tank was a metal mesh, similar to what one would find on catwalks and other industrial settings. So I cut away all the floor, and found some fine screen, with the intention of using the screen for the floor to simulate the grating. This would allow the fancy suspension bit to be seen through the floor just a little bit. Later on, in my quest for find proper paint colors, I ran across some photos of a restored Panzer and it had flooring made of diamond plate, which is quite opaque. So, instead of the screen idea and instead of trying to find some scale diamond plate, I took some styrene sheet, heated it with a cooking torch (like for making creme brulee) and pressed the screen from a cooking splatter guard into it to form a criss-cross pattern that is similar to diamond plate.
Finally, I learned that the interior and engine kits both came with a firewall to go between. Once all the parts for the interior and exterior are in place, without any firewalls, they take up pretty much the whole interior, leaving not enough room for EITHER firewall. So, what I ended up having to do is to build a new firewall from scratch from styrene. I tried to get the general shape from both of the resin parts and even clipped off a few of the resin details and added them to the new version. I also found that I had to cut quite a bit off of the bottom of the engine in order to get it to sit low enough in the chassis for the upper hull pieces to be able to attach. This, of course, caused all the pipes to mis-align, so there are still a few things that will need tweaking once paint is done and I am cementing things into the hull.
Some images of the built-up interior and engine:
And finally, with a coat of Mr Surfacer 1200 as a primer:
Next: some paint!