
Letter Block Toy Box
29 - June - 2020 - 20:08
Some dear friends had themselves a baby a little while back so I wanted to build something for them that would hopefully last a lifetime. After searching around for some theme ideas, I stumbled across some toy block themed toy boxes that I thought would be fun. I wasn't crazy about the ones that I saw construction-wise (they looked a bit too flimsy), so I spent a bit of time mocking up a box in the computer and landed on a design that I thought would look nice, be sturdy enough to take lots of abuse and all while being safe for a toddler.
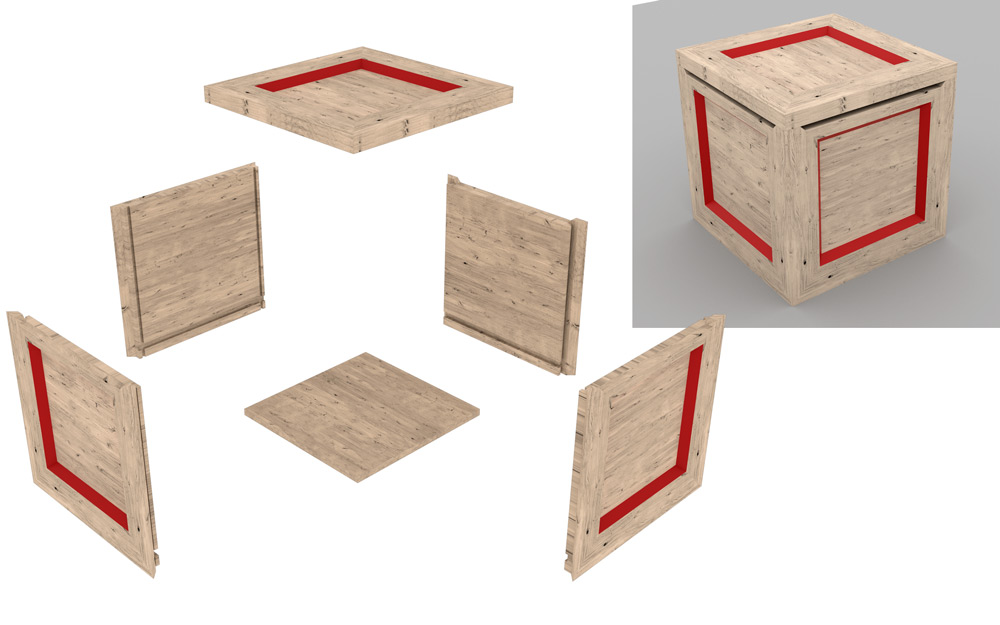
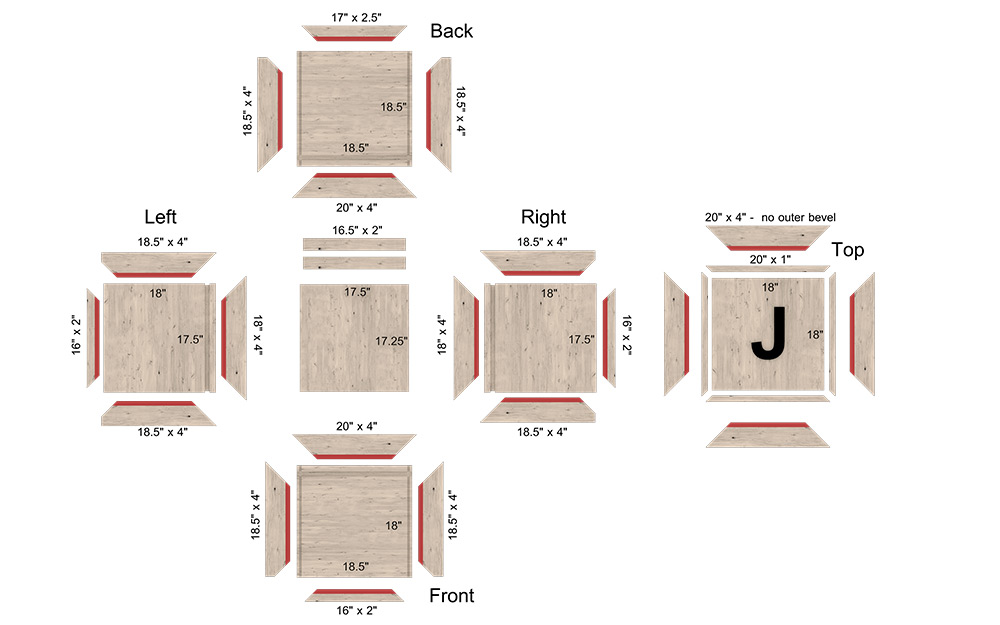
Below you can see the couple of images that I ended up with after my design process. I'll talk a bit about the special features as they come up in pictures later on, but the important thing to note is that it is big, heavy and made from solid ash. Did I mention that it is heavy?
This one is light on details and heavy on pictures, so enjoy the show!
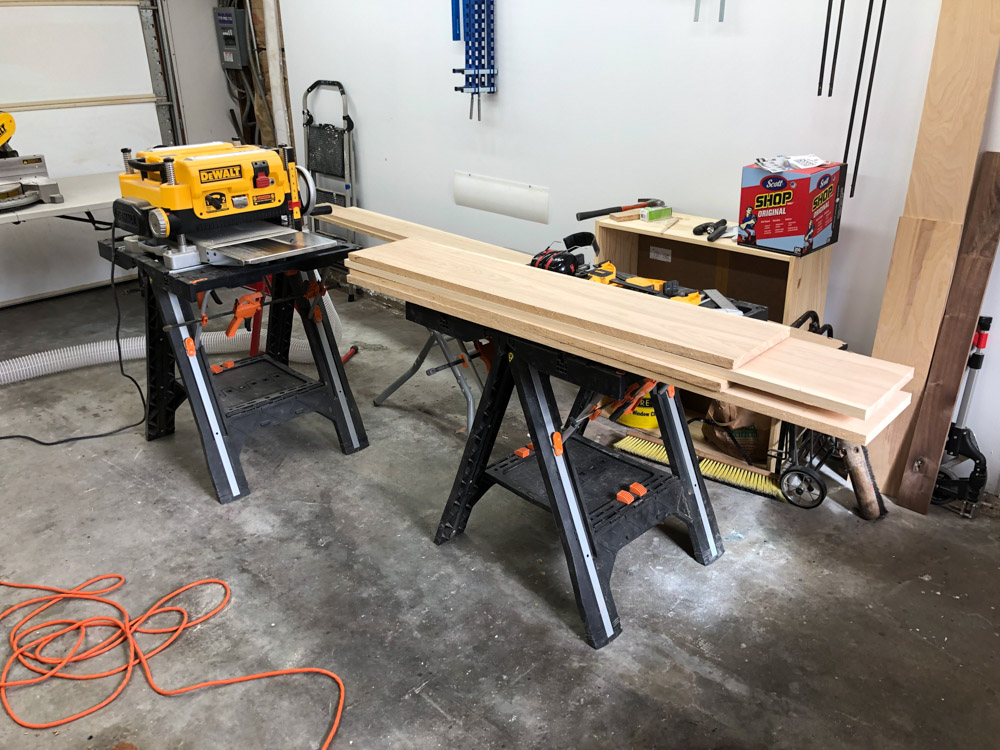
As usual, I started with a pile of wood from my local hardwood dealer, and milled it down to 3/4".
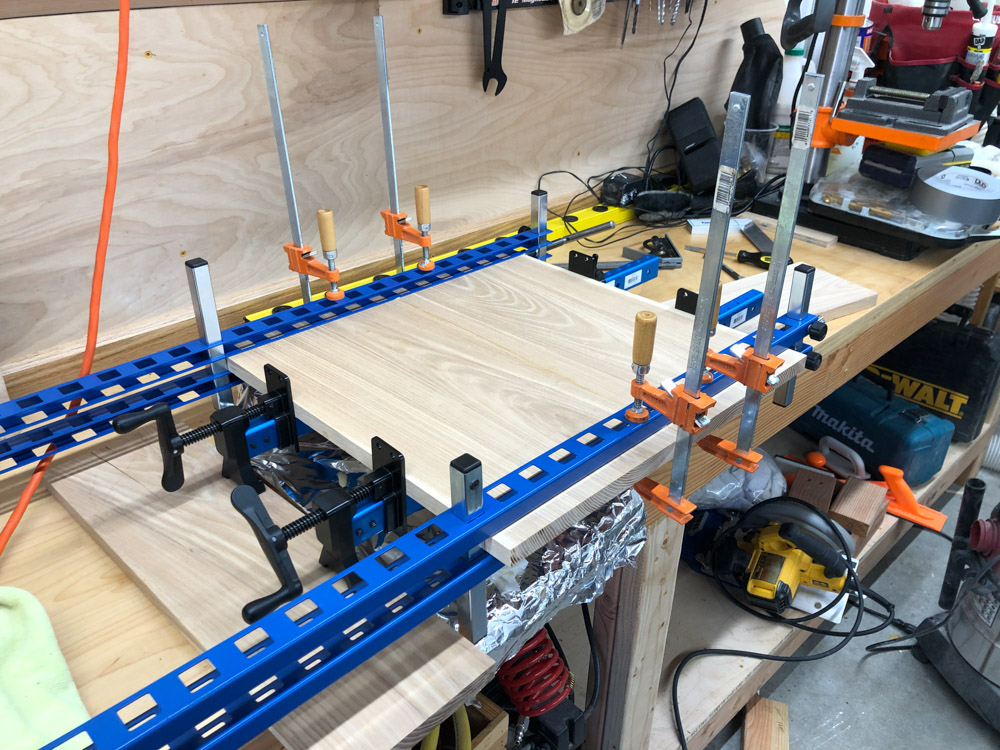
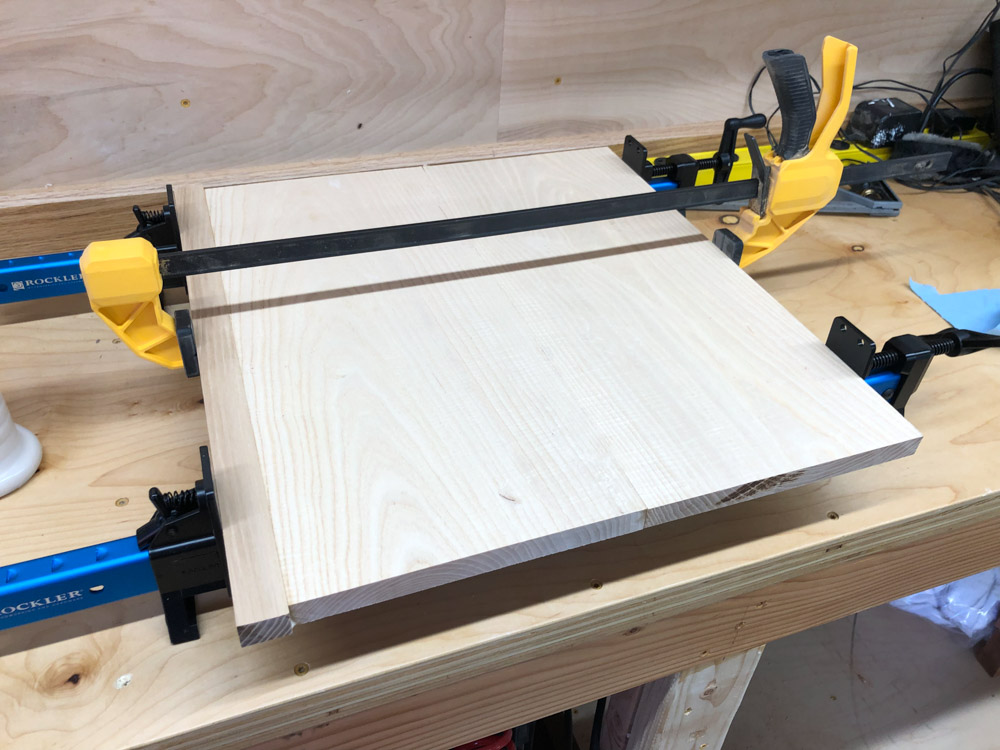
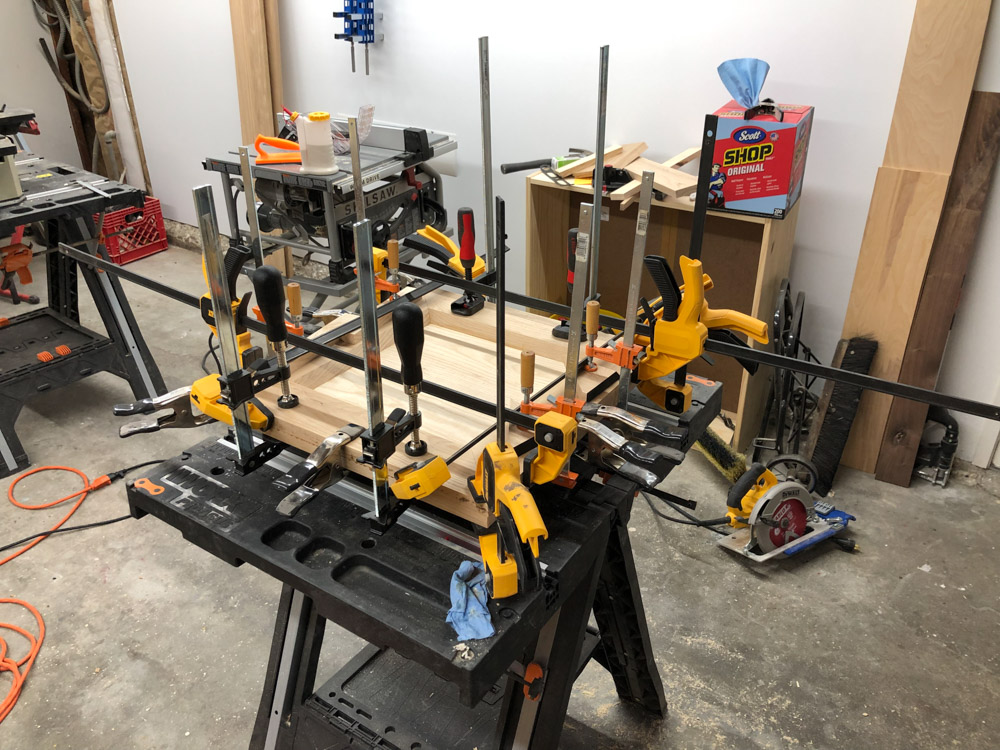
After cutting down to rough length, the main side panels were glued up. Below you can see the panel clamps from Rockler that I got for this project. I try to embrace Mike Pekovich's (creative director at Fine Woodworking magazine) theory that you should try to buy a new tool for each project, thereby slowly increasing your set of tools, but also trying out something new.
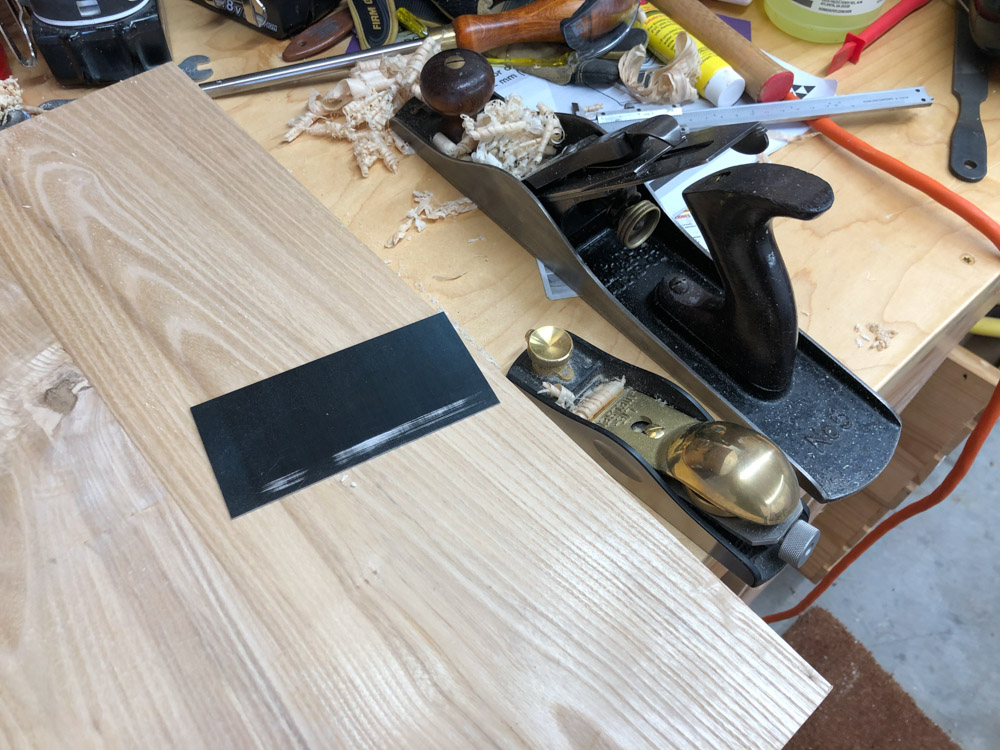
The panels took a bit of fine tuning, planing, scraping and such to get them smooth and clean.
Turns out that the stock that I bought was an awkward width, being not quite wide enough to use two pieces to make one side. Fortunately, this extra bit should be hidden at the bottom of the inside.
And sometimes you accidentally make a panel just a liiiiiitle bit too narrow.
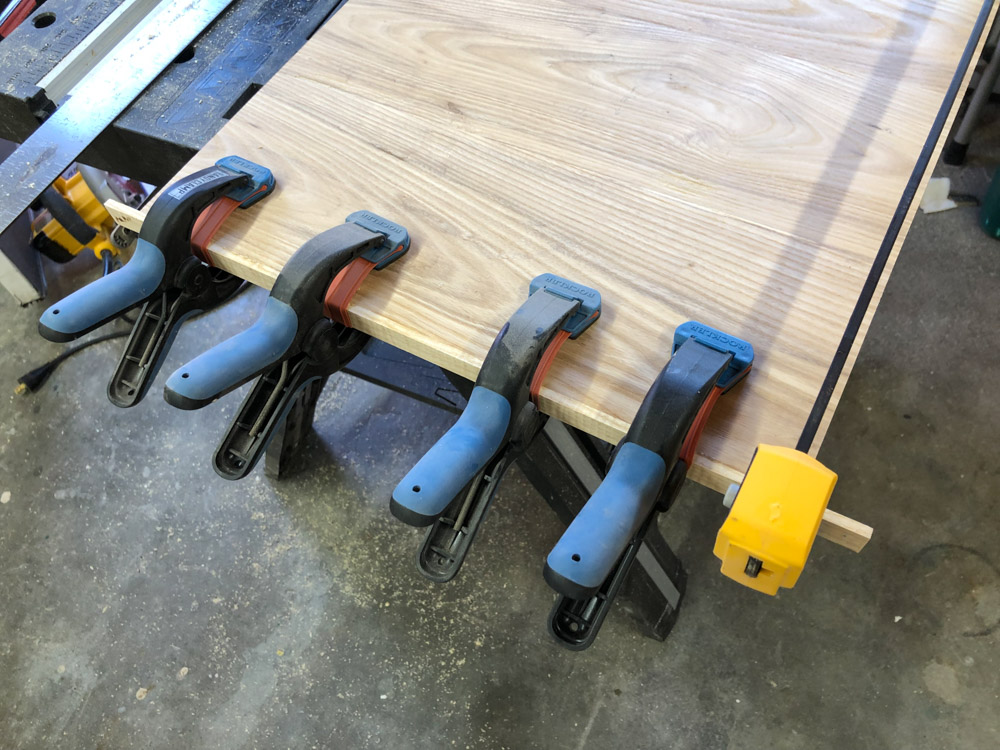
Here's the main box sides glued up. One side is a little taller in order to give the back hinge a little height. More on that shortly.
Below you can see the beveled edges being glued to the top.
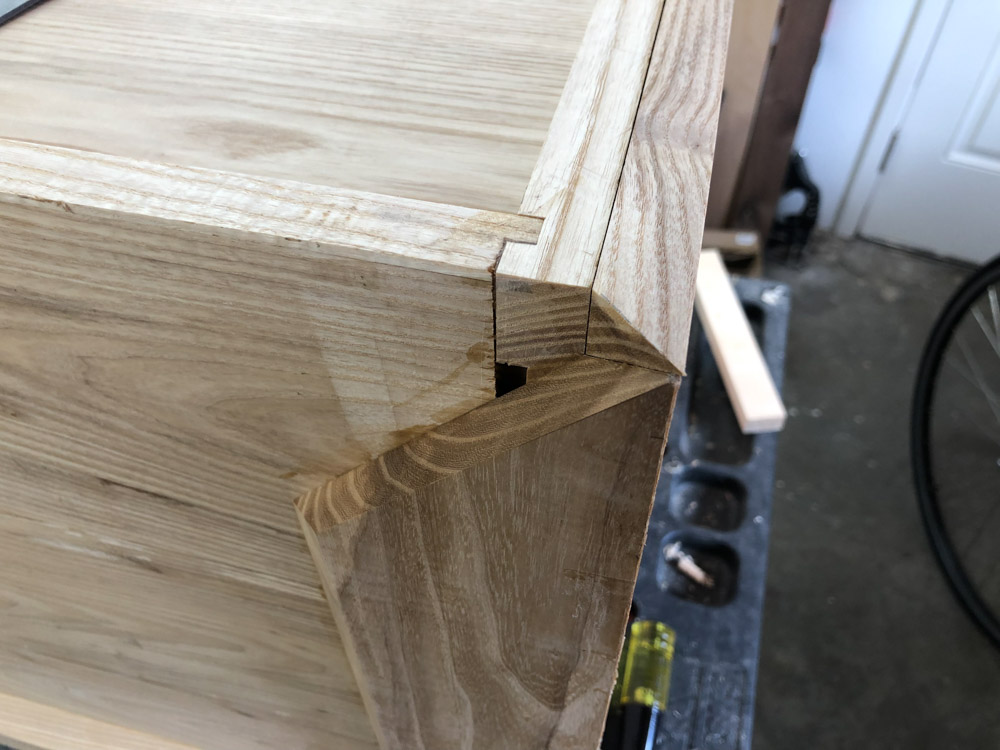
Here's where it starts to get a little tricky. The side have the same chamfered edging, but they are meant to stick up a bit from the side panels, in order to leave a gap below the closed lid (no pinched little fingers), and then also have a miter at the outside edges.
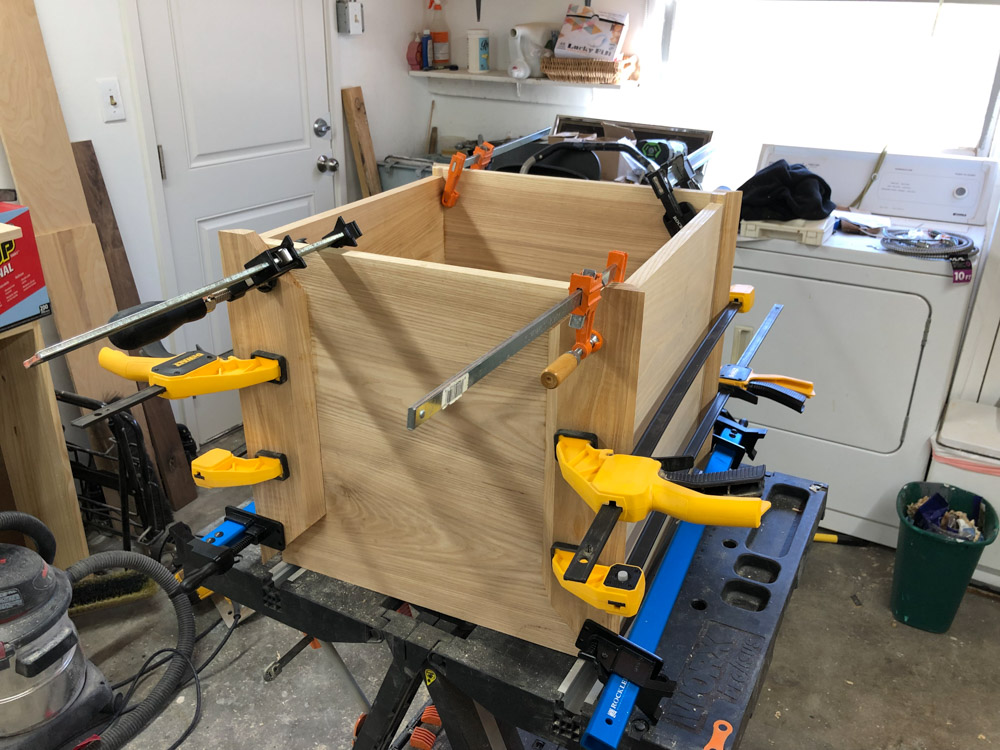
This makes for some unusual meeting of corners at the bottom of each side.
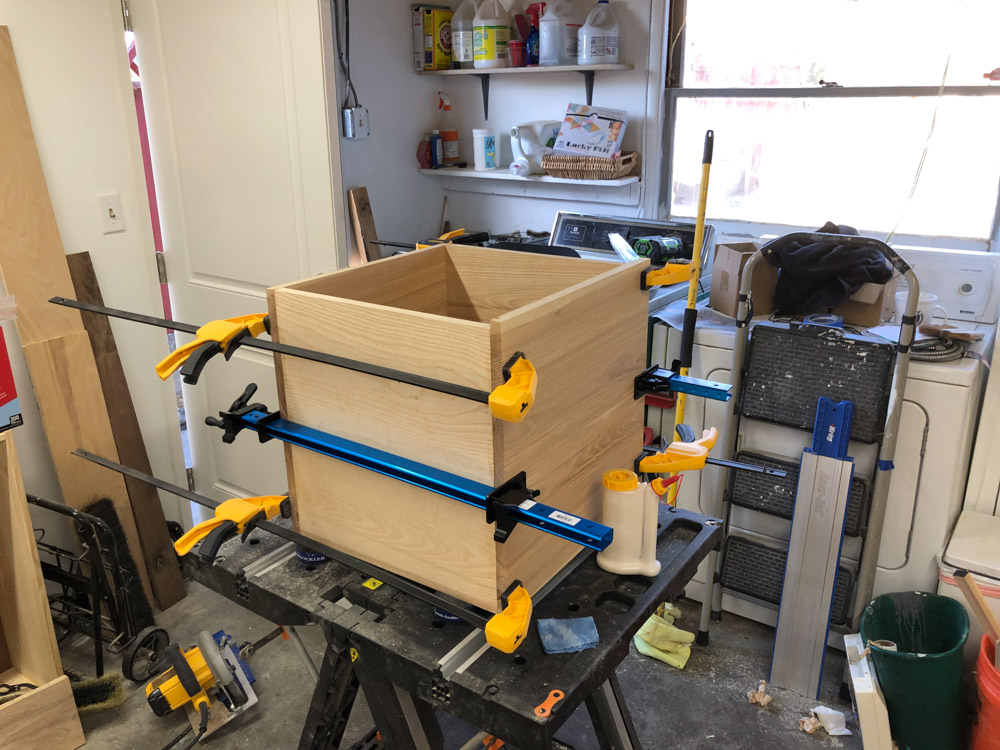
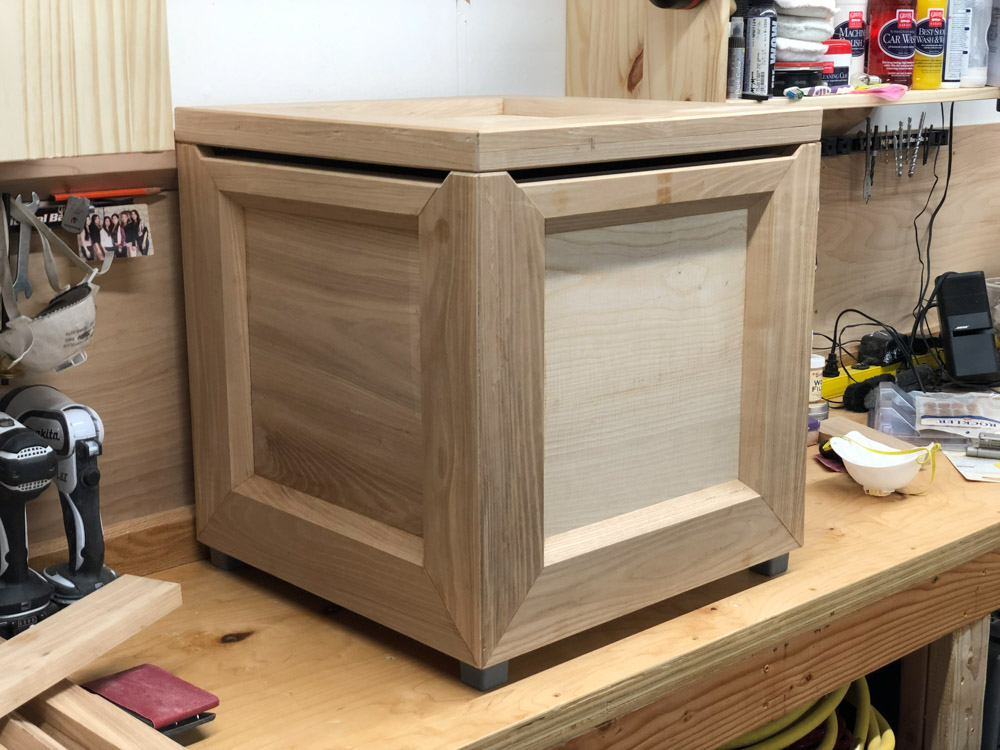
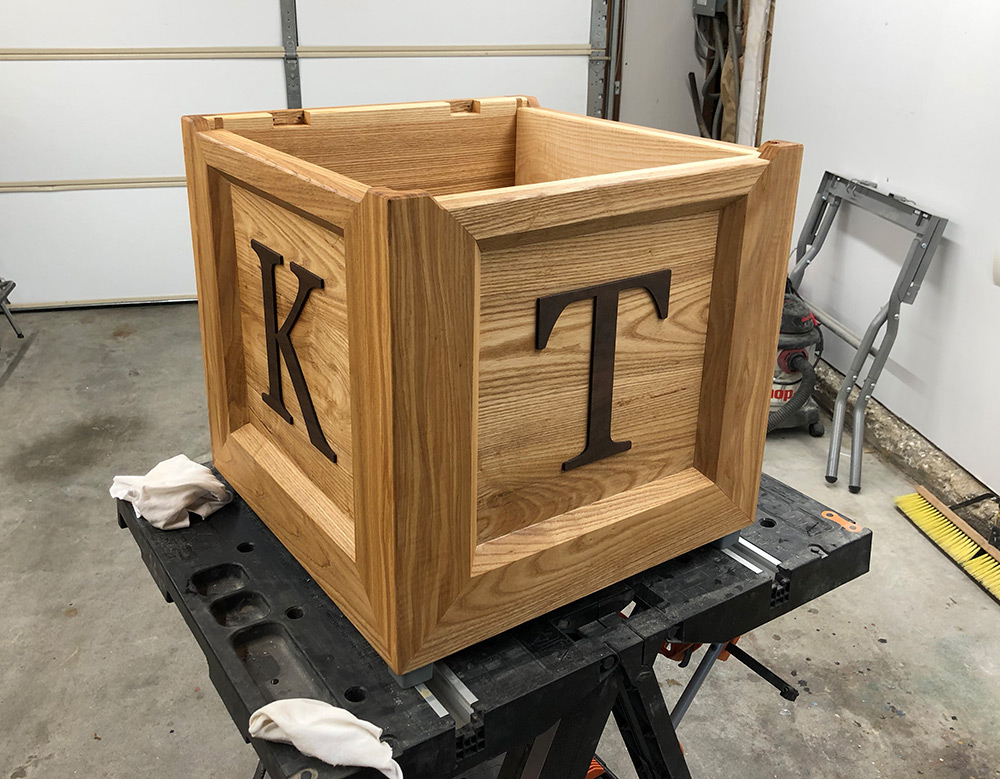
Here's the box all glued up, with the lid set on top.
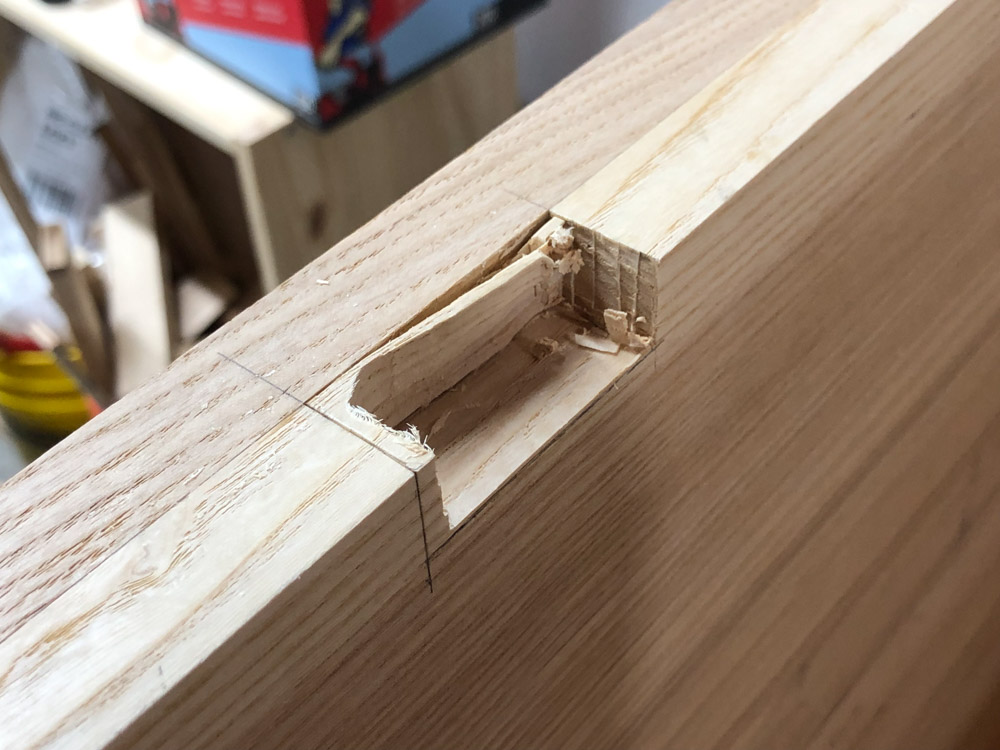
The torsion hinges that I bought (no slammed lids) were only meant to go onto a 3/4" board, not the 1 1/2" thickness I had at the back of the box, so I need to carve out some recesses for them. Probably could have sharpened those chisels a bit more…
For the letters on the sides of the box, I had some 1/8" walnut laser cut at a local shop. Below you can see it after the burned edges had been sanded clean.

I had some high-tech clamping methods to glue those letters in place.

Finally, before assembly, I finished the box with tung oil (100% kid safe). A bit about tung oil: it smells pleasant and nutty, makes a nice rich finish and takes FOREVER to cure. On top of a few coats of the tung oil went a bit of a beeswax furniture polish (the sort that is used on children's wooden toys).
After finishing the hinges were put in place, chains added so that the top doesn't open TOO far, little rubber bumpers added on the front upper corners, for the lid to land on and non-slip rubber feet added to the bottom.
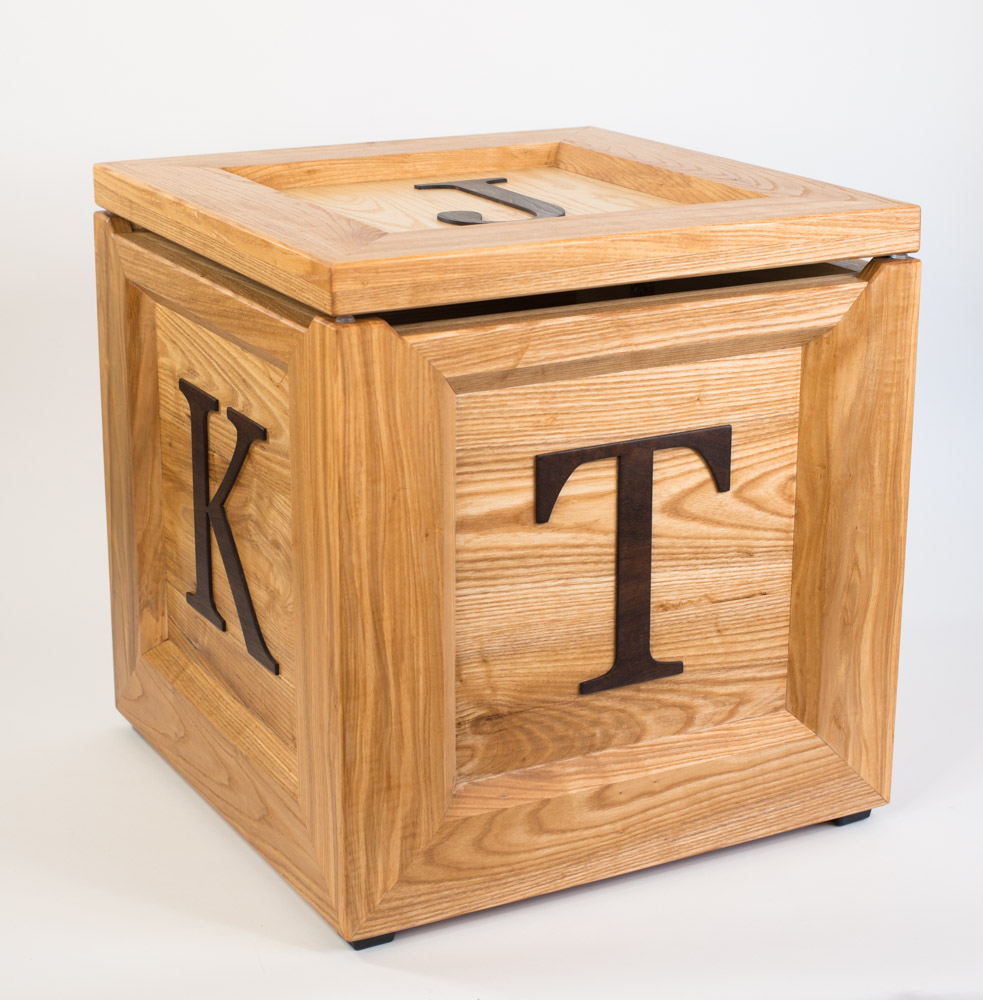
In all, I think the box turned out well and my friends seemed pleased with it :)
Here is a gallery with more photos of the finished product, where you can also see the hinges in action, holding the lid partly open.
Thanks for reading!
Below you can see the couple of images that I ended up with after my design process. I'll talk a bit about the special features as they come up in pictures later on, but the important thing to note is that it is big, heavy and made from solid ash. Did I mention that it is heavy?
This one is light on details and heavy on pictures, so enjoy the show!
As usual, I started with a pile of wood from my local hardwood dealer, and milled it down to 3/4".
After cutting down to rough length, the main side panels were glued up. Below you can see the panel clamps from Rockler that I got for this project. I try to embrace Mike Pekovich's (creative director at Fine Woodworking magazine) theory that you should try to buy a new tool for each project, thereby slowly increasing your set of tools, but also trying out something new.
The panels took a bit of fine tuning, planing, scraping and such to get them smooth and clean.
Turns out that the stock that I bought was an awkward width, being not quite wide enough to use two pieces to make one side. Fortunately, this extra bit should be hidden at the bottom of the inside.
And sometimes you accidentally make a panel just a liiiiiitle bit too narrow.
Here's the main box sides glued up. One side is a little taller in order to give the back hinge a little height. More on that shortly.
Below you can see the beveled edges being glued to the top.
Here's where it starts to get a little tricky. The side have the same chamfered edging, but they are meant to stick up a bit from the side panels, in order to leave a gap below the closed lid (no pinched little fingers), and then also have a miter at the outside edges.
This makes for some unusual meeting of corners at the bottom of each side.
Here's the box all glued up, with the lid set on top.
The torsion hinges that I bought (no slammed lids) were only meant to go onto a 3/4" board, not the 1 1/2" thickness I had at the back of the box, so I need to carve out some recesses for them. Probably could have sharpened those chisels a bit more…
For the letters on the sides of the box, I had some 1/8" walnut laser cut at a local shop. Below you can see it after the burned edges had been sanded clean.
I had some high-tech clamping methods to glue those letters in place.
Finally, before assembly, I finished the box with tung oil (100% kid safe). A bit about tung oil: it smells pleasant and nutty, makes a nice rich finish and takes FOREVER to cure. On top of a few coats of the tung oil went a bit of a beeswax furniture polish (the sort that is used on children's wooden toys).
After finishing the hinges were put in place, chains added so that the top doesn't open TOO far, little rubber bumpers added on the front upper corners, for the lid to land on and non-slip rubber feet added to the bottom.
In all, I think the box turned out well and my friends seemed pleased with it :)
Here is a gallery with more photos of the finished product, where you can also see the hinges in action, holding the lid partly open.
Thanks for reading!
Front Porch Planter Boxes
23 - September - 2019 - 20:23
After the holidays last year, it became quite apparent that any packages left on our front porch by delivery people were on display for all to see. Not that we had anything stolen, but it seemed like it was just a matter of time. It got me to thinking about a way to help fix that problem and perhaps spruce up the front porch a bit in the process.
After some discussion with the wife, a bit of measuring and a quick mock-up on the computer, I settled on building some planter boxes that would run all the way across our front porch and both make things look nicer and give the delivery folks a place to hide small-to-medium packages.
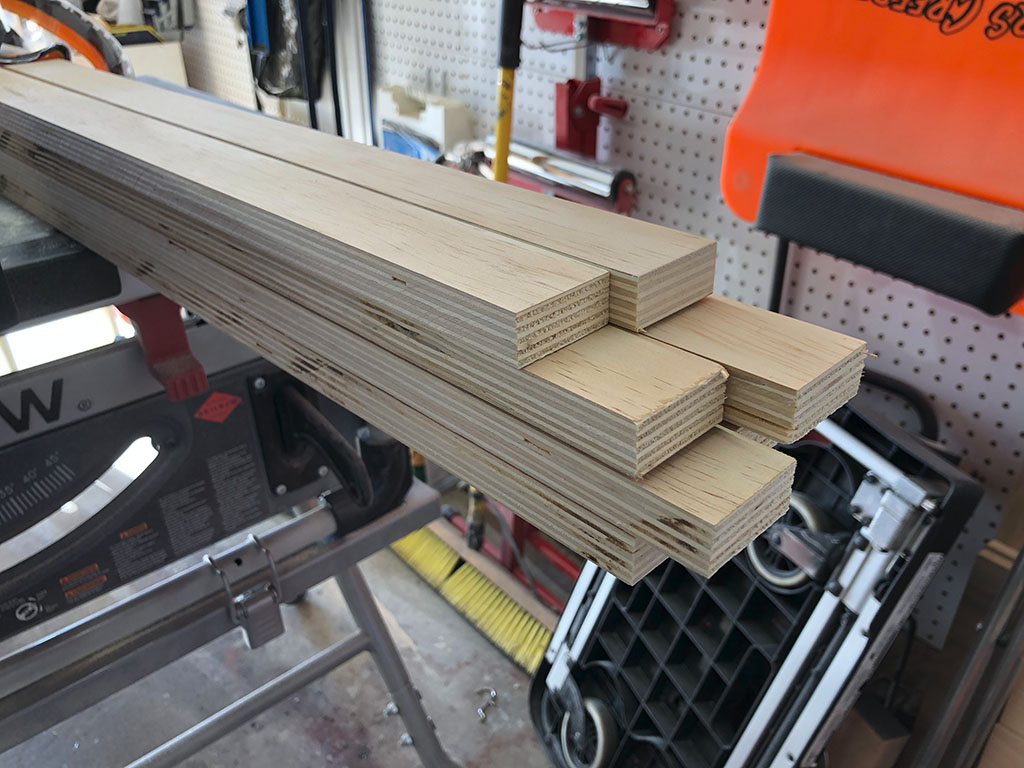
This was a pretty quick and easy weekend project, using a sheet of plywood and a few pieces of construction redwood. The first order of business was to cut down the plywood to make the sides of the planter boxes.

Here you can see the boxes screwed together. The clamps are there to help glue back together the few places where the plywood split apart a bit at the edges (probably should have drilled larger pilot holes).
The idea was to have a plastic planter box nest inside the wooden boxes, so that the wood wasn’t in constant contact with the soil itself. That meant that I needed a lip inside the boxes for that plastic box to rest on. I cut the remaining plywood into narrow strips, as seen here.
The strips were then glued and screwed in place, and the screw holes filled. Here you can see the stack of boxes waiting for the filler to dry.
The next step was to prime the entire box, to make it a bit more weather-resistant, and then paint the outside surface to match the color of the house. We had a decent amount of leftover paint from painting the house, so all I had to do was dig the big bucket out of the shed and slap on a few coats.
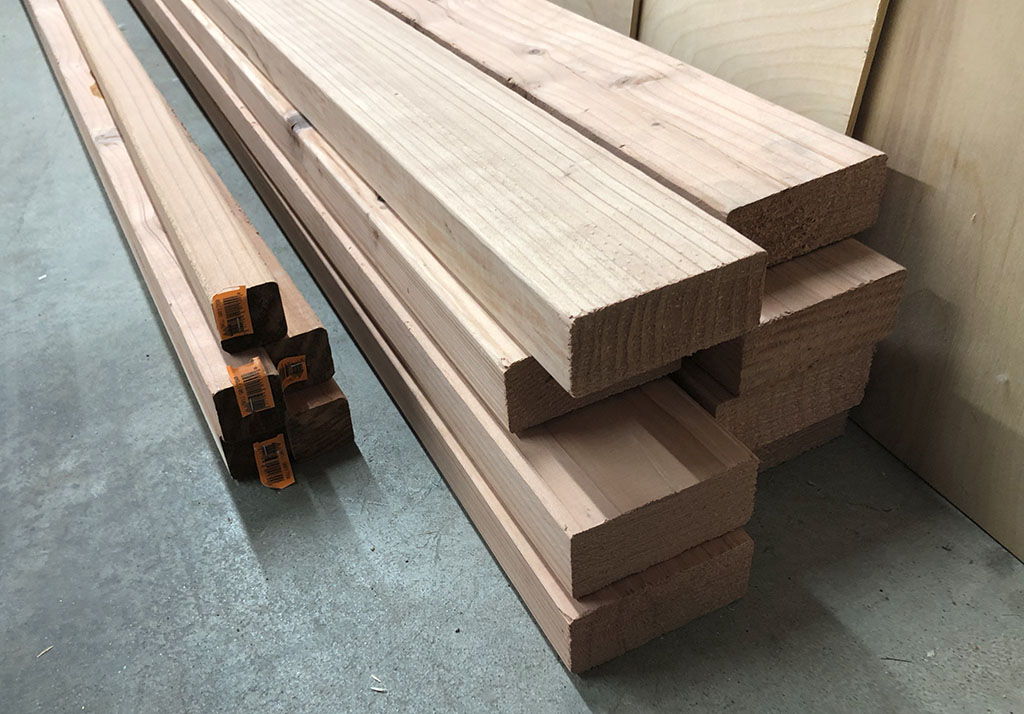
The construction redwood that I mentioned earlier was to be milled square and then cut into strips that will be nailed to the sides of the boxes for ornamentation. I used the 2x4’s for that and the small square stock was to be cut down and made into little legs for the boxes, in order to get them up off the ground.
Once again, I did a poor job of documenting this part, but just imagine me running the 2x4’s through the planer to clean up the top and bottom surfaces and then ripping ¼” thick strips from those on the table saw. In the interest of keeping my fingers, I could only use about two thirds of each piece of wood, as beyond that it got a little dicey feeding the wood through the saw blade.
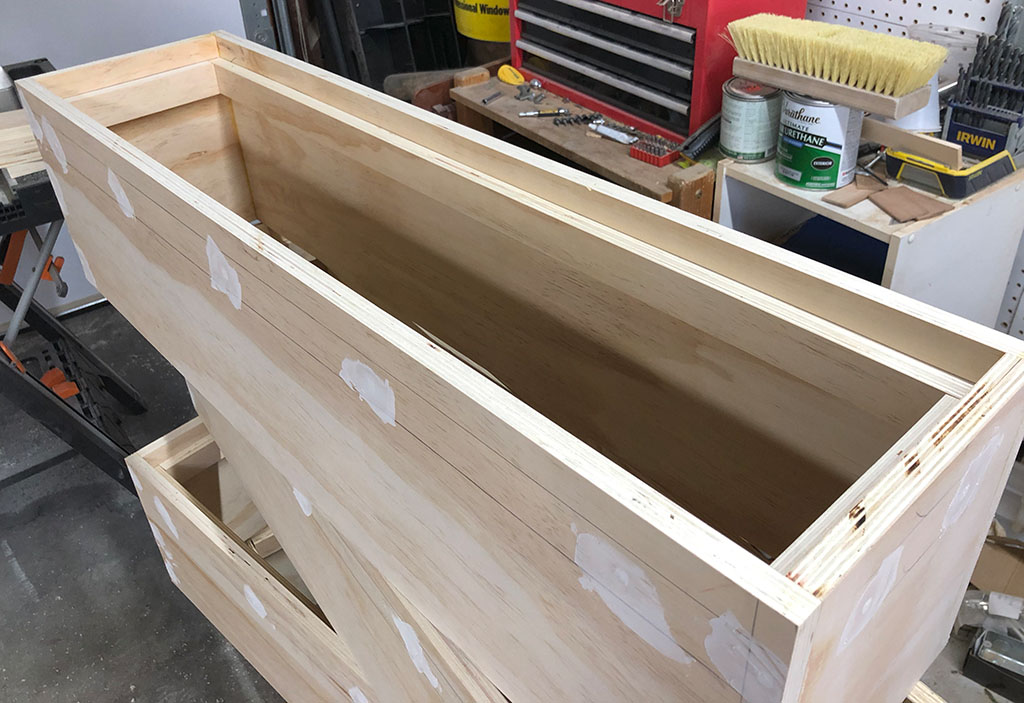
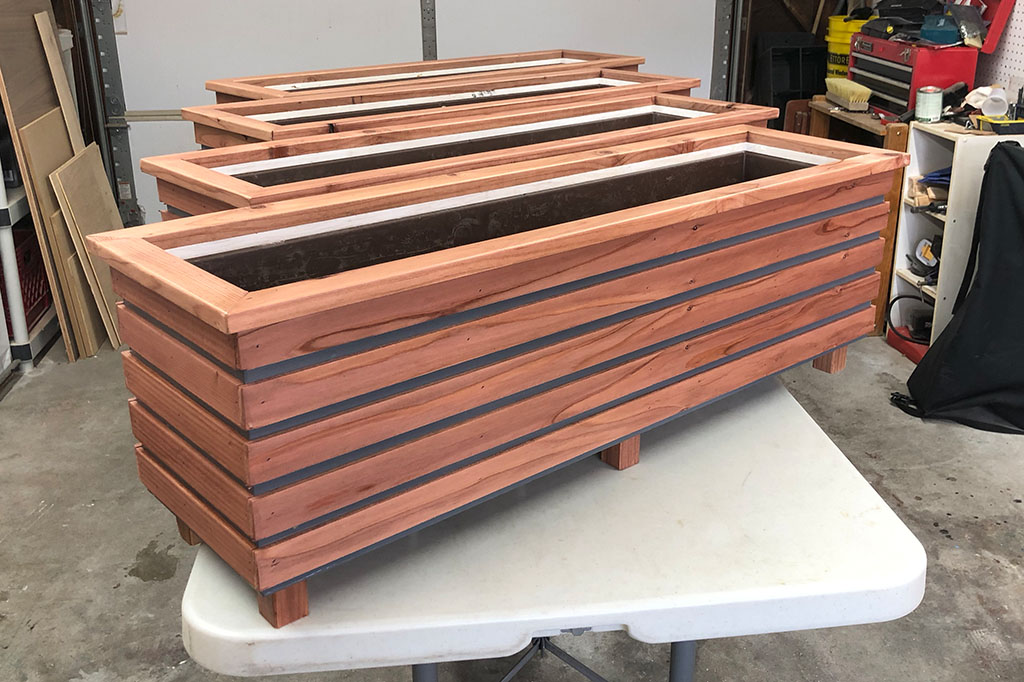
But I was able to use some of the excess wood to make a nice little lip around the top edge of each box. Here you can see the four boxes all lined up and ready for finishing. You can also see here how the brown plastic planter boxes fit inside the wooden boxes.
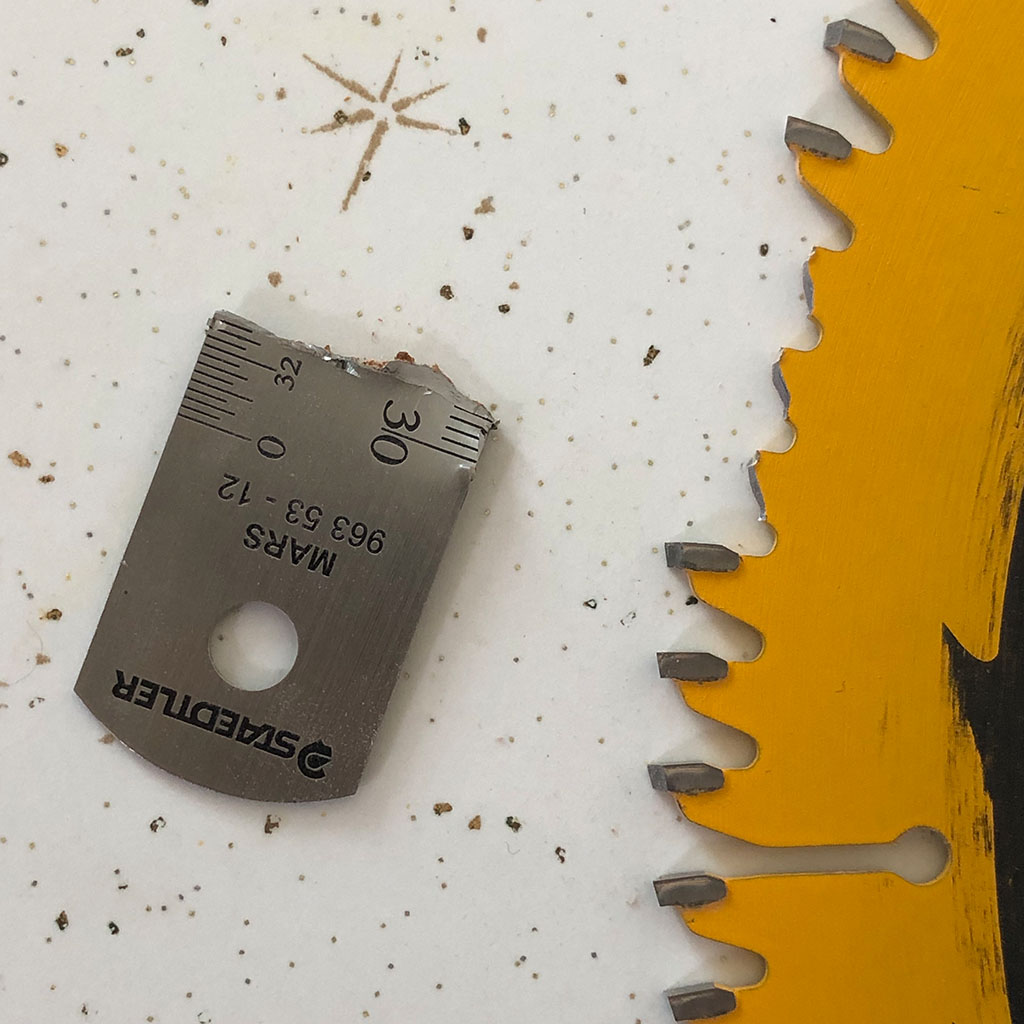
Just a reminder to double check your miter saw for non-wood items before make a quick cut. In this case, I missed the shiny metal ruler that I had left on the shiny metal saw. I put my wood right down on top of it and cost myself a $90 saw blade. Live and learn.
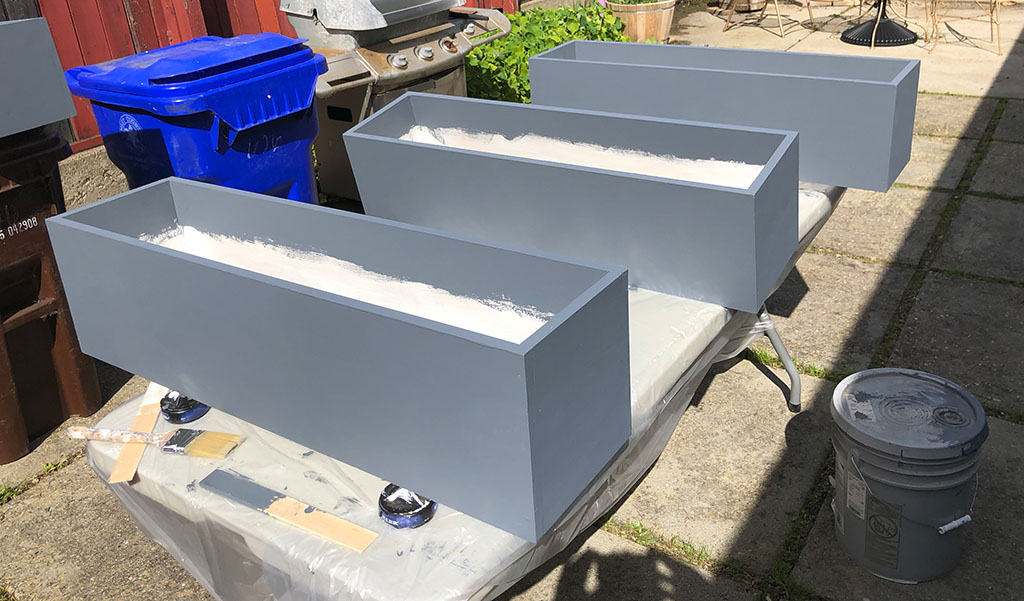
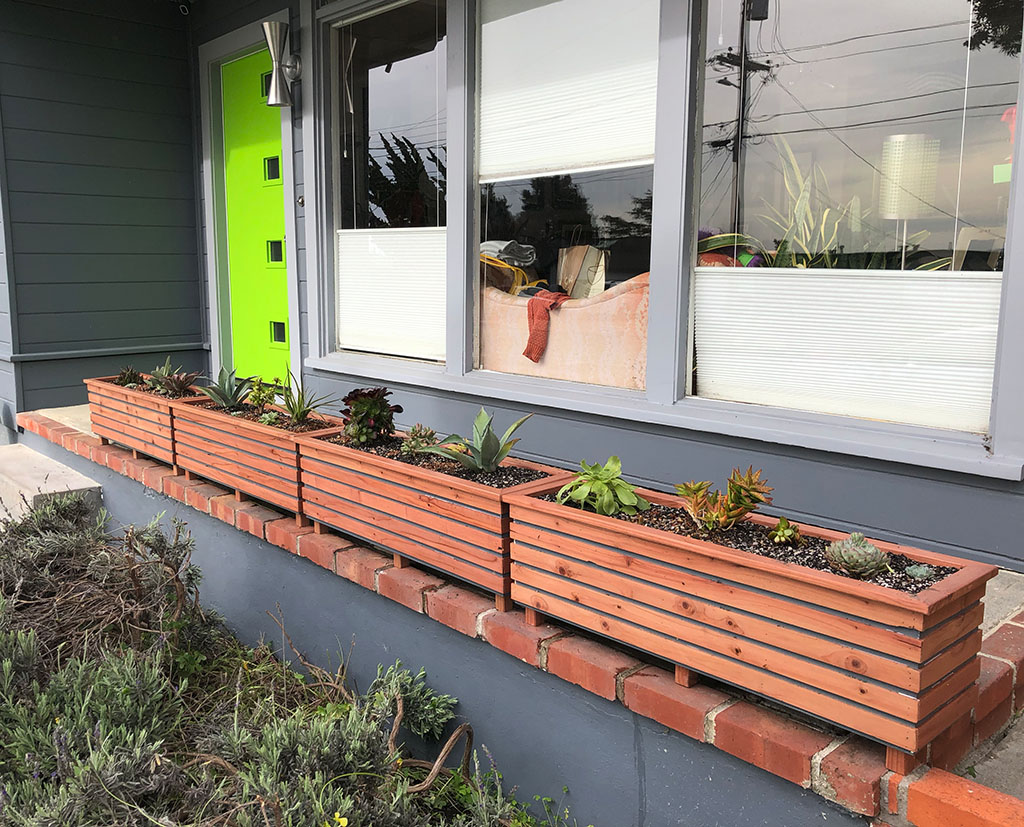
Here’s the final result, with some fresh new succulents planted in them.
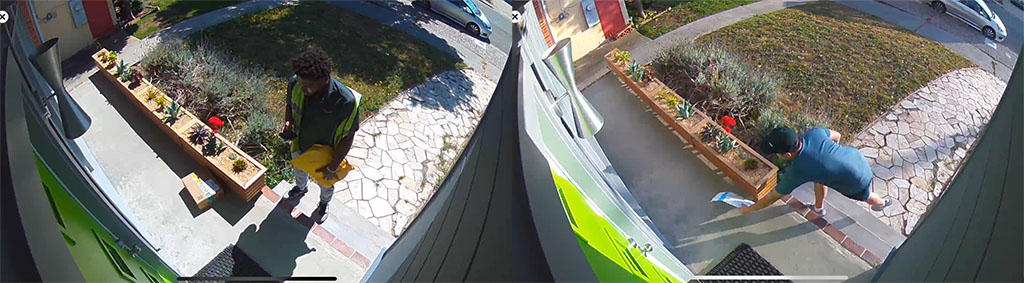
I’m happy to report that the delivery people have taken the hint and almost always put the packages behind the planters when no one is home.
This was a quick and easy project, using materials that are inexpensive and easy to find (although I did have to order the long plastic planter boxes from Amazon) and could easily be altered to fit most spaces.
Thanks for reading!
After some discussion with the wife, a bit of measuring and a quick mock-up on the computer, I settled on building some planter boxes that would run all the way across our front porch and both make things look nicer and give the delivery folks a place to hide small-to-medium packages.
This was a pretty quick and easy weekend project, using a sheet of plywood and a few pieces of construction redwood. The first order of business was to cut down the plywood to make the sides of the planter boxes.
Here you can see the boxes screwed together. The clamps are there to help glue back together the few places where the plywood split apart a bit at the edges (probably should have drilled larger pilot holes).
The idea was to have a plastic planter box nest inside the wooden boxes, so that the wood wasn’t in constant contact with the soil itself. That meant that I needed a lip inside the boxes for that plastic box to rest on. I cut the remaining plywood into narrow strips, as seen here.
The strips were then glued and screwed in place, and the screw holes filled. Here you can see the stack of boxes waiting for the filler to dry.
The next step was to prime the entire box, to make it a bit more weather-resistant, and then paint the outside surface to match the color of the house. We had a decent amount of leftover paint from painting the house, so all I had to do was dig the big bucket out of the shed and slap on a few coats.
The construction redwood that I mentioned earlier was to be milled square and then cut into strips that will be nailed to the sides of the boxes for ornamentation. I used the 2x4’s for that and the small square stock was to be cut down and made into little legs for the boxes, in order to get them up off the ground.
Once again, I did a poor job of documenting this part, but just imagine me running the 2x4’s through the planer to clean up the top and bottom surfaces and then ripping ¼” thick strips from those on the table saw. In the interest of keeping my fingers, I could only use about two thirds of each piece of wood, as beyond that it got a little dicey feeding the wood through the saw blade.
But I was able to use some of the excess wood to make a nice little lip around the top edge of each box. Here you can see the four boxes all lined up and ready for finishing. You can also see here how the brown plastic planter boxes fit inside the wooden boxes.
Just a reminder to double check your miter saw for non-wood items before make a quick cut. In this case, I missed the shiny metal ruler that I had left on the shiny metal saw. I put my wood right down on top of it and cost myself a $90 saw blade. Live and learn.
Here’s the final result, with some fresh new succulents planted in them.
I’m happy to report that the delivery people have taken the hint and almost always put the packages behind the planters when no one is home.
This was a quick and easy project, using materials that are inexpensive and easy to find (although I did have to order the long plastic planter boxes from Amazon) and could easily be altered to fit most spaces.
Thanks for reading!
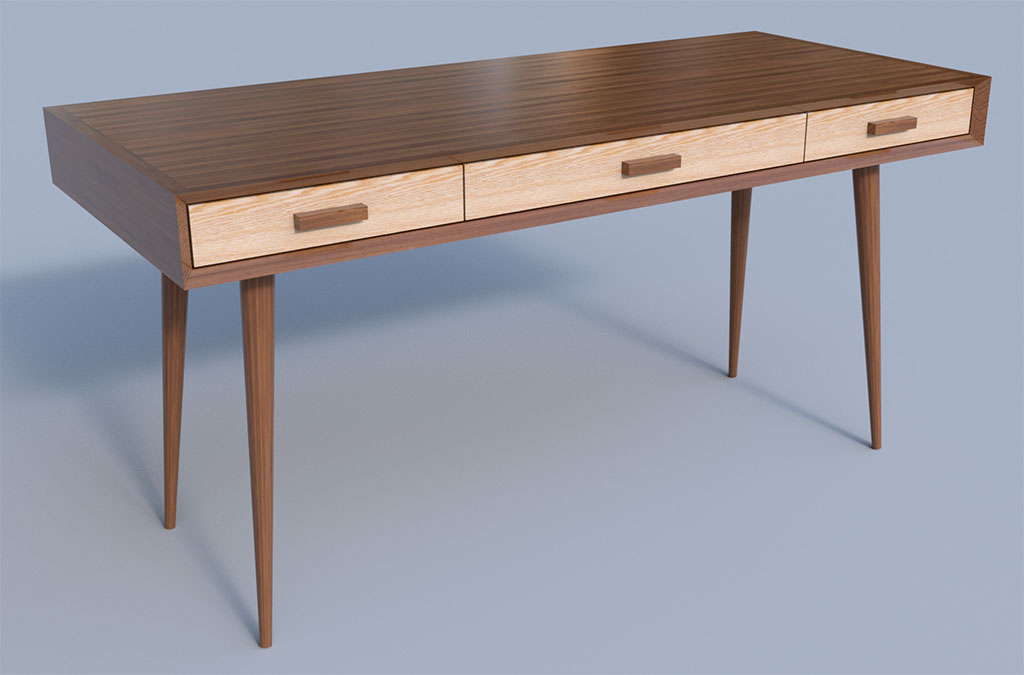
Mid-century Desk Build
17 - September - 2019 - 21:43
The reason for this project was that I had been searching for a new desk for years and never quite found the right mix of size, design and price. There were desks that I really liked the look of, but they were either too big for my small home office, or maybe the materials were not very good, or they were just too expensive. After seeing a few how-to videos for midcentury-styled desks, it occurred to me that perhaps I could simply build my own desk, and in the process build up my home woodworking tool set.
I spent some time measuring and confirming exactly how big I wanted the desk to be, researched designs a bit and settled on deriving my design from the desk that this fellow makes in his video:
https://www.youtube.com/watch?v=sOhE8-W2Ryk
I made a few changes, so that the plywood wouldn’t be on the corners, mostly for durability and opted for a much thicker front edge, so I could add the large bevel. I also decided to go with dowels as the primary fastener, because I like torturing myself, apparently.
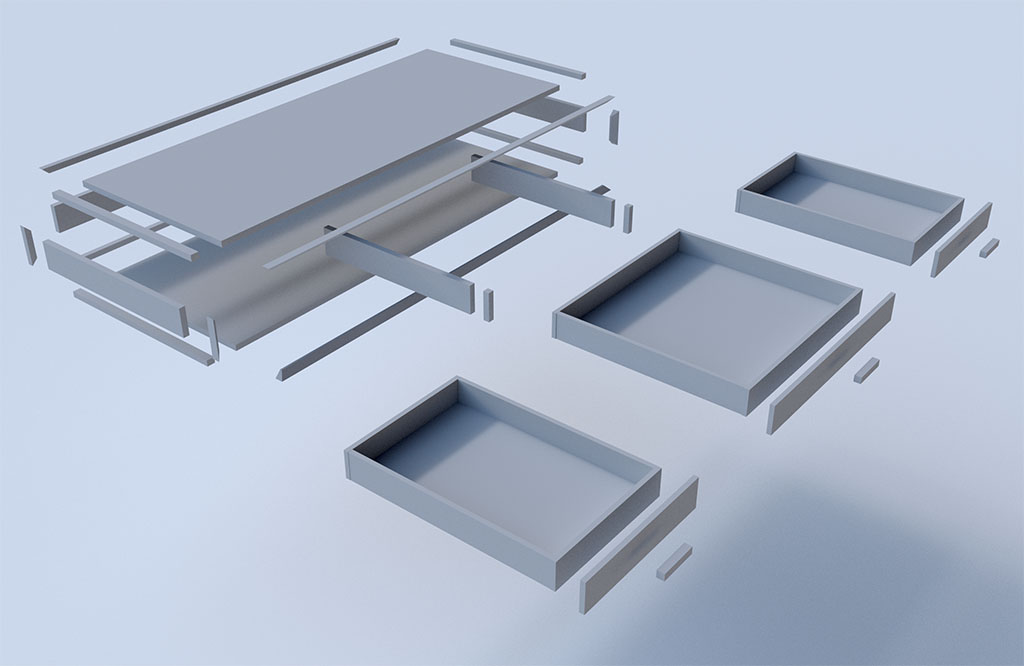
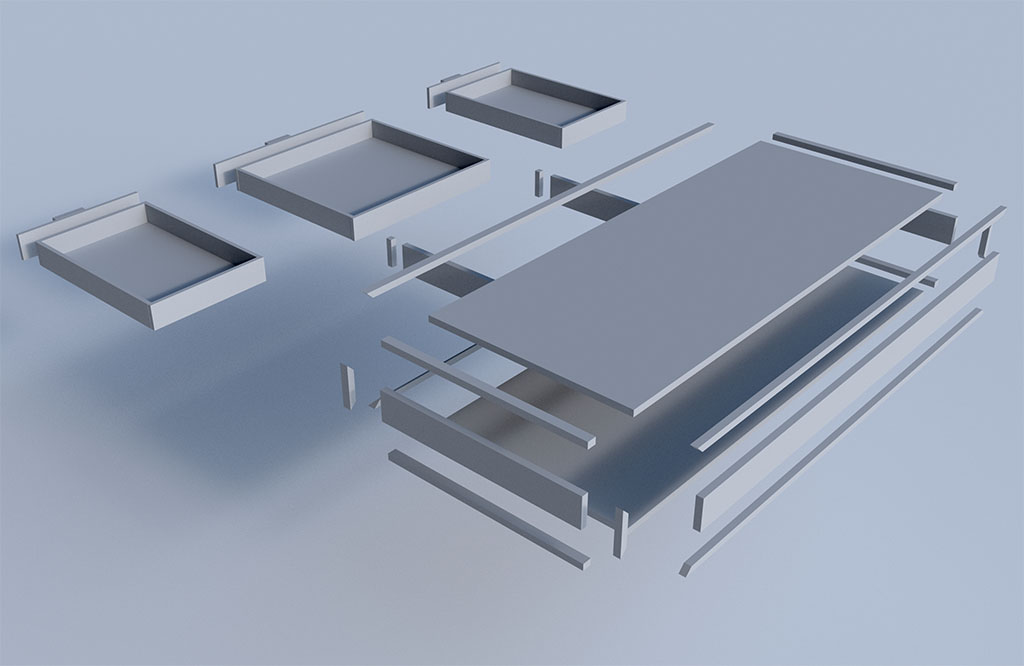
Anyhoo, here’s what I designed in the ol computer:
While I didn’t make myself proper plans, I did give myself a few exploded views to work from and then manually notated those with the important measurements.
After convincing my very-patient wife that I could instead spend the desk-buying money on tools and wood, I placed a few orders and waited for things to arrive.
Here’s what I used tools- and materials-wise for this project:
Tools
- Skilsaw worm-drive portable table saw (new)
- Delta 6” Jointer (new)
- Dewalt DW735x Planer (new)
- DeWalt 12in miter saw (already had)
- Porter Cable 2-1/4hp Router (already had)
- Dewalt 7-1/4” circular saw (already had)
- Makita finishing sander (already had)
- Misc drills, drivers, etc
Materials
- 4x8’ sheet of walnut veneer plywood
- A roughly 10' x 8" piece of 4/4 walnut, rough-sawn.
- A roughly 4' x 8" piece of 3/4" spalted birds eye maple, for the drawer fronts
- Set of walnut legs and angled brackets from tablelegs.com (https://tinyurl.com/y2u48799)
- Pre-finished ½” drawer side plywood (I forgot the exact amount)
- Three 2x4’ sheets of ¼” plywood for the drawer bottoms
- Approx 10’ x 8” piece of 4/4 walnut
- Approx 4’ x 8” piece of birdseye maple
- Drawer slides and pulls
- Strong sense of adventure
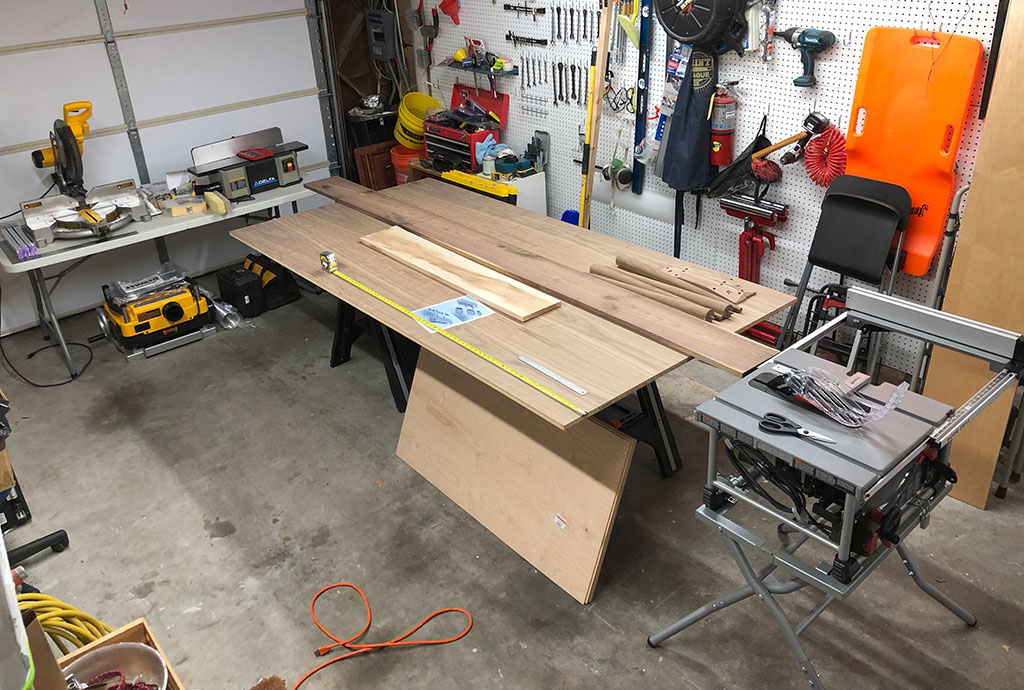
First order of business was ripping the big sheet of plywood down into the top and bottom pieces. This took a bit of help from the afore-mentioned patient wife, since my table saw is far smaller than a sheet of plywood. Once it was cut down a bit, I hopped right into milling down the walnut to final thickness (going to mention why NOT to do this in a bit), and cutting and doweling the edges and corners.
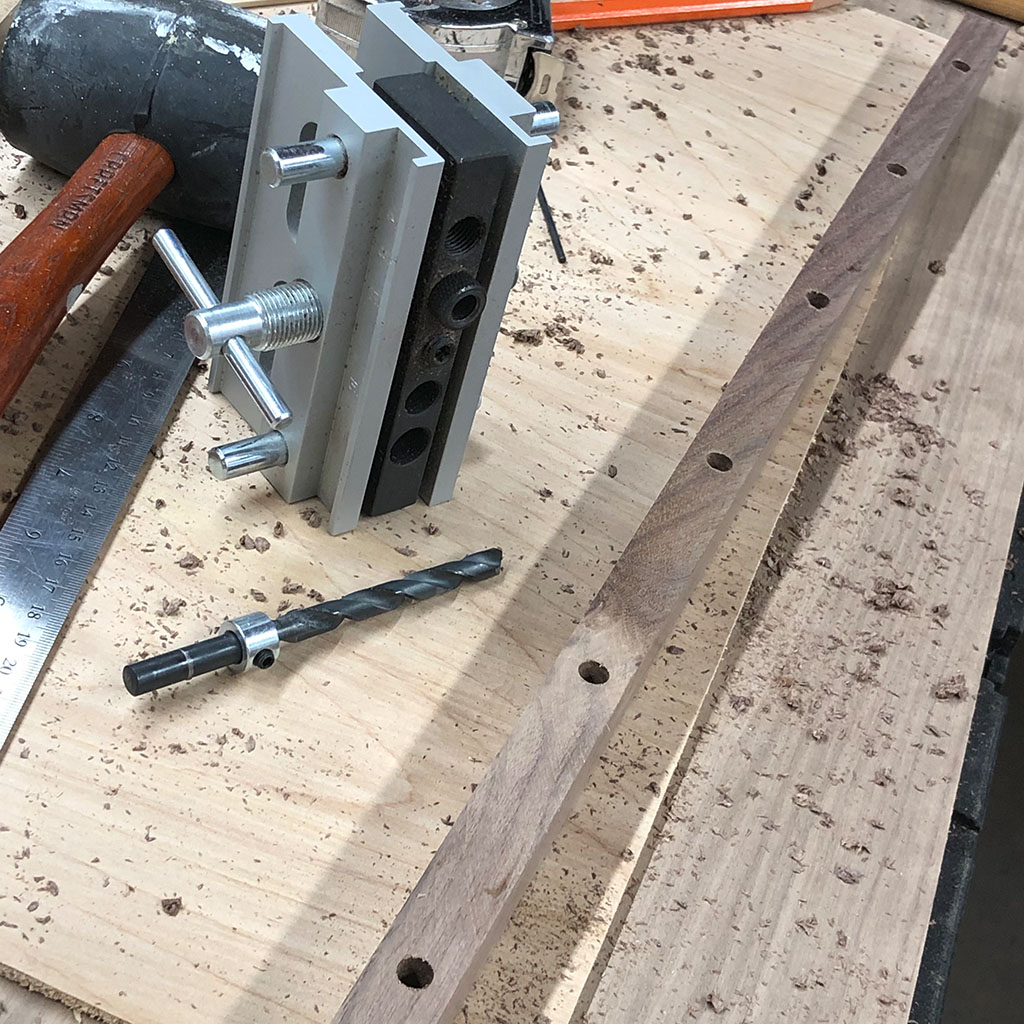
Here you can see the doweling jig that I was using to center the holes.
I used these handy Bandy Clamps from Rockler (https://www.rockler.com/rockler-bandy-clamps
) to attach the corners and in this photo you can see why I say to NOT mill your wood to final thickness right away. What I SHOULD have done it leave it a bit thicker, glue it on and then plane it down, in order to avoid the plywood being a bit higher, as you can see on the right side below. This is also how I found that the doweling jig is a bit of a beast in that it always seems to be just a little off, so you need to build with that in mind and give yourself extra wood to shave down later. Ah well, live and learn.

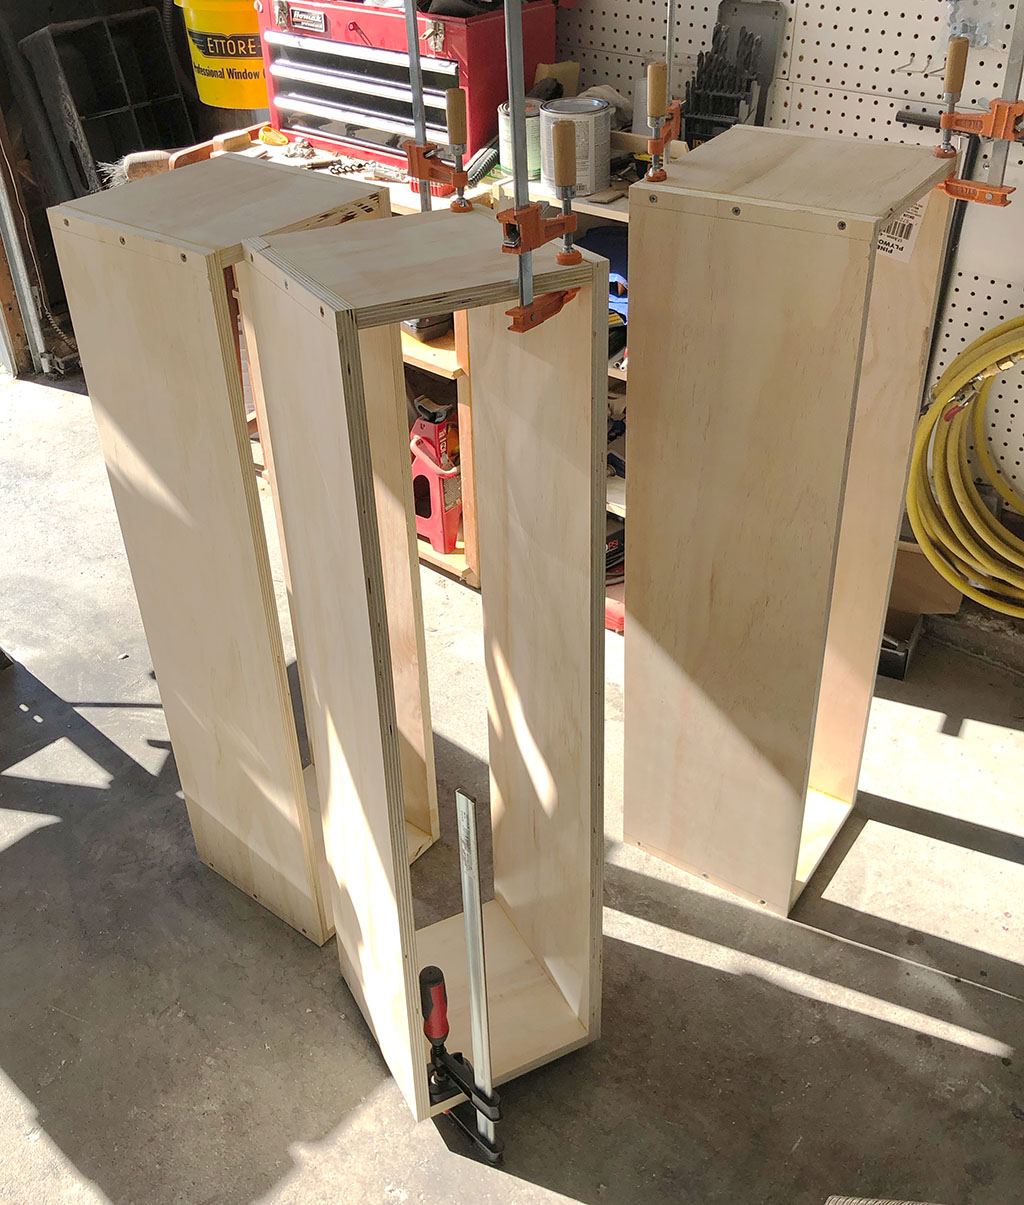
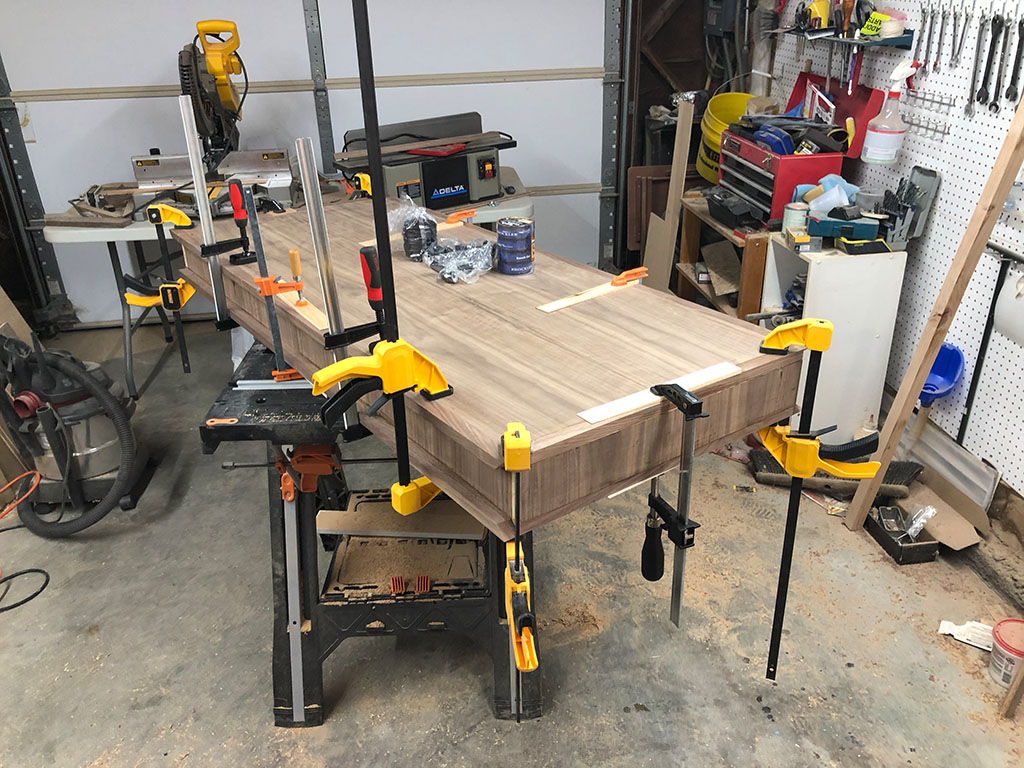
Below you can see the top and bottom pieces with the edging glued on. This is also when I discovered that I need roughly 800 more clamps than I currently owned. What is also visible here are the end pieces of plywood that will eventually give the desk its thickness.
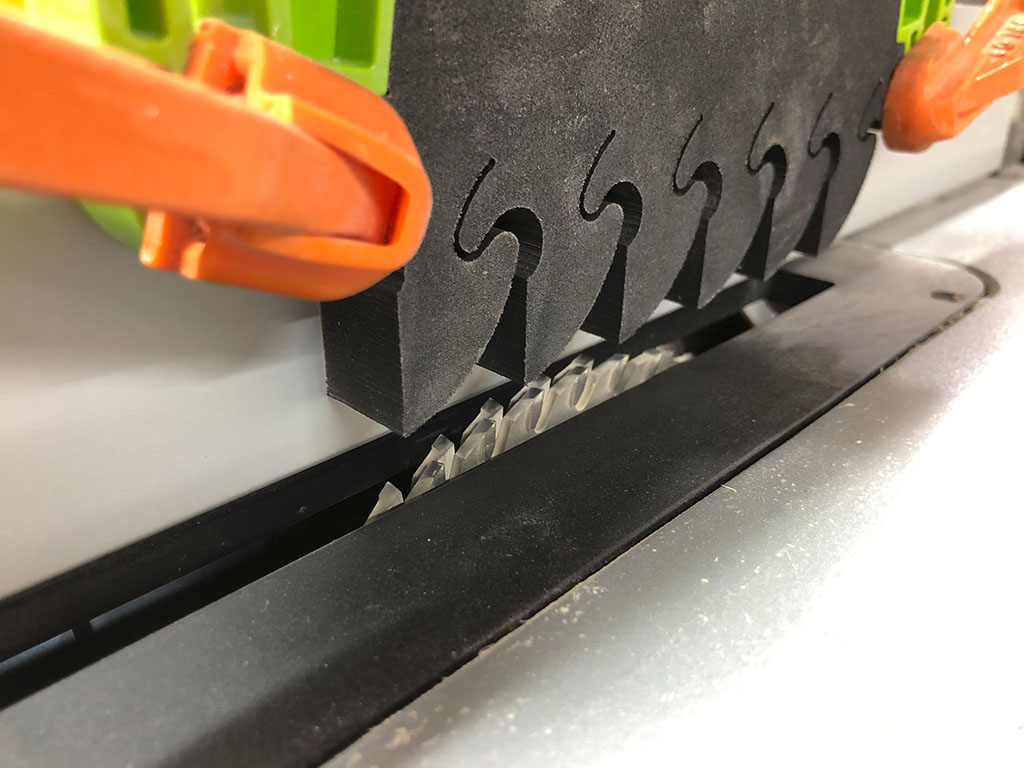
But before the desk gets put together, I opted to make my life a little easier and try to get the drawers all built and fit, since this would be far easier with no top on the desk. I cut all the drawer sides to length and width on the table saw and miter saw and then set up the table saw with a dado blade in order to cut the grooves for the drawer bottoms.
Here you can see the dado setup and feather board for safety. I also just learned a few weeks ago that dado blades are illegal in Europe for safety reasons. Interesting!
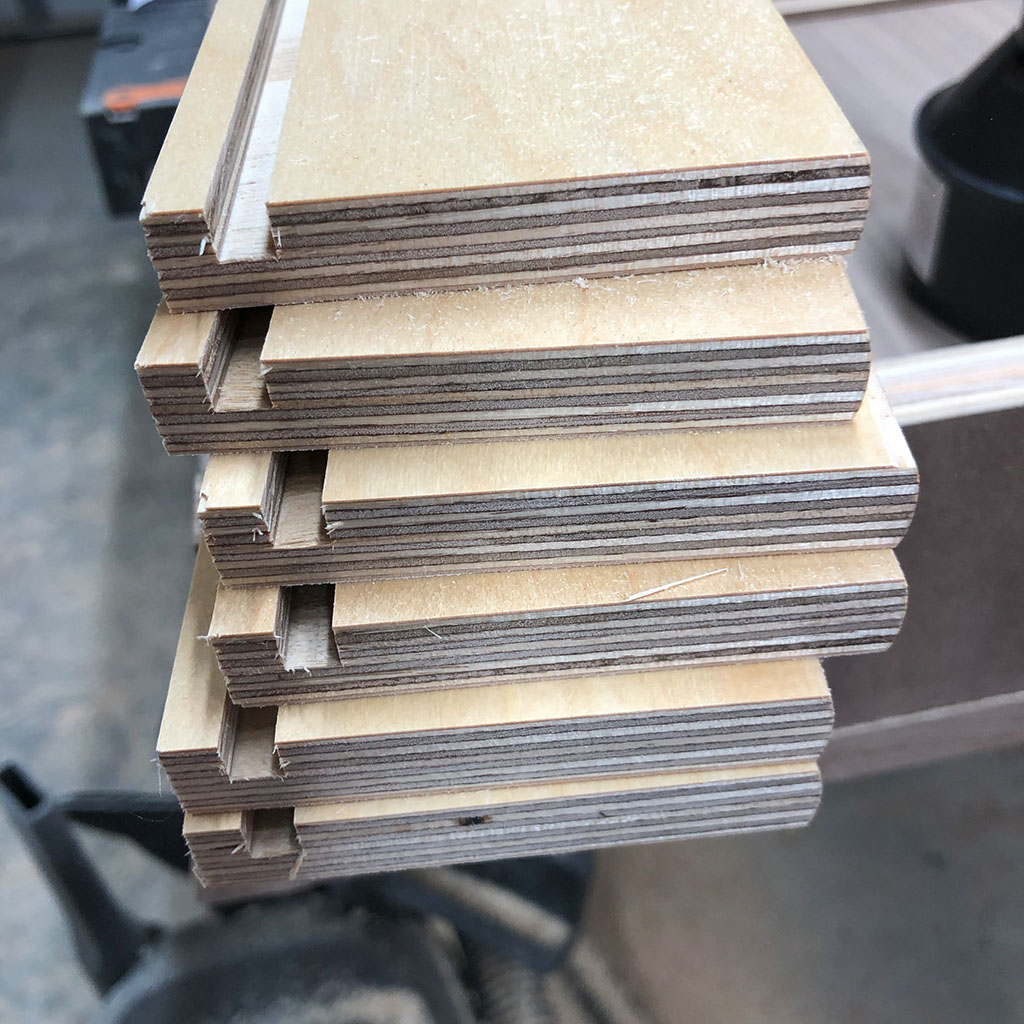
Here’s the freshly cut drawer sides. The plywood that I bought for these was prefinished and had the edges rounded over (right edges in the photo). I cut the drawer sides as to always take advantage of this rounded edge, so that the top edge of each drawer had this nice rounded and finished surface.
I found that using my one-car garage as a wood shop has a few disadvantages. There is no dust collection, and living in a fairly dense neighborhood, I wanted to keep the doors closed in order to keep the sound from being too disruptive. As a result, the air gets pretty thick with dust and it’s also extremely loud in the small enclosed space.
Here I am all dolled up in my dust and noise protection gear.

With the drawer boxes assembled, I placed them in the desk in order to figure out placement of the drawer slides. I simply had some 1/8” thick pieces of wood that I used to set the heights so that I could measure where the slides should be on the boxes.
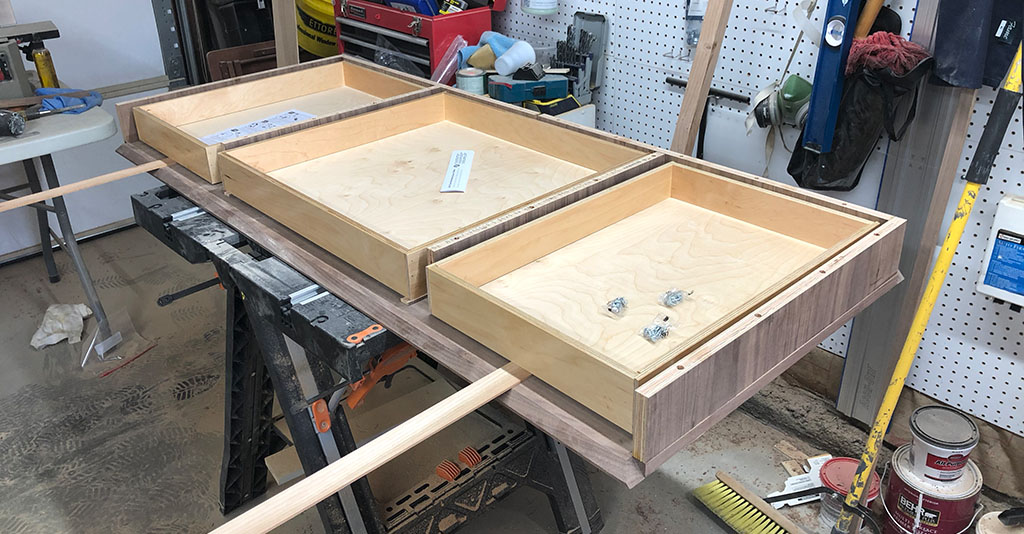
Here you can see the slides in place and me getting prepared to glue all the dowels in place before gluing on the top. Also note how much saw dust is all over everything in the background.
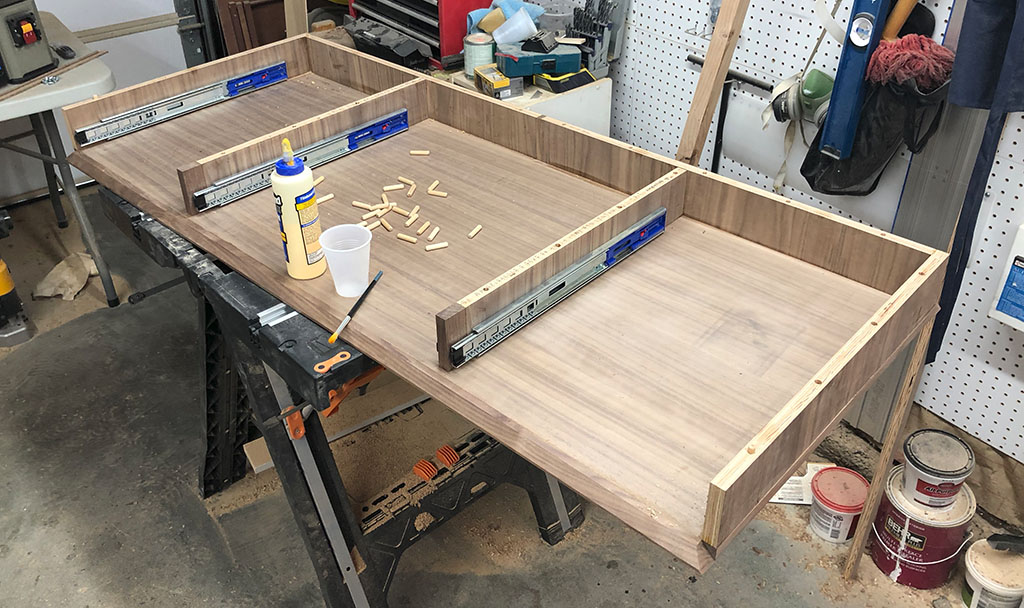
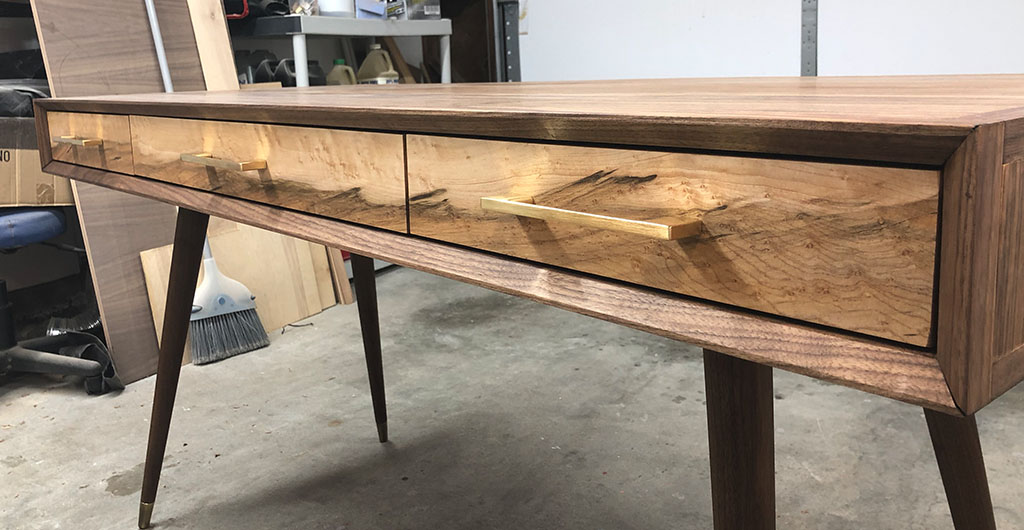
Back to the drawers. Here you can see the milled and sized birdseye maple glued to the front of the drawer boxes.
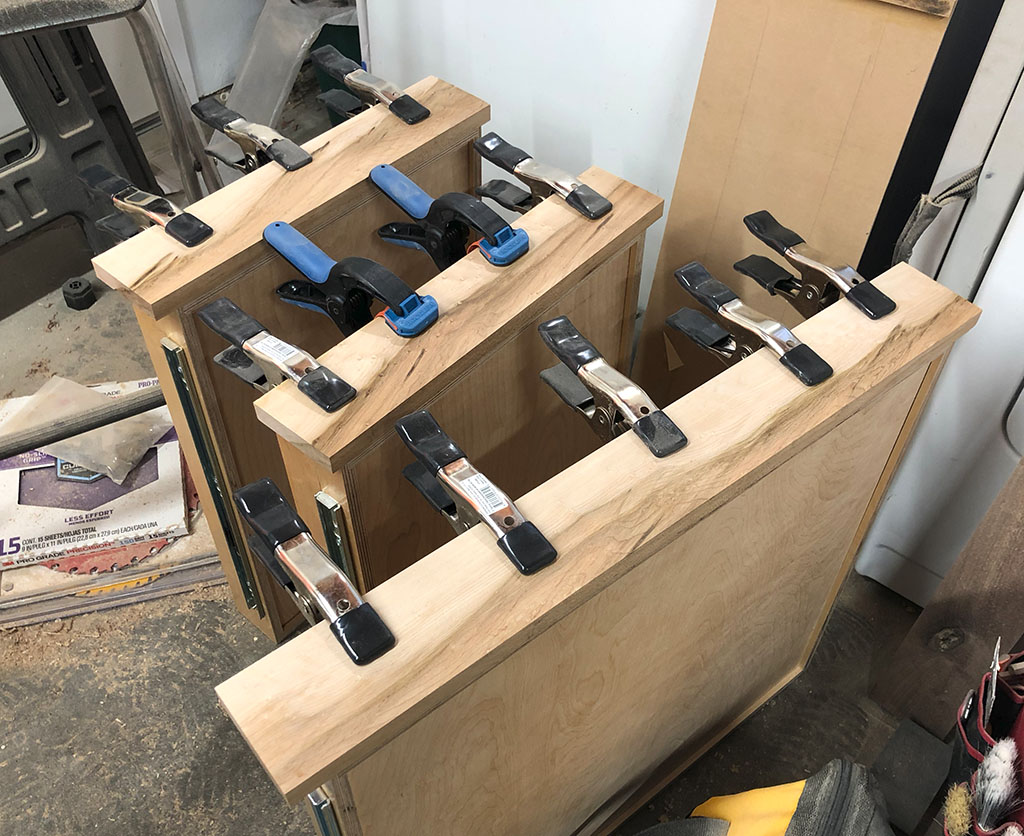
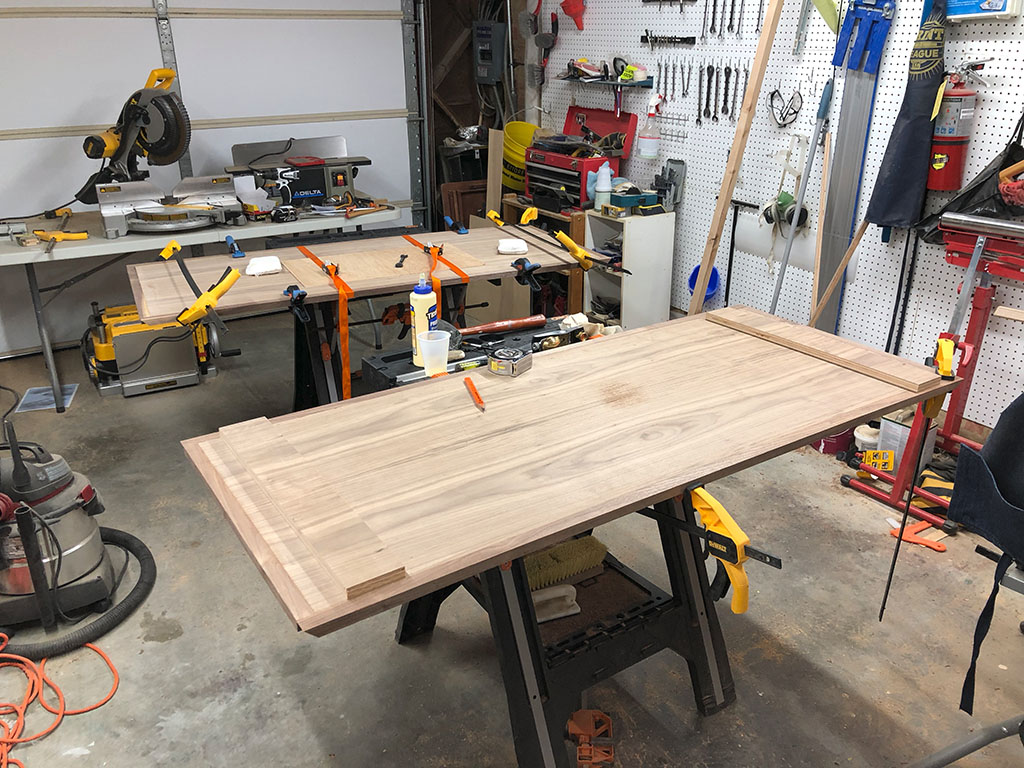
The big glue-up! Here’s where the top and bottom came together and where I still had FAR too few clamps. This was actually pretty straightforward, since the dowels kept everything pretty well in line.
Here’s the big gap in my pictures. Since I hadn’t really intended to write a blog post about this project, I didn’t do a very good job of documenting the steps involved with attaching the legs and the finishing process.
Somewhere in here was also the routing of the front lip, in order to give it the bevel. I don’t have a router table, so this was done freehand with the edge attached to the desk. It really taught me that I need a router table ;-) There are a few bumps where the router wiggled, but it still turned out well overall.
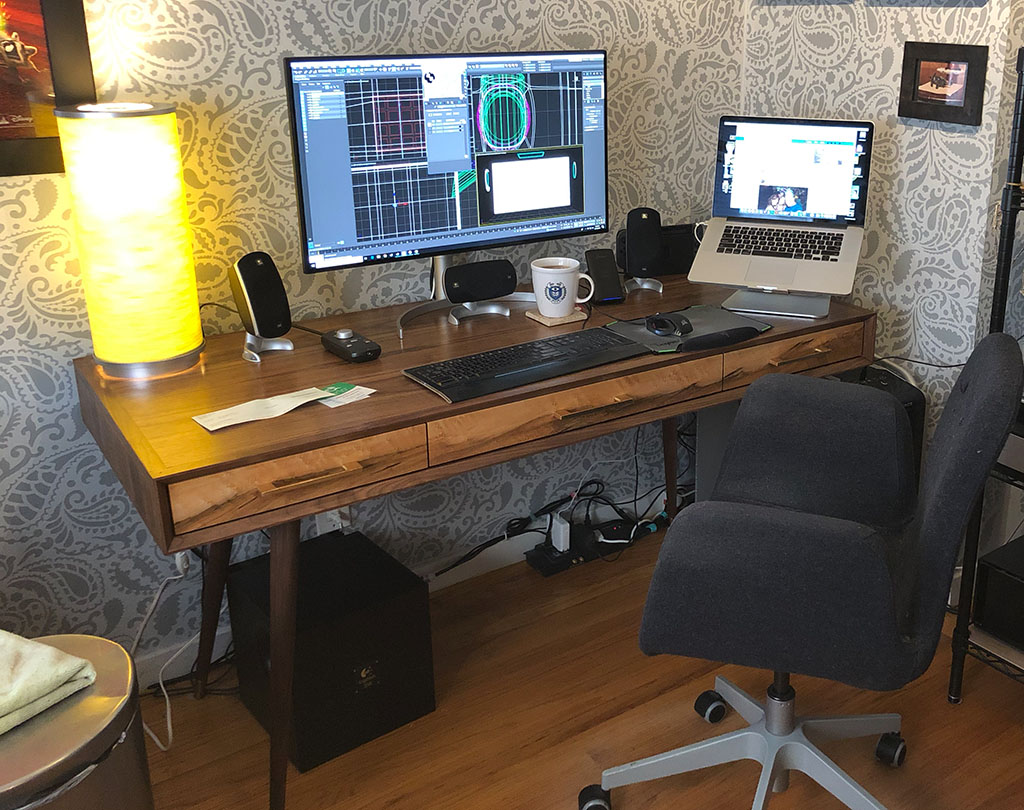
The legs were actually quite simple to attach. The cleats that they came with just screw right to the bottom of the desk, in a position such that they do not stick out further than the edge of the desk (since they are slightly splayed out). I posted photos of the completed desk on reddit and got a few questions about the strength of the splayed legs, and so far they seem super strong. The cleats are large and solid walnut, so there is very little give.
I decided to go with Danish Oil as the finish , in order for it to not be too glossy and have it still feel like natural wood, more or less. I applied four coats (I think), sanding with 400 grit between the first couple and then ‘wet sanding’ with 800-grit using the Danish Oil as the water and I was pretty happy with that finish. I then read a suggestion to put a few coats of furniture wax over top and that’s where I ended up.
Finally the drawer pulls were attached and the little metal feets attached to the legs.
Here’s the final result, with just the Danish Oil applied
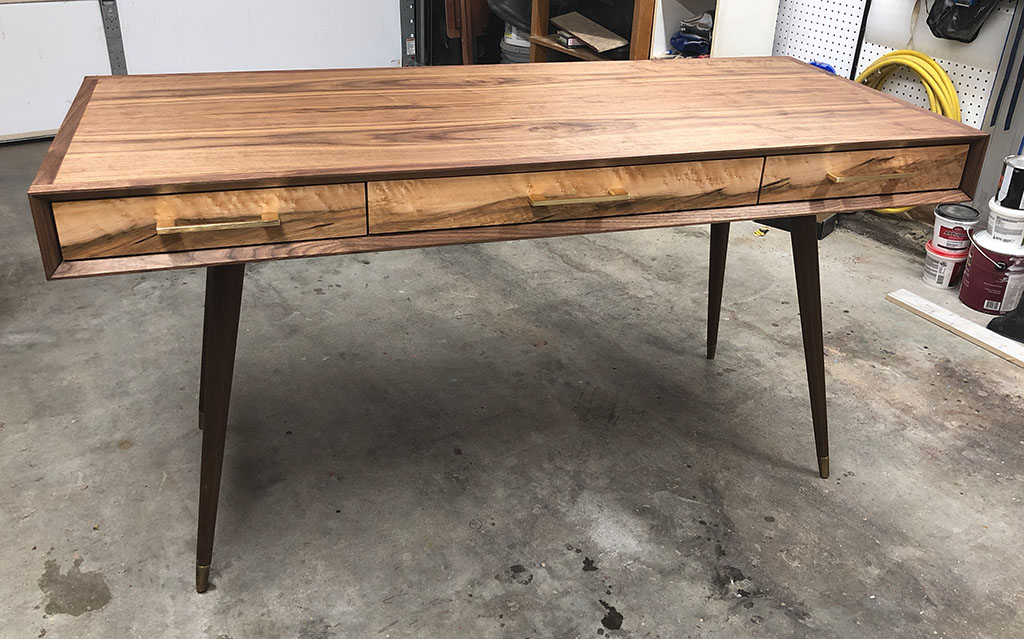
Here’s the final FINAL result, in place, with a few coats of furniture wax
Overall, I learned a ton about woodworking during this project and also learned that there is MUCH more to learn. The biggest takeaway for me was getting into the habit of squaring up all my tools before I use them and after I adjust them. Those front corners would be much tighter if I had noticed that my miter saw had gotten a degree or two out of square.
I’ve only just scratched the surface of working with wood, but also I have found that it is something that I really enjoy, so look for more woodworking projects (with more thorough documentation) here in the future!
Thanks for reading!
I spent some time measuring and confirming exactly how big I wanted the desk to be, researched designs a bit and settled on deriving my design from the desk that this fellow makes in his video:
https://www.youtube.com/watch?v=sOhE8-W2Ryk
I made a few changes, so that the plywood wouldn’t be on the corners, mostly for durability and opted for a much thicker front edge, so I could add the large bevel. I also decided to go with dowels as the primary fastener, because I like torturing myself, apparently.
Anyhoo, here’s what I designed in the ol computer:
While I didn’t make myself proper plans, I did give myself a few exploded views to work from and then manually notated those with the important measurements.
After convincing my very-patient wife that I could instead spend the desk-buying money on tools and wood, I placed a few orders and waited for things to arrive.
Here’s what I used tools- and materials-wise for this project:
Tools
- Skilsaw worm-drive portable table saw (new)
- Delta 6” Jointer (new)
- Dewalt DW735x Planer (new)
- DeWalt 12in miter saw (already had)
- Porter Cable 2-1/4hp Router (already had)
- Dewalt 7-1/4” circular saw (already had)
- Makita finishing sander (already had)
- Misc drills, drivers, etc
Materials
- 4x8’ sheet of walnut veneer plywood
- A roughly 10' x 8" piece of 4/4 walnut, rough-sawn.
- A roughly 4' x 8" piece of 3/4" spalted birds eye maple, for the drawer fronts
- Set of walnut legs and angled brackets from tablelegs.com (https://tinyurl.com/y2u48799)
- Pre-finished ½” drawer side plywood (I forgot the exact amount)
- Three 2x4’ sheets of ¼” plywood for the drawer bottoms
- Approx 10’ x 8” piece of 4/4 walnut
- Approx 4’ x 8” piece of birdseye maple
- Drawer slides and pulls
- Strong sense of adventure
First order of business was ripping the big sheet of plywood down into the top and bottom pieces. This took a bit of help from the afore-mentioned patient wife, since my table saw is far smaller than a sheet of plywood. Once it was cut down a bit, I hopped right into milling down the walnut to final thickness (going to mention why NOT to do this in a bit), and cutting and doweling the edges and corners.
Here you can see the doweling jig that I was using to center the holes.
I used these handy Bandy Clamps from Rockler (https://www.rockler.com/rockler-bandy-clamps
) to attach the corners and in this photo you can see why I say to NOT mill your wood to final thickness right away. What I SHOULD have done it leave it a bit thicker, glue it on and then plane it down, in order to avoid the plywood being a bit higher, as you can see on the right side below. This is also how I found that the doweling jig is a bit of a beast in that it always seems to be just a little off, so you need to build with that in mind and give yourself extra wood to shave down later. Ah well, live and learn.
Below you can see the top and bottom pieces with the edging glued on. This is also when I discovered that I need roughly 800 more clamps than I currently owned. What is also visible here are the end pieces of plywood that will eventually give the desk its thickness.
But before the desk gets put together, I opted to make my life a little easier and try to get the drawers all built and fit, since this would be far easier with no top on the desk. I cut all the drawer sides to length and width on the table saw and miter saw and then set up the table saw with a dado blade in order to cut the grooves for the drawer bottoms.
Here you can see the dado setup and feather board for safety. I also just learned a few weeks ago that dado blades are illegal in Europe for safety reasons. Interesting!
Here’s the freshly cut drawer sides. The plywood that I bought for these was prefinished and had the edges rounded over (right edges in the photo). I cut the drawer sides as to always take advantage of this rounded edge, so that the top edge of each drawer had this nice rounded and finished surface.
I found that using my one-car garage as a wood shop has a few disadvantages. There is no dust collection, and living in a fairly dense neighborhood, I wanted to keep the doors closed in order to keep the sound from being too disruptive. As a result, the air gets pretty thick with dust and it’s also extremely loud in the small enclosed space.
Here I am all dolled up in my dust and noise protection gear.
With the drawer boxes assembled, I placed them in the desk in order to figure out placement of the drawer slides. I simply had some 1/8” thick pieces of wood that I used to set the heights so that I could measure where the slides should be on the boxes.
Here you can see the slides in place and me getting prepared to glue all the dowels in place before gluing on the top. Also note how much saw dust is all over everything in the background.
Back to the drawers. Here you can see the milled and sized birdseye maple glued to the front of the drawer boxes.
The big glue-up! Here’s where the top and bottom came together and where I still had FAR too few clamps. This was actually pretty straightforward, since the dowels kept everything pretty well in line.
Here’s the big gap in my pictures. Since I hadn’t really intended to write a blog post about this project, I didn’t do a very good job of documenting the steps involved with attaching the legs and the finishing process.
Somewhere in here was also the routing of the front lip, in order to give it the bevel. I don’t have a router table, so this was done freehand with the edge attached to the desk. It really taught me that I need a router table ;-) There are a few bumps where the router wiggled, but it still turned out well overall.
The legs were actually quite simple to attach. The cleats that they came with just screw right to the bottom of the desk, in a position such that they do not stick out further than the edge of the desk (since they are slightly splayed out). I posted photos of the completed desk on reddit and got a few questions about the strength of the splayed legs, and so far they seem super strong. The cleats are large and solid walnut, so there is very little give.
I decided to go with Danish Oil as the finish , in order for it to not be too glossy and have it still feel like natural wood, more or less. I applied four coats (I think), sanding with 400 grit between the first couple and then ‘wet sanding’ with 800-grit using the Danish Oil as the water and I was pretty happy with that finish. I then read a suggestion to put a few coats of furniture wax over top and that’s where I ended up.
Finally the drawer pulls were attached and the little metal feets attached to the legs.
Here’s the final result, with just the Danish Oil applied
Here’s the final FINAL result, in place, with a few coats of furniture wax
Overall, I learned a ton about woodworking during this project and also learned that there is MUCH more to learn. The biggest takeaway for me was getting into the habit of squaring up all my tools before I use them and after I adjust them. Those front corners would be much tighter if I had noticed that my miter saw had gotten a degree or two out of square.
I’ve only just scratched the surface of working with wood, but also I have found that it is something that I really enjoy, so look for more woodworking projects (with more thorough documentation) here in the future!
Thanks for reading!
Building Raised Garden Beds
14 - September - 2019 - 19:39
The soil in our back yard is fairly awful. It’s very clay-heavy and previous attempts at trying to grow things like carrots did not turn out well. Instead we ended up with horror movie prop carrots, like so (eyes added for extra horror):

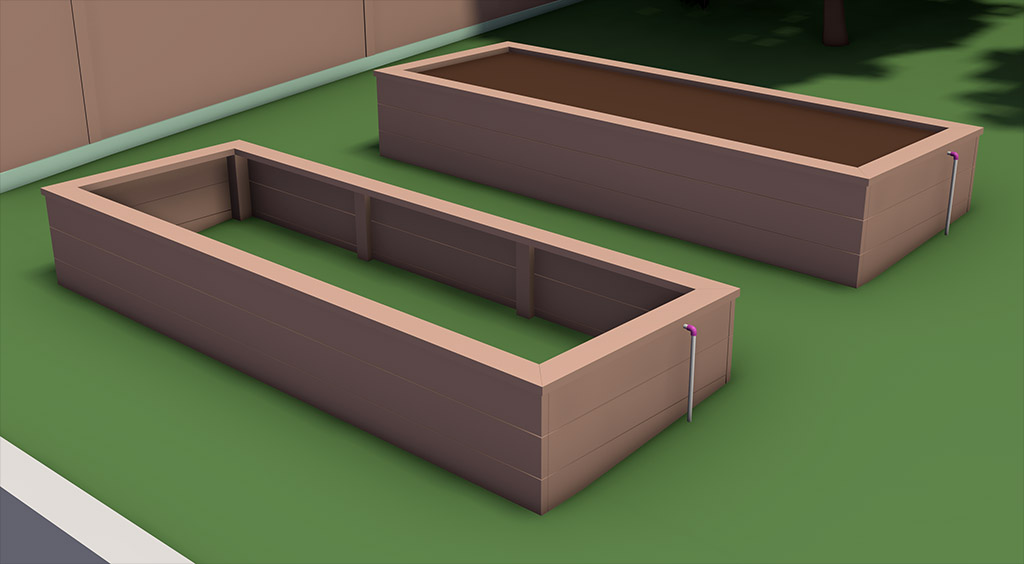
As a result, we decided to put some time and money into building raised beds, so we could have better soil and easier access to the garden (and less lawn to mow). I wanted to keep it fairly simple, but still have them look nice, provide plenty of planting space and I had a hunch that I could tap into the existing back yard sprinkler system in order to automate irrigation. With those things in mind, I mocked up my back yard and proposed garden beds in a 3d modeling package, and got something like this:
That also allowed me to figure out how much wood I would need and in what dimensions, so I could order it from the lumber yard. The sides of the beds were to be made from 12’ long 2x8’s and the caps are 2x6’s, with 4x4 posts for the corners and 2x4 braces. I choose to go with all redwood on this projects, since all of the wood was to be in constant contact with soil and weather. Since I planned on growing food in these beds, I didn’t want to go with pressure-treated lumber, due to concerns about the chemicals leeching into the soil over time.
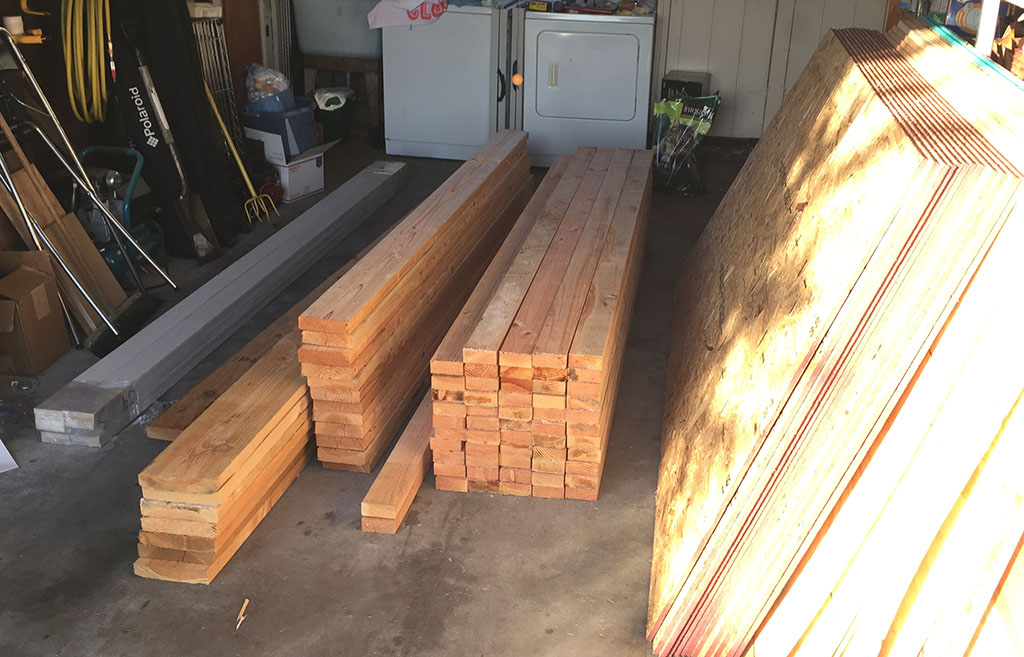
Here’s my starting lumber pile in the garage:
I set myself up a miter station in the back yard and also measured out where exactly the beds were to be located (those little blue flags in the background are my makeshift corner markers.
I also knew that I wanted the beds to be level, but the entire back yard has a slope to it. This meant digging into the yard so that the front edge of each bed would meet the ground and the back edge would go down into the soil. Here you can see my process. I put two of the posts and one cross bar together, so that I could dig into the ground and get it level.
I did the same thing for the far end, and after a great deal of digging, got the long boards in place and leveled as well.
At the end of the first day, I had the two beds in place and mostly put together. Each of these measures about 12’ long by 4’ wide.
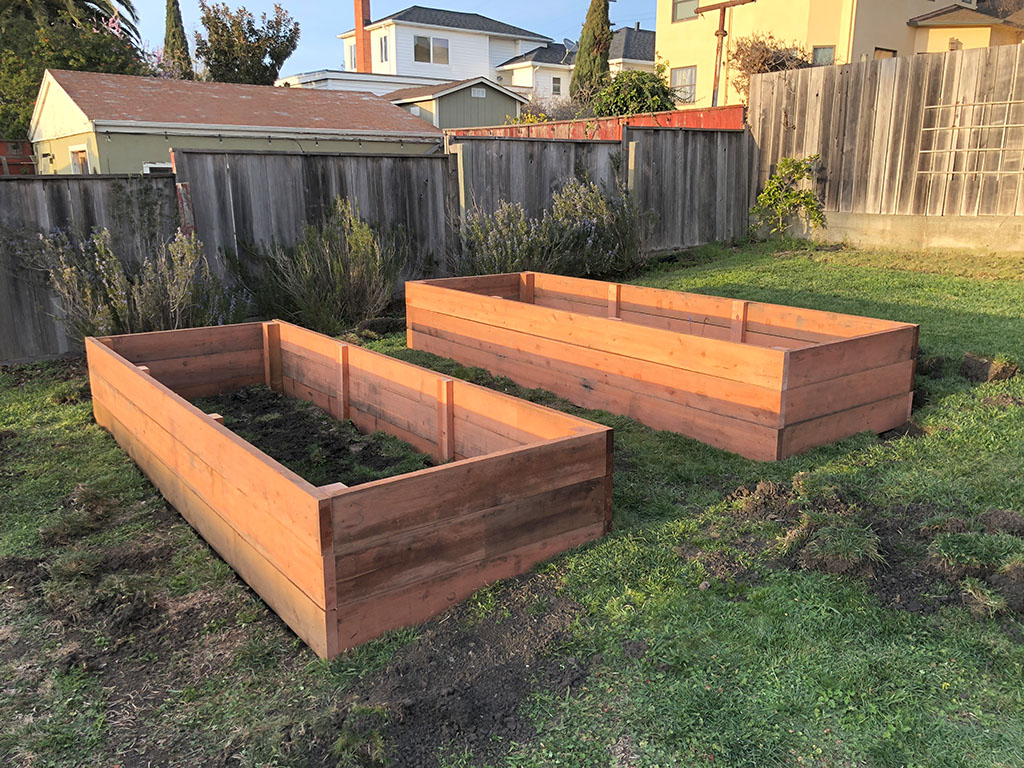
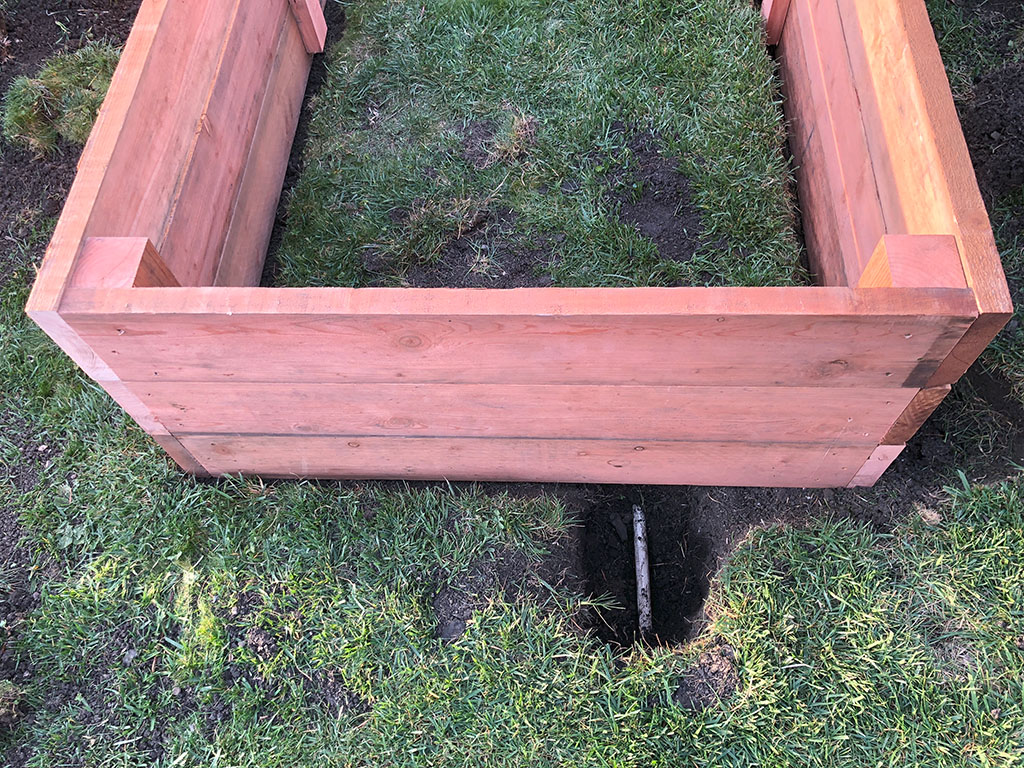
During that digging, I also figured out where the underground sprinkler pipe should be and dug down to it for later access. Here you can see how it runs underneath one of the beds.
The next day I added the caps, mostly to make the beds a little more comfortable to use. My wife and I also spent a few hours sanding the exteriors of the beds in order to smooth them out a bit and make the redwood a bit nicer to look at. Here you can see the sanded beds.
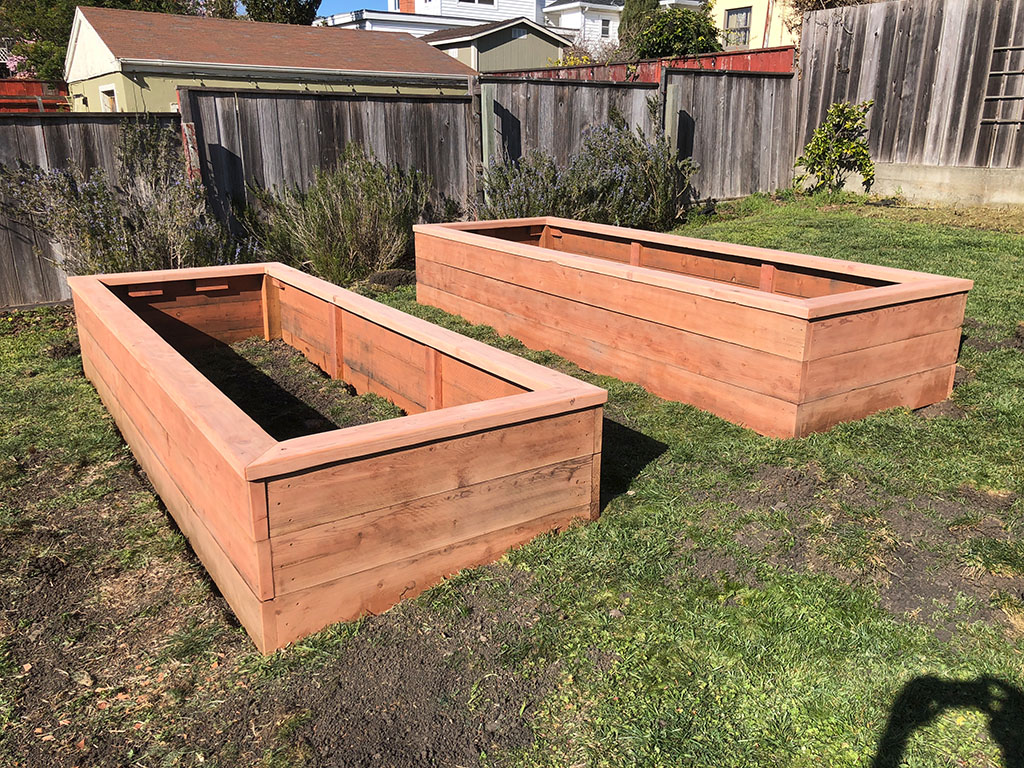
And an end view to show the change in elevation vs the ground.
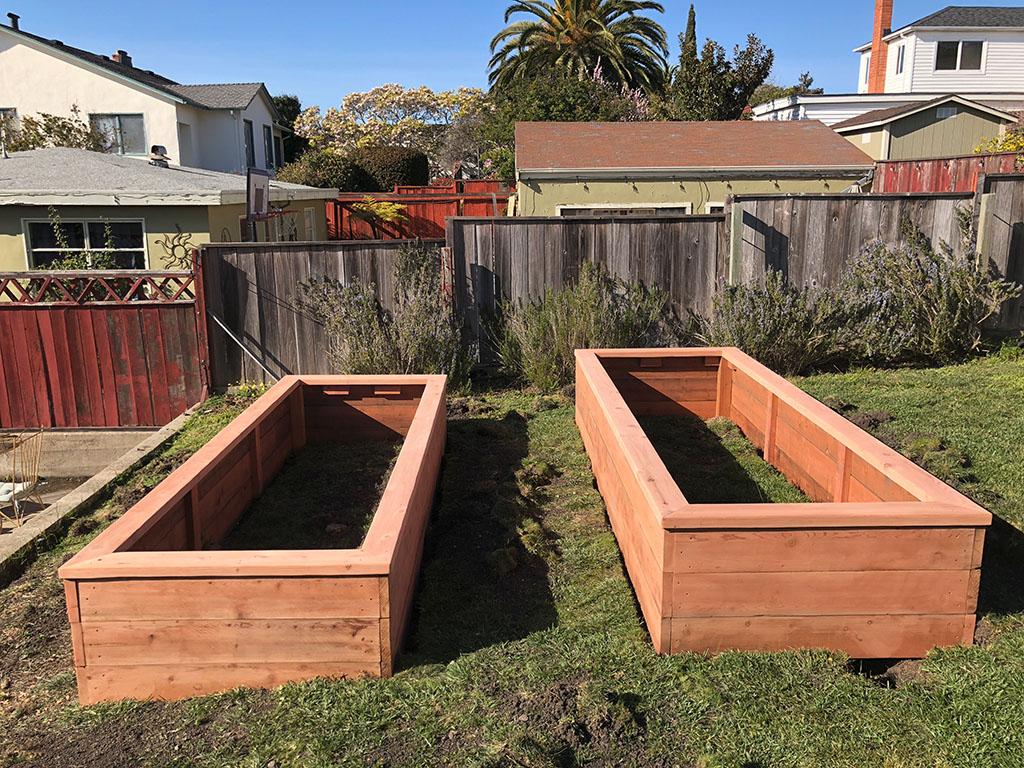
A week or so later this truck showed up and dumped a couple cubic yards of garden soil onto a tarp in our driveway. It turns out that it takes a LOT of soil to fill two 12x4’ beds.
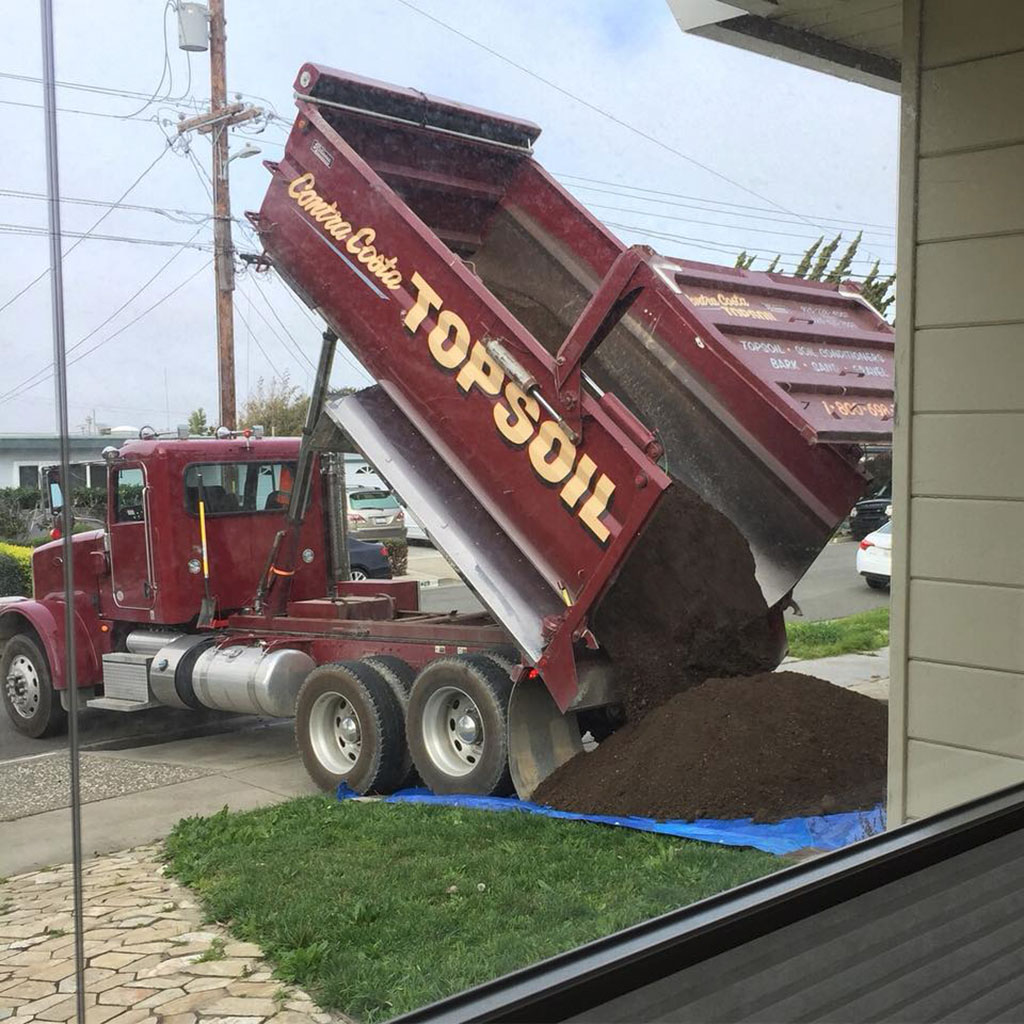
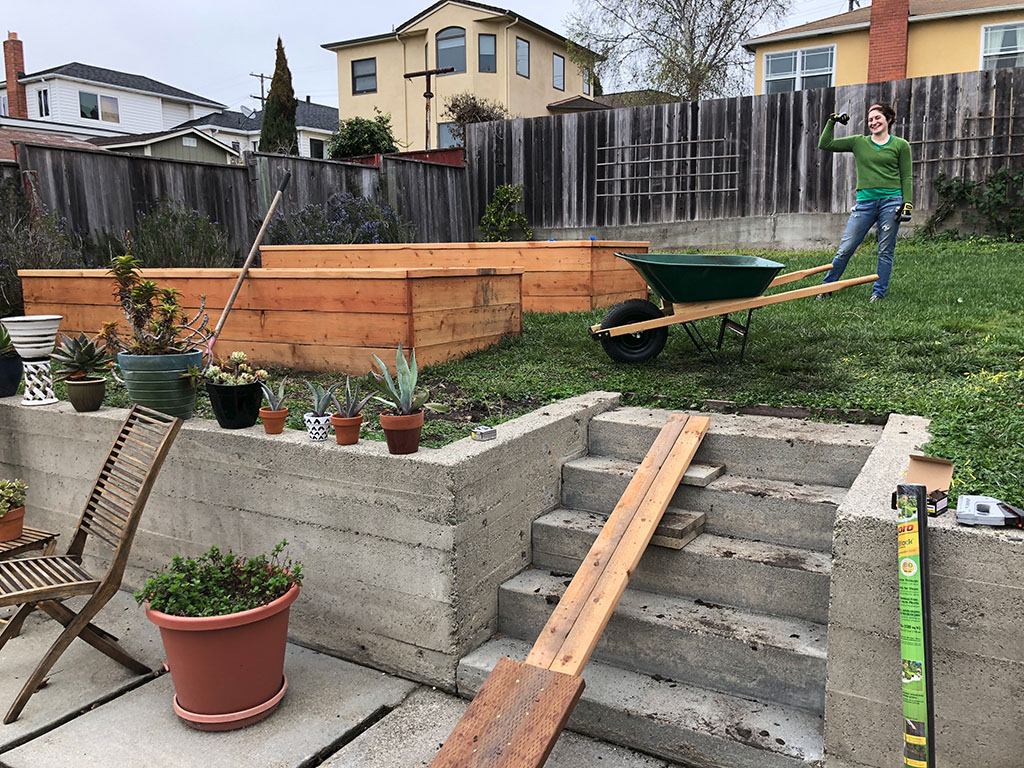
Thus began what I think might have been the most backbreaking day of labor in my entire life. Since the driveway is in front of our house and there is no way to get that truck any closer to the beds, all of the soil needed to be loaded into a wheelbarrow and pushed around the house, up this little makeshift ramp and then emptied over the edge of the beds. All that soil was HEAVY. It also took a good six hours of heavy lifting to get it all moved. I could barely move at the end of the day.
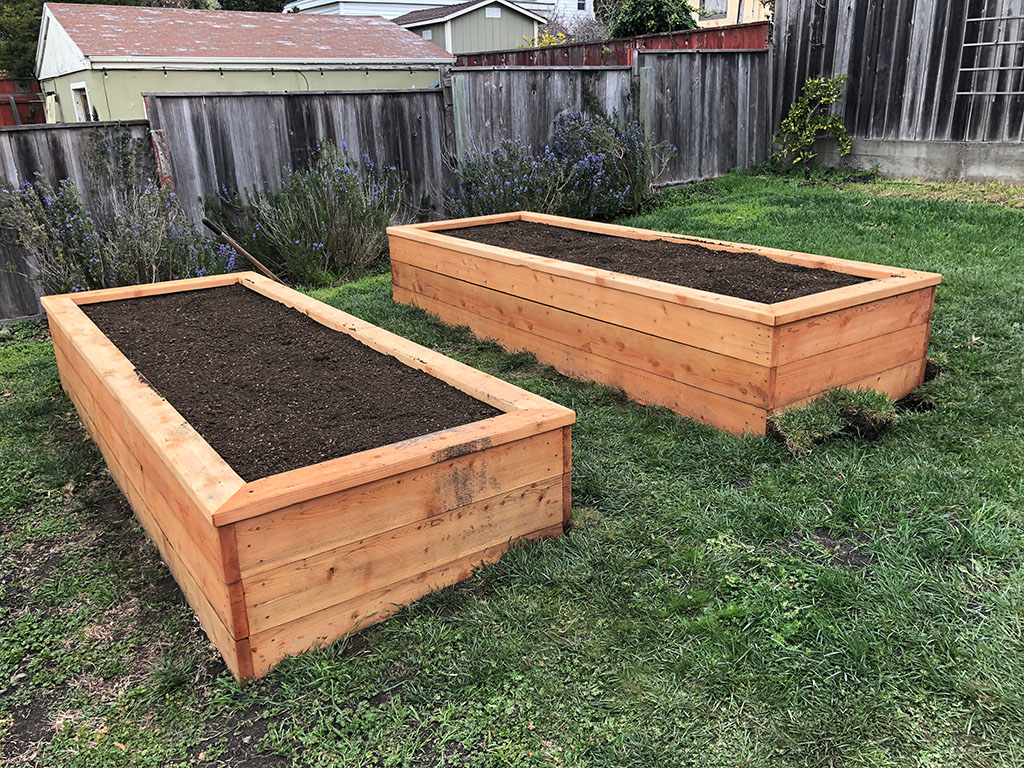
But look how nice the beds are when filled with fresh soil! No eldritch horror carrots from THESE beds!
Next step was to dig a little trench for irrigation and tap into the sprinkler line. This was all pretty simple PVC pipe work, but I did discover that there wasn’t enough water pressure to run BOTH the lawn sprinklers and the bed irrigation. Sorry middle-of-the-lawn, but no more water for you! Fortunately, the pipe in question only fed four sprinklers, one of which was now under a couple feet of soil and another of which would just be spraying the side of the new bed. Overall this leaves a little gap right in the middle of the lawn that doesn’t get water in the summer, but that’s not too big a deal.
As you can see below, I just diverted the underground pipe up to the upper bed and then added a T joint in order to get a line down to the lower bed. I also added cutoff valves in case I didn’t want to water one bed for some reason. It doesn’t really ever get below freezing here in Northern California, so no real need to worry about pipes freezing in the winter or anything like that.
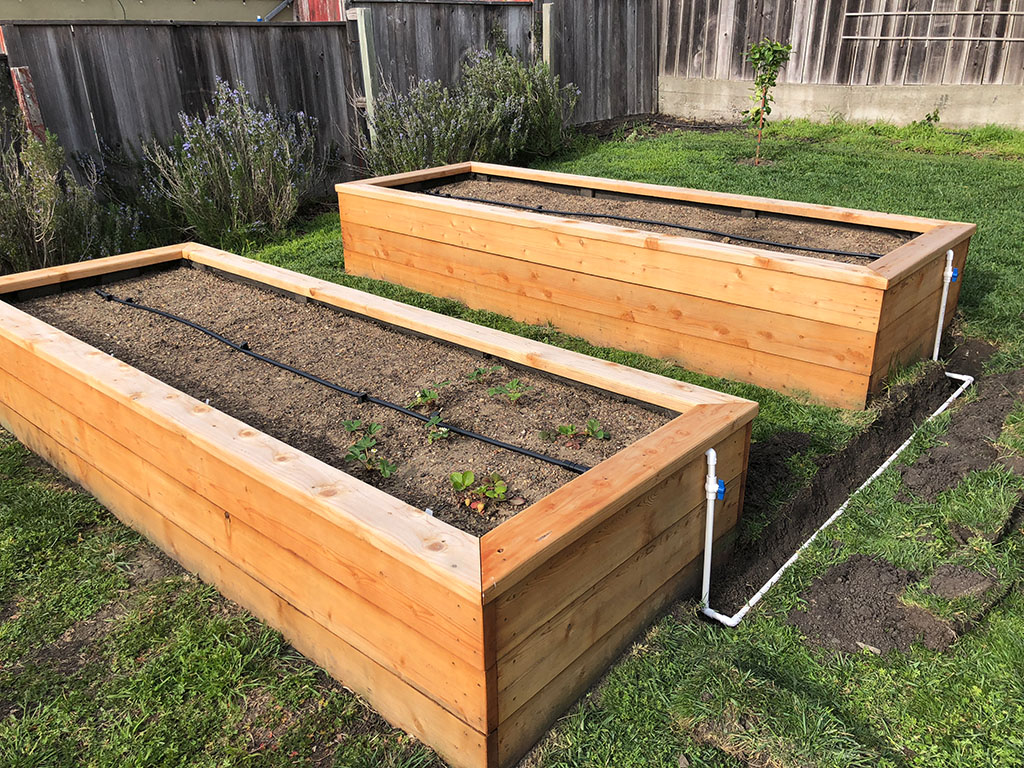
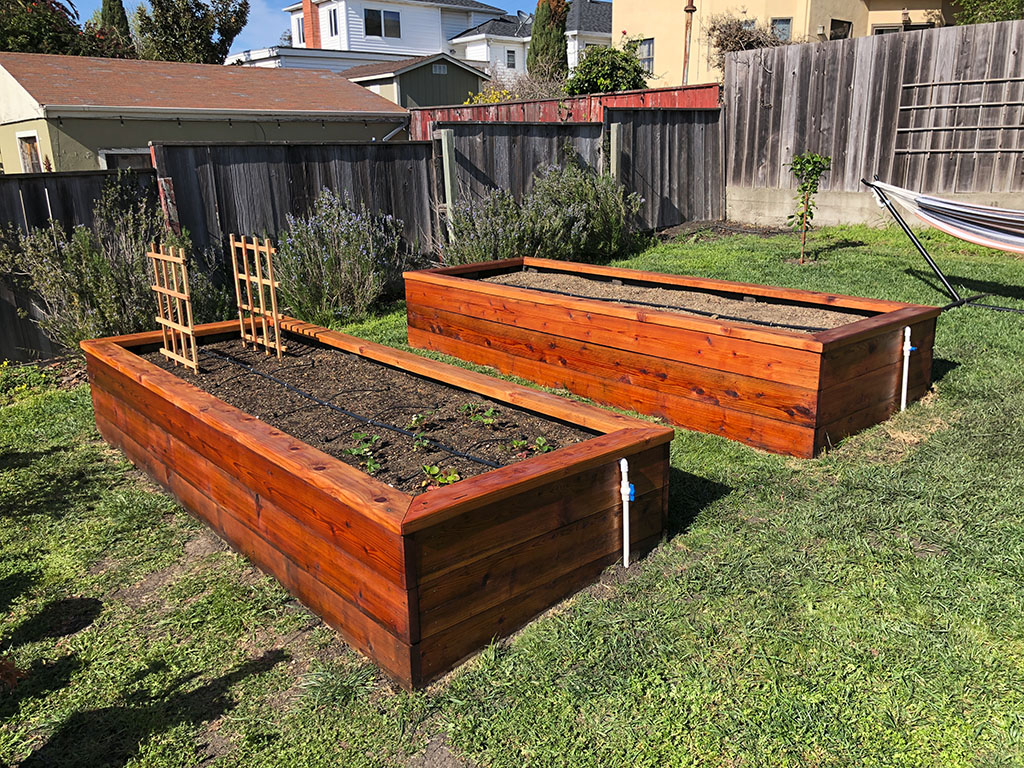
The final result! Here you can see some strawberries planted, pea trellises in place and a coat of deck sealer on the outside of all the wood.
These have been in place for a bit over a year now and aside from having to add more soil this year, after it all settled a bit, everything has been working great!
Thanks for reading!
As a result, we decided to put some time and money into building raised beds, so we could have better soil and easier access to the garden (and less lawn to mow). I wanted to keep it fairly simple, but still have them look nice, provide plenty of planting space and I had a hunch that I could tap into the existing back yard sprinkler system in order to automate irrigation. With those things in mind, I mocked up my back yard and proposed garden beds in a 3d modeling package, and got something like this:
That also allowed me to figure out how much wood I would need and in what dimensions, so I could order it from the lumber yard. The sides of the beds were to be made from 12’ long 2x8’s and the caps are 2x6’s, with 4x4 posts for the corners and 2x4 braces. I choose to go with all redwood on this projects, since all of the wood was to be in constant contact with soil and weather. Since I planned on growing food in these beds, I didn’t want to go with pressure-treated lumber, due to concerns about the chemicals leeching into the soil over time.
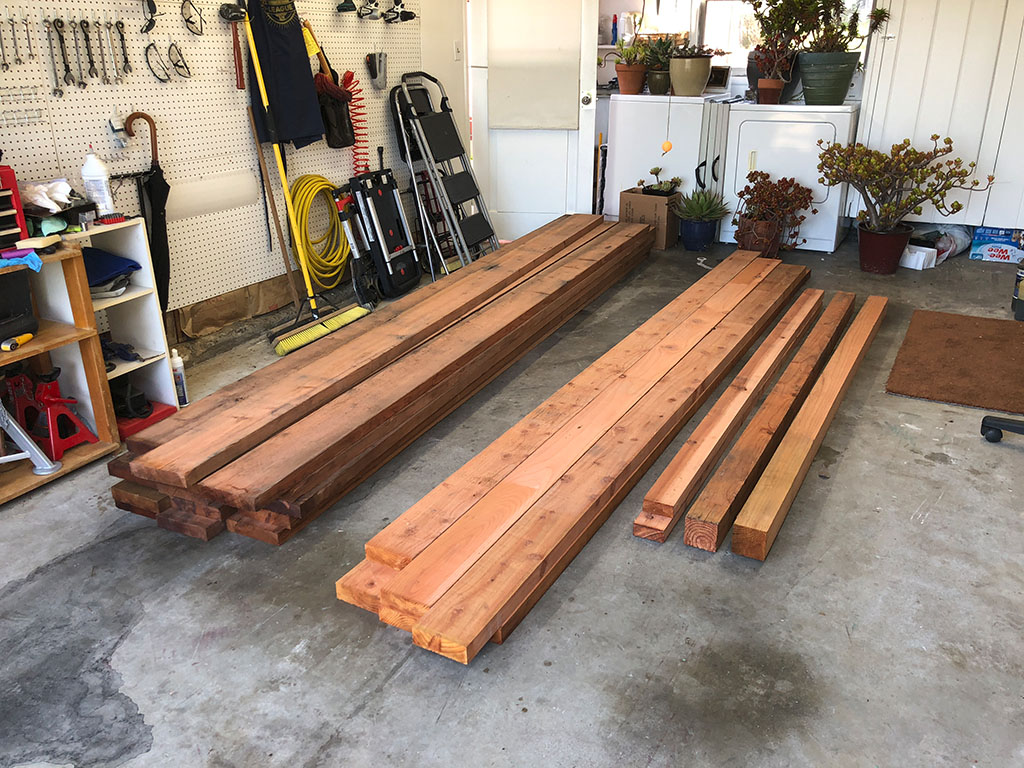
Here’s my starting lumber pile in the garage:
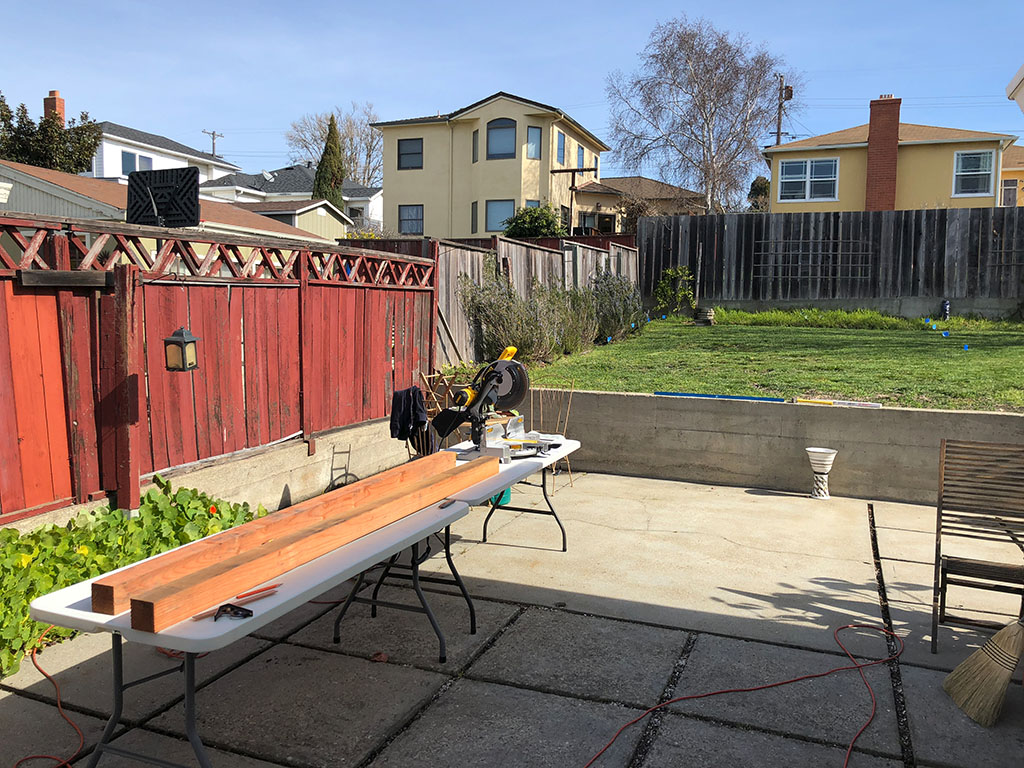
I set myself up a miter station in the back yard and also measured out where exactly the beds were to be located (those little blue flags in the background are my makeshift corner markers.
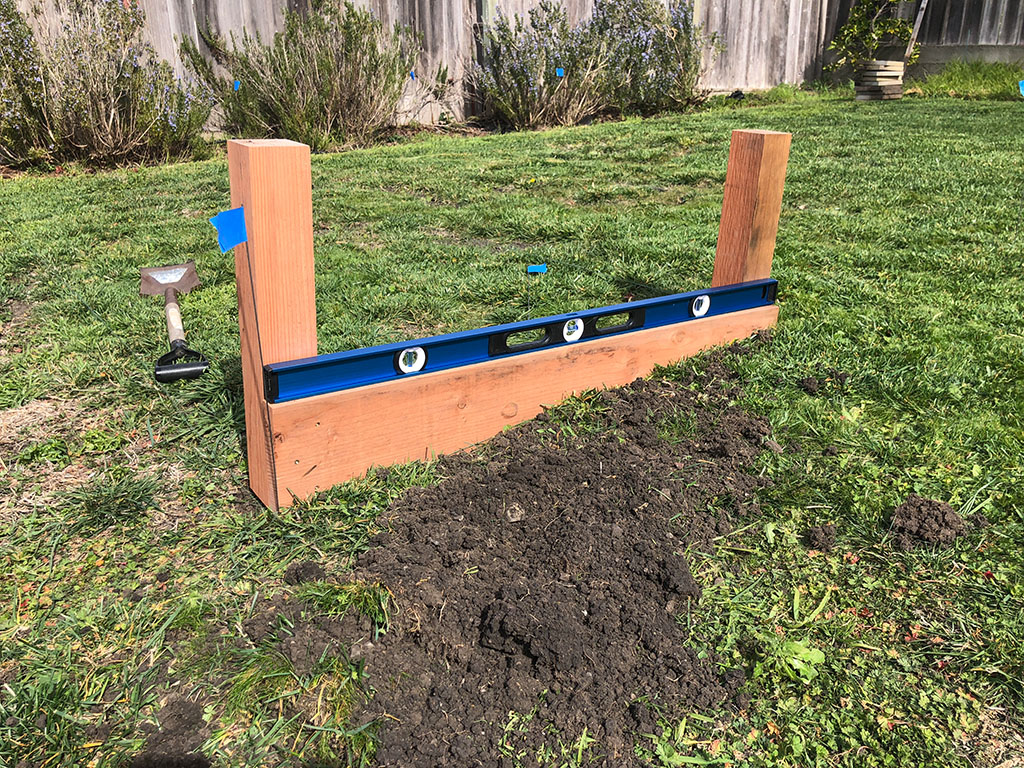
I also knew that I wanted the beds to be level, but the entire back yard has a slope to it. This meant digging into the yard so that the front edge of each bed would meet the ground and the back edge would go down into the soil. Here you can see my process. I put two of the posts and one cross bar together, so that I could dig into the ground and get it level.
I did the same thing for the far end, and after a great deal of digging, got the long boards in place and leveled as well.
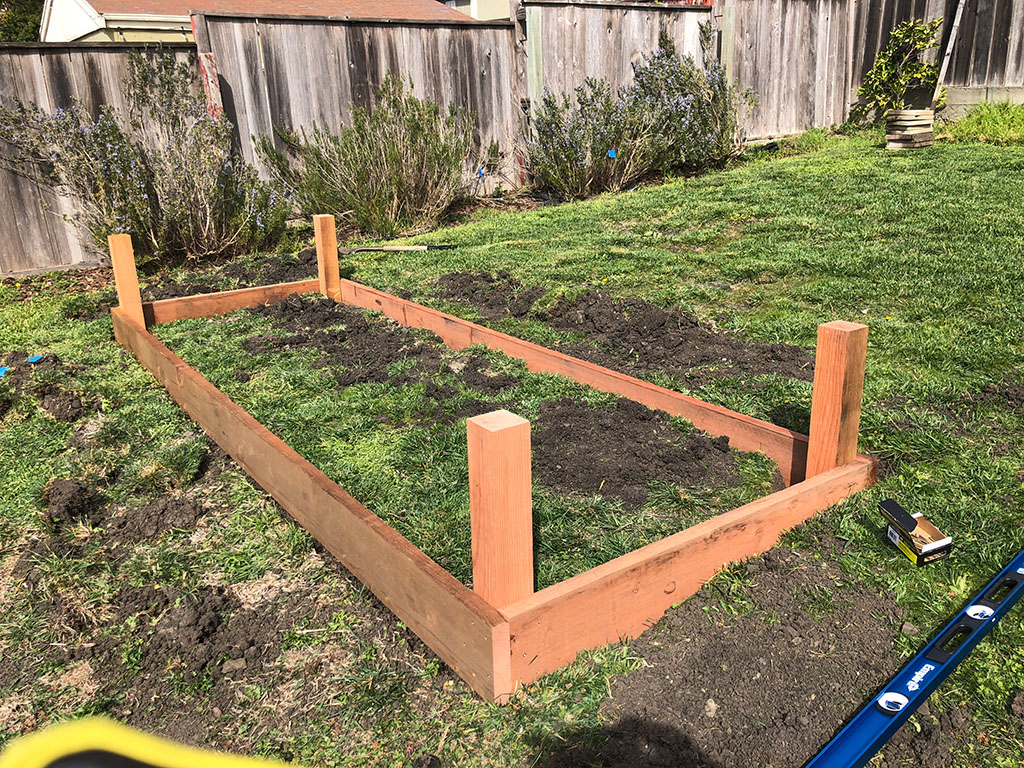
At the end of the first day, I had the two beds in place and mostly put together. Each of these measures about 12’ long by 4’ wide.
During that digging, I also figured out where the underground sprinkler pipe should be and dug down to it for later access. Here you can see how it runs underneath one of the beds.
The next day I added the caps, mostly to make the beds a little more comfortable to use. My wife and I also spent a few hours sanding the exteriors of the beds in order to smooth them out a bit and make the redwood a bit nicer to look at. Here you can see the sanded beds.
And an end view to show the change in elevation vs the ground.
A week or so later this truck showed up and dumped a couple cubic yards of garden soil onto a tarp in our driveway. It turns out that it takes a LOT of soil to fill two 12x4’ beds.
Thus began what I think might have been the most backbreaking day of labor in my entire life. Since the driveway is in front of our house and there is no way to get that truck any closer to the beds, all of the soil needed to be loaded into a wheelbarrow and pushed around the house, up this little makeshift ramp and then emptied over the edge of the beds. All that soil was HEAVY. It also took a good six hours of heavy lifting to get it all moved. I could barely move at the end of the day.
But look how nice the beds are when filled with fresh soil! No eldritch horror carrots from THESE beds!
Next step was to dig a little trench for irrigation and tap into the sprinkler line. This was all pretty simple PVC pipe work, but I did discover that there wasn’t enough water pressure to run BOTH the lawn sprinklers and the bed irrigation. Sorry middle-of-the-lawn, but no more water for you! Fortunately, the pipe in question only fed four sprinklers, one of which was now under a couple feet of soil and another of which would just be spraying the side of the new bed. Overall this leaves a little gap right in the middle of the lawn that doesn’t get water in the summer, but that’s not too big a deal.
As you can see below, I just diverted the underground pipe up to the upper bed and then added a T joint in order to get a line down to the lower bed. I also added cutoff valves in case I didn’t want to water one bed for some reason. It doesn’t really ever get below freezing here in Northern California, so no real need to worry about pipes freezing in the winter or anything like that.
The final result! Here you can see some strawberries planted, pea trellises in place and a coat of deck sealer on the outside of all the wood.
These have been in place for a bit over a year now and aside from having to add more soil this year, after it all settled a bit, everything has been working great!
Thanks for reading!
Building a Shed From Scratch
11 - September - 2019 - 07:00
In the summer of 2017, my wife and I ended up buying the house that we had been renting for five-or-so years. This had a few advantages in that we already knew all the things that were wrong with the place and we also had a long list of improvements that we would make, if given the chance. Pretty much at the top of my list was tearing down the ramshackle shed in the back yard and replacing it with one that was larger, weatherproof and secure. This would allow me to relocate much of the clutter in the garage out to the shed and not have to worry about it getting wet or being stolen.
While there are lots of great shed solutions out there, such as TuffShed, that allow you to purchase a kit and put it together yourself, I was pretty specific about what I wanted in a shed and it wasn’t a kit. I really wanted something that had a bit of a mid-century look to it, in order to match our 1951 house and I had a pretty specific space in which to fit this shed.
Although I build lots of buildings for movies, that in no way translates into me knowing how to actually build a building in my back yard. Accordingly, I spent some time hunting for plans online and ended up purchasing a set of plans from https://www.icreatables.com/ for their ‘8x8 Modern Shed’ Once I had those in hand, I had to do a bit of reconciling against my actual needs shed-wise and what I was willing to spend on said shed. I didn’t need nearly as many windows as the plans called for, both because I didn’t want people to be able to see what I was storing in the shed and because I didn’t want to have to buy a bunch of new windows. I did, however have a store nearby that sells used and surplus doors, windows and misc construction things.
With my measurements in hand, I went to the store, and found a door that was the proper size and a single sliding window that I could adapt to fit above the door, mostly for light and ventilation purposes. I placed an order at a nearby lumber store and a few days later they dropped off about a million pounds of wood in front of our house, which my amazing wife dragged into the garage while I was at work.
In all, it took me something like 9 days of solid work to tear down the old shed and build up the new one, which was about 5 days longer than I was expecting. Learning!
On a bright and sunny Saturday morning, I started with this pile of lumber, a mixture of 2x4s, 2x6s, 2x8s, some chip board sheet goods and some trim boards:
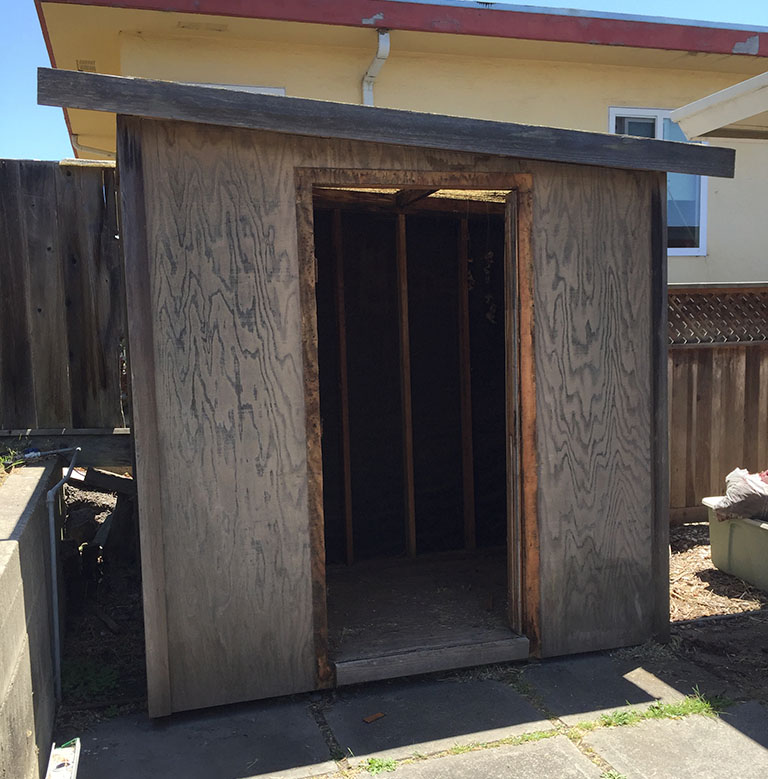
Here’s the old shed that I was replacing. I forgot to get a picture before I started tearing it down, so here it is after I already removed the door (it was an interior door that had warped and was coming apart from getting wet over the years).
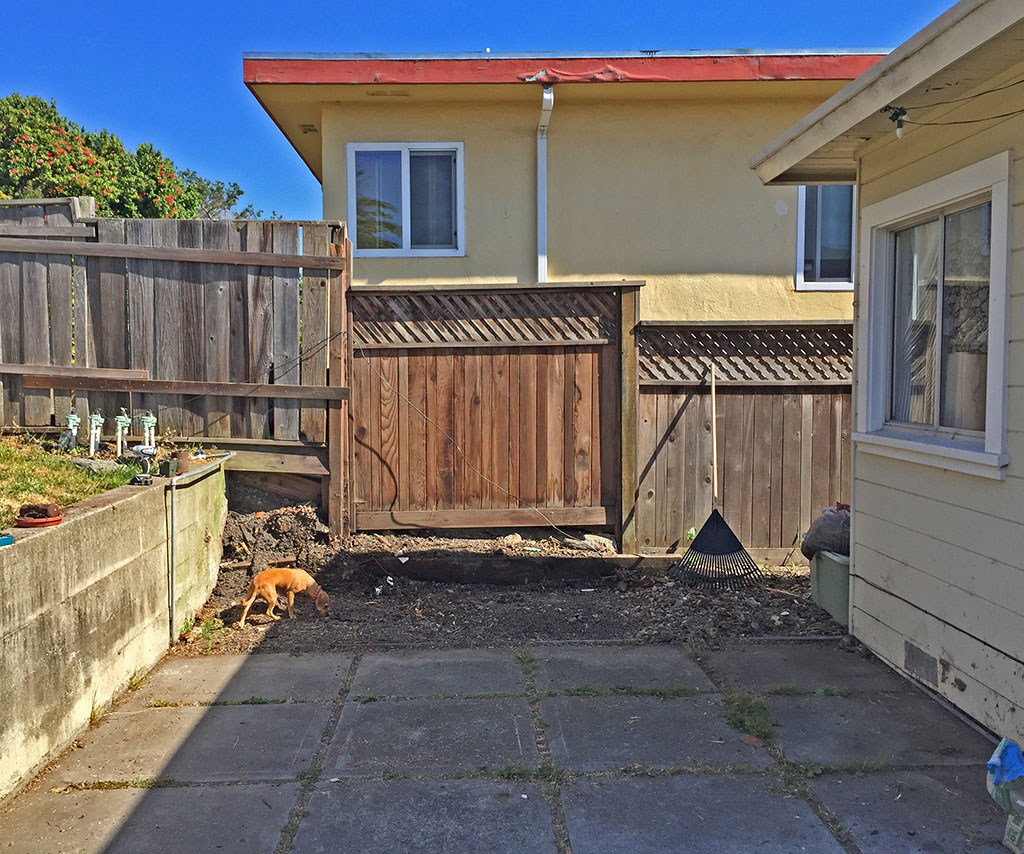
After demolishing the old shed, I cleared and leveled out the area underneath. The helpful assistant dog also gave it a very thorough sniffing.
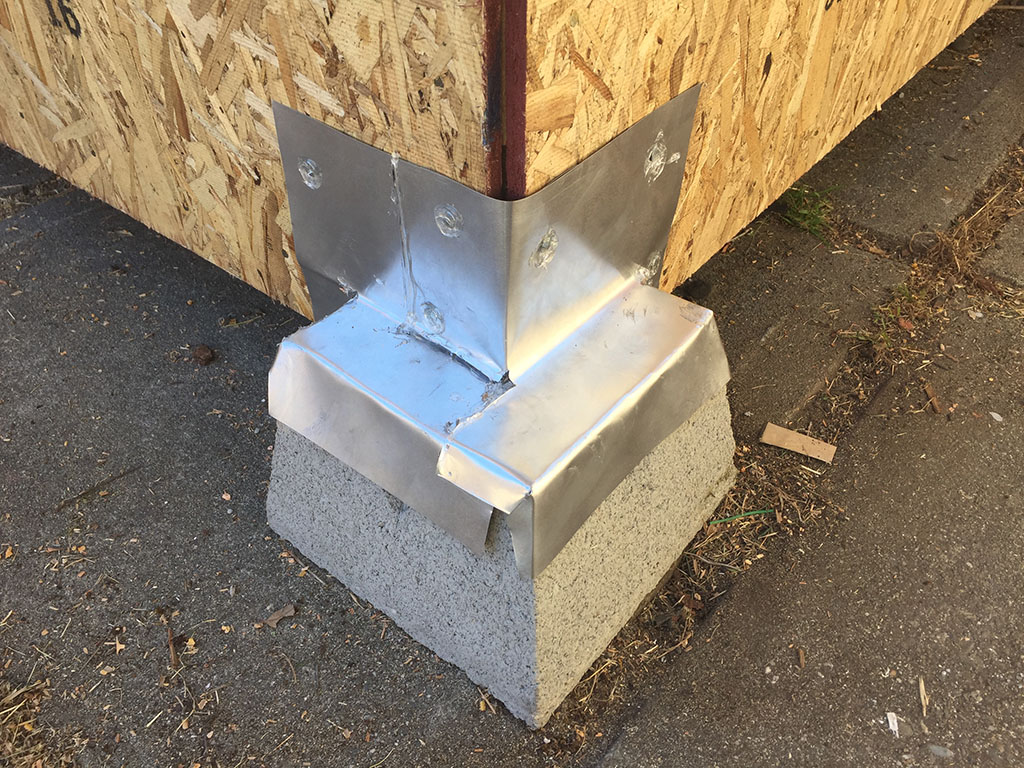
I used deck footers as my ‘foundation’ since I didn’t want to pour concrete and wanted to get it up above the ground just a bit. These were readily available at the local big box store and seemed well suited to the job. I used compacting gravel under the back two blocks, in order to get everything level and square.
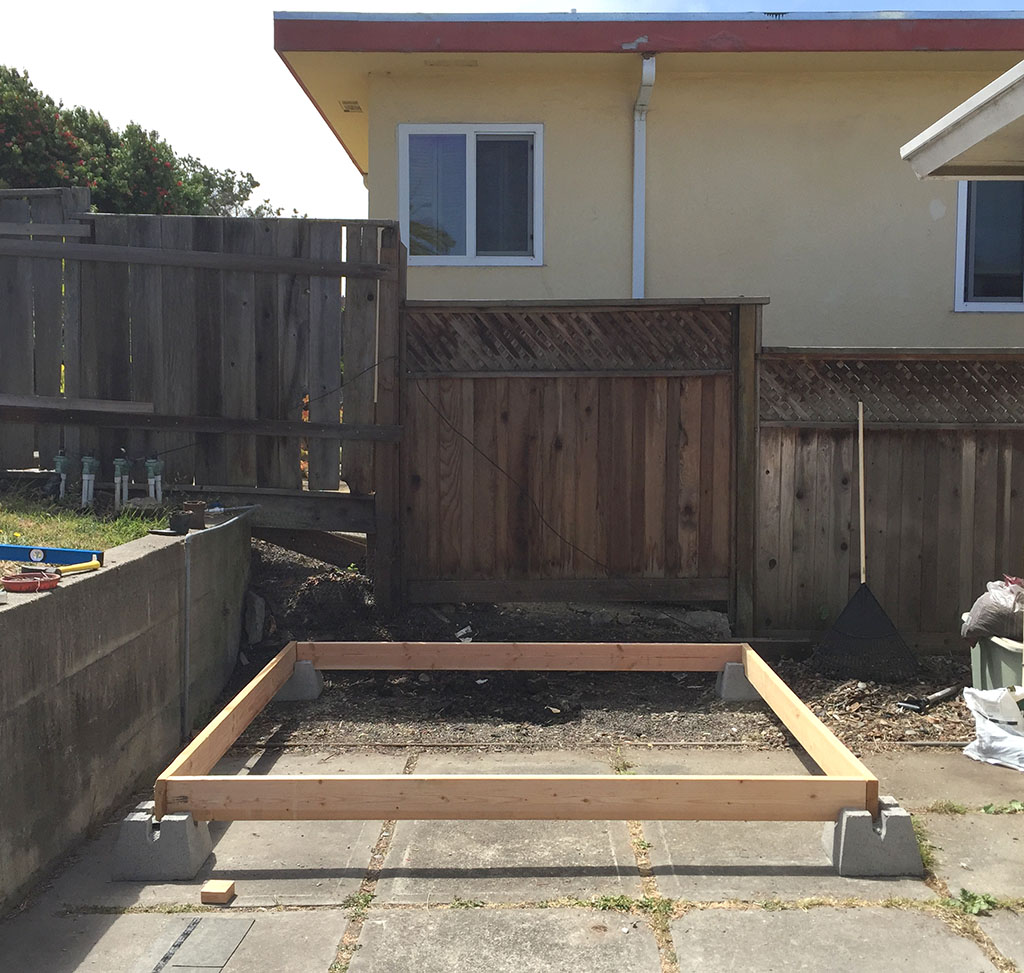
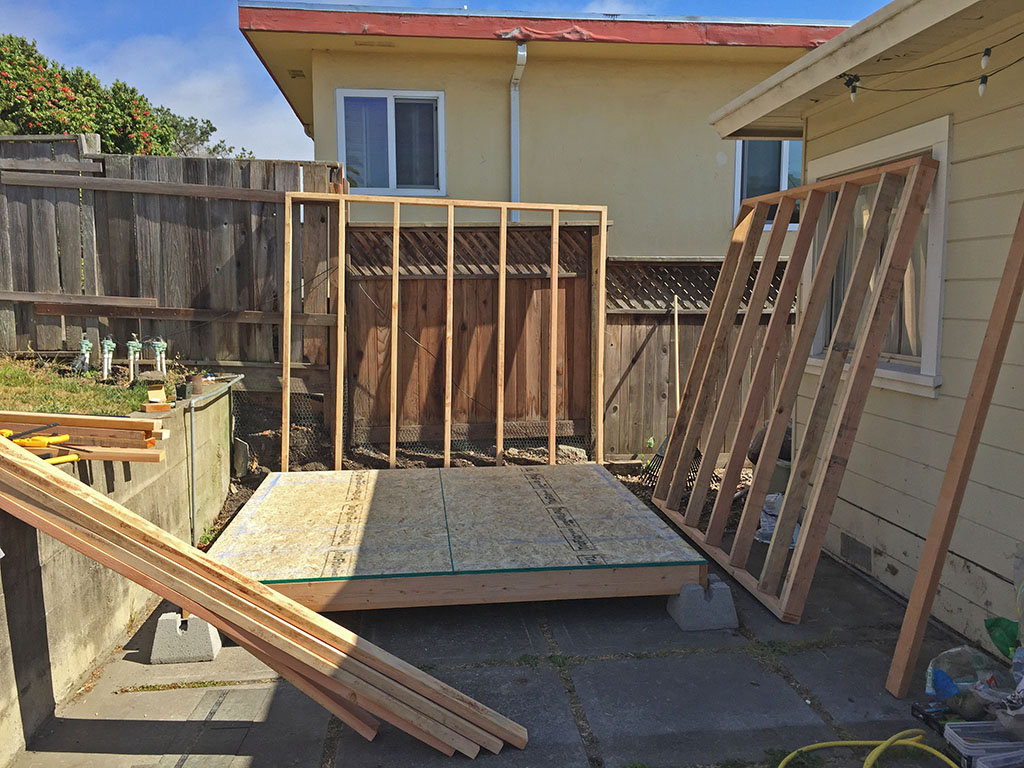
Here you can see the framing well under way. It’s pretty much put together like a house, which is probably way more than I needed for a shed, but I’m a fan of over-engineering. I figure that if I build it strong the first time, I won’t have to fix it later.
It was around this time that I discovered how heavy all the green lumber was, when it was all nailed together into a wall. Most of my previous building experience had been using kiln-dried lumber from Home Depot, which is significantly lighter, since all the water has been cooked out. I didn't realize that the standard from a lumber yard was going to be 'green' lumber, meaning that it hasn't been dried, so still has all that water in it. This makes it heavier and also means that it'll shrink a bit as it dries.
You might also notice the bright yellow pneumatic hose in this photos. I already had an air compressor, so I bought a fairly inexpensive framing nailer and I cannot recommend it enough! There is no way my arm would have held up to pounding in that many nails by hand (did I mention that I sit in front of a computer all day?).
This is the one that I purchased and it served me well: https:www.amazon.com/gp/product/B0032JTDPO
It’s also worth noting that for the most part, I was building this by myself. There were a few occasions that I found myself unable to lift, stabilize and square-up walls all by myself, so I dragged my wife out to help a bit, but generally it was just me putting this thing together.
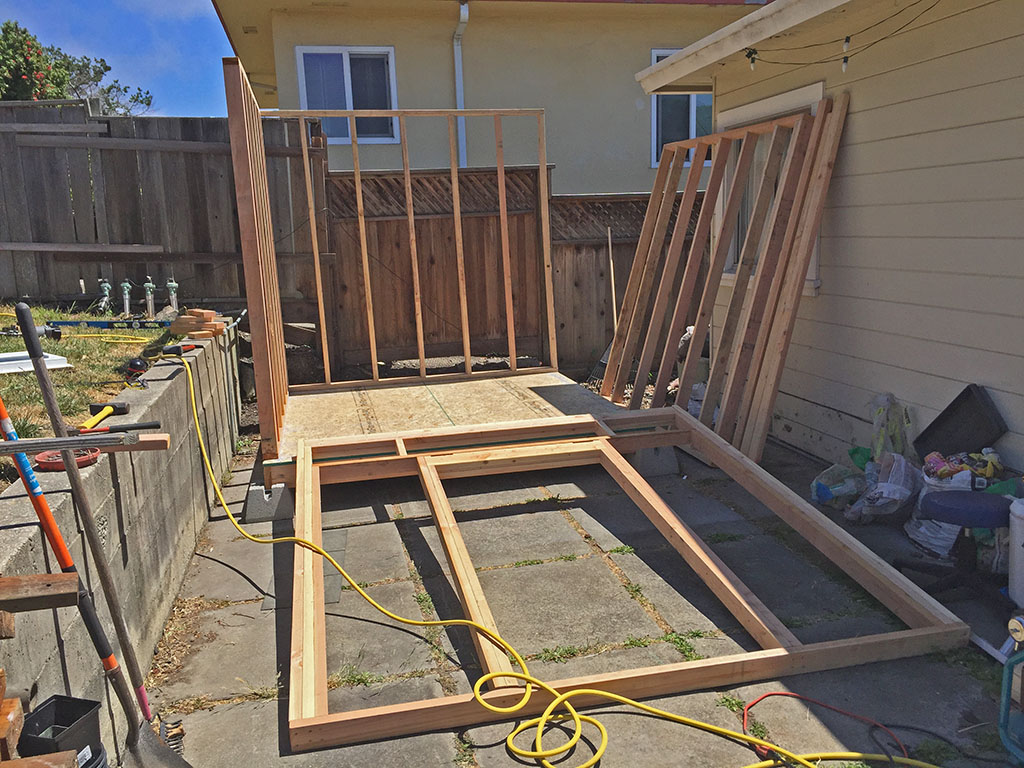
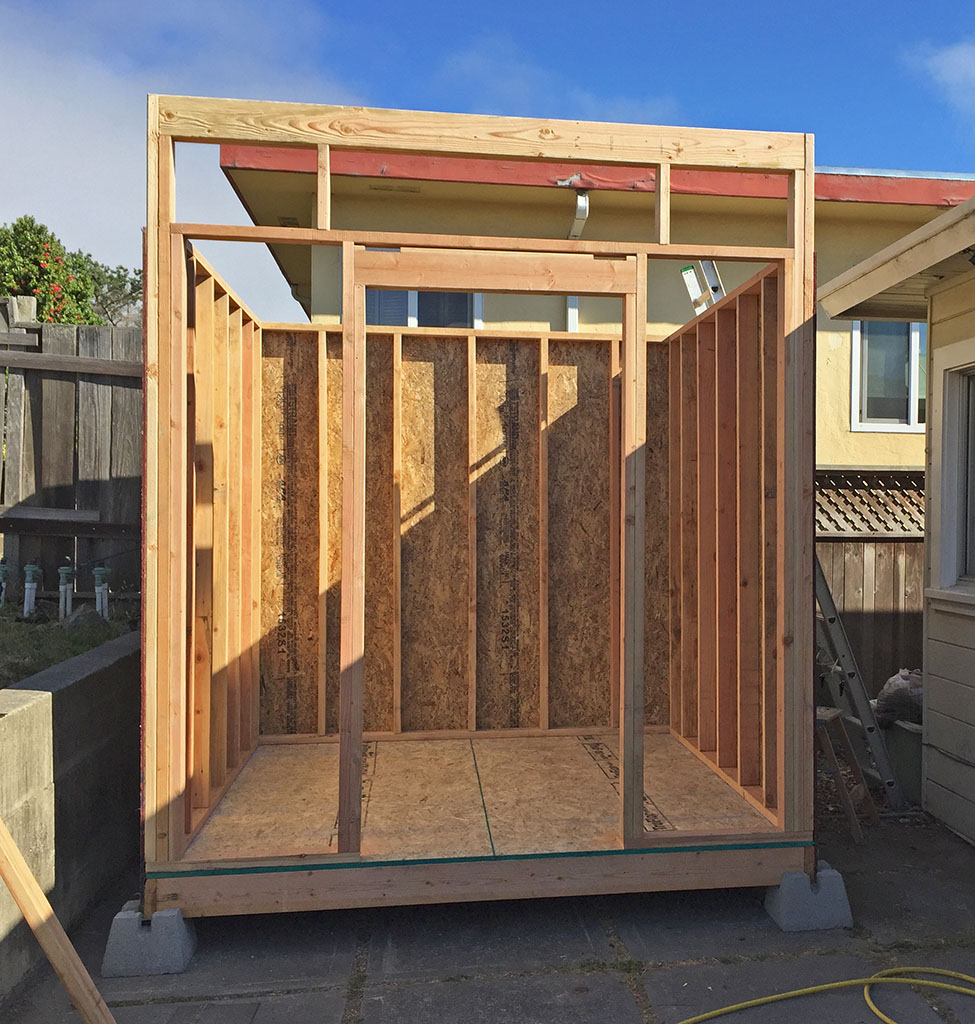
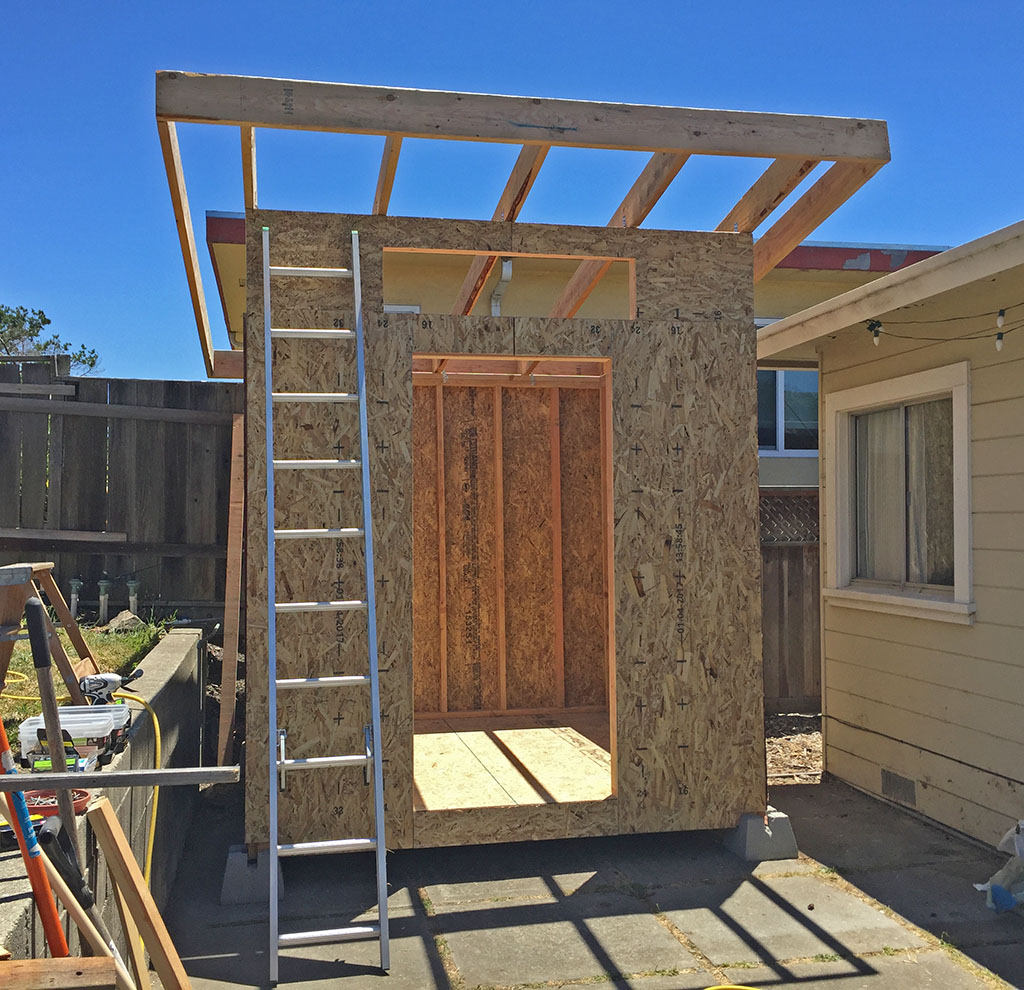
Here you can see the walls framed and some sheathing attached. What is also of note here is that you can see how the area above the doorway was altered from the plans in order to accommodate the single window that I found at the store.
Getting the rafters in place for the roof was probably the hardest part of this whole project. It turns out that a 12’ long green 2x8 is HEAVY. Most of the boards could be propped up and then dragged up and into place, but the front, back and outside ones were tricky. I ended up screwing a few temporary brackets onto the end of the rafters so that I had a support for the front and back boards. With my wife’s help, I could get them propped up in place well enough to be able to put in a few nails and get things secured. I was definitely sore after this day was done.
Here you can see the door and window installed and the soffits installed under the edges of the roof. This was also about the stage that I realized I goofed in a few ways on the roof. The sheer act of getting the boards in place was so hard that I forgot to measure the diagonals and make sure it was square, so it ended up just a bit off, which resulted in some gaps in the roof surface. I also accidentally made the roof stick out about 6” too far on each side, but I don’t mind the way it looks, so no worries there
Here you can see my makeshift flashing to keep water from pooling in the footers and soaking into the floor frame. In hindsight, it probably would have been better to use pressure-treated lumber for the floor framing. This was just some aluminum roof flashing and a whole lot of flashing sealer to hold it all together.
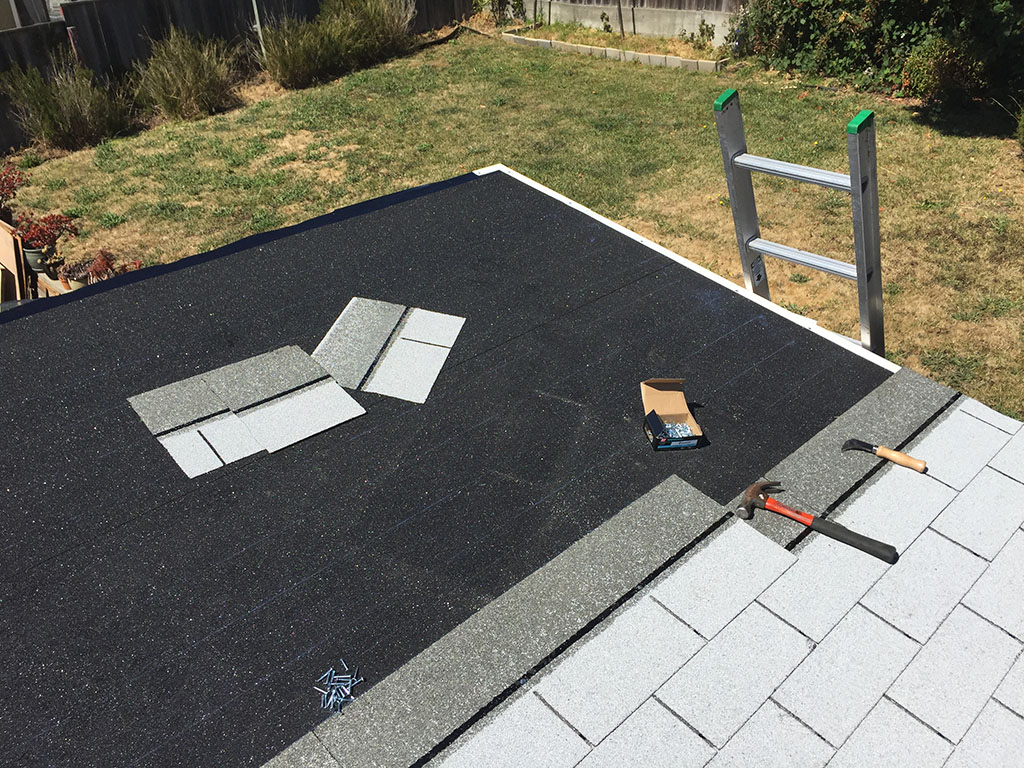
For the roof, I put down a water/ice barrier layer and then standard shingles. There was also a drip edge involved and a bunch of nails. Once again, probably far more than needed for this shed, but hopefully I’ll move away before it ever needs replacing.
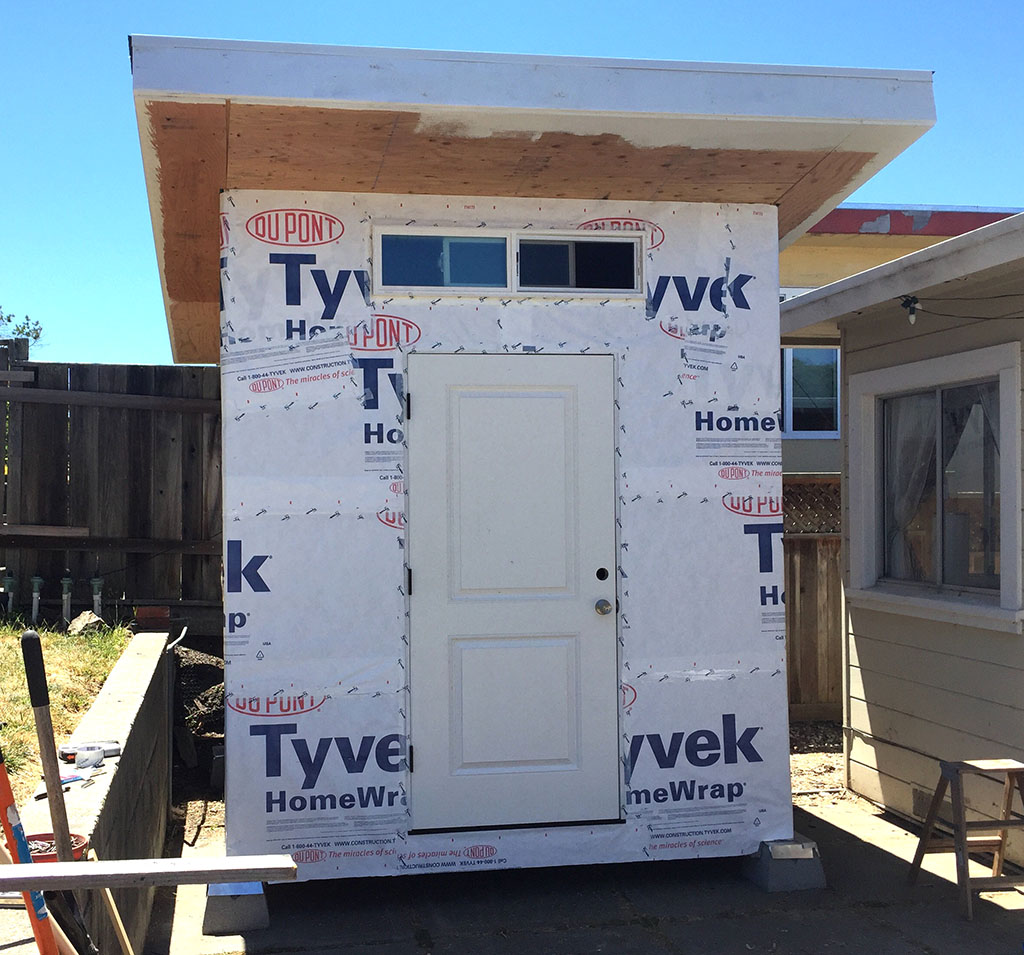
A quick wrap to make it generally weather-proof. There are also some intake vents on the lower right side and you’ll see the roof vents in the finished photo as well.
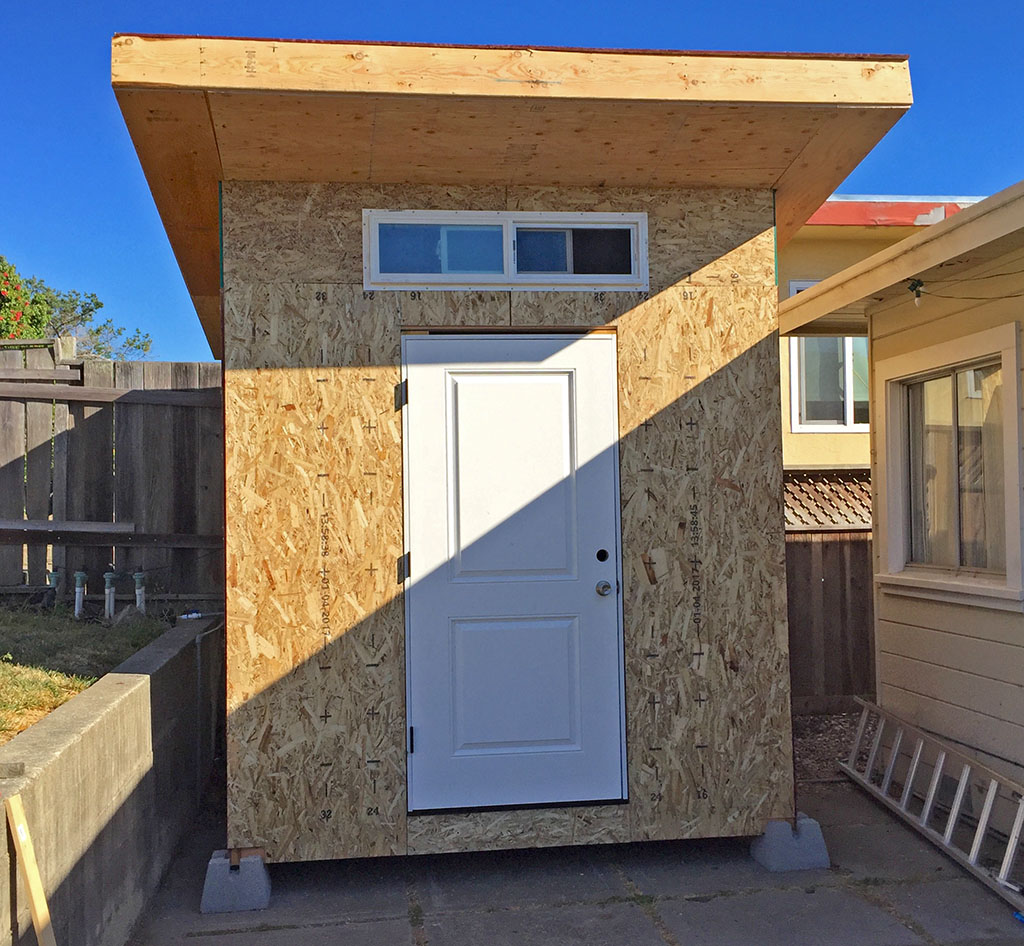
Finally, some basic siding and trim installed. The siding was just a cheap plywood kinda stuff that had a horizontal line pattern that was similar to the house.

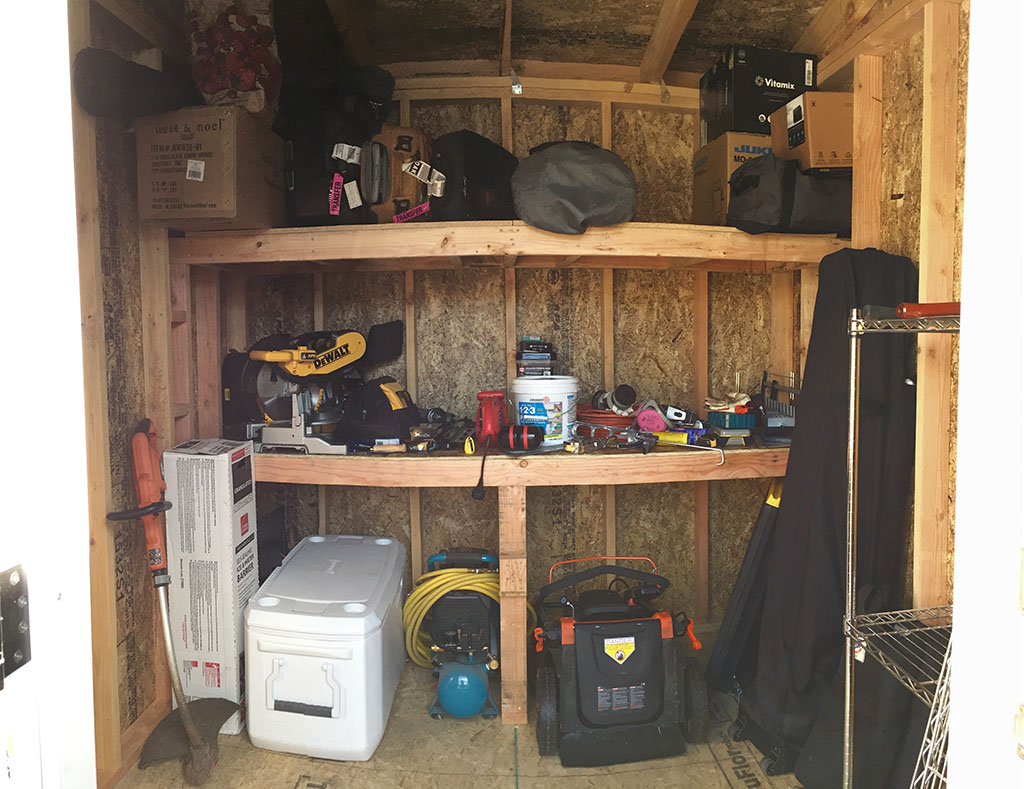
Here’s the interior of the shed and you can see the couple of shelves that I made out of a few extra 2x4’s that I had around. This was just to give me a place to store things like suitcases up out of the way and for a basic work surface, in case I needed it. Although, in practice, that lower shelf has just been more storage rather than any sort of work space.
Here’s the whole thing, primed, locks installed and some simple steps in place.
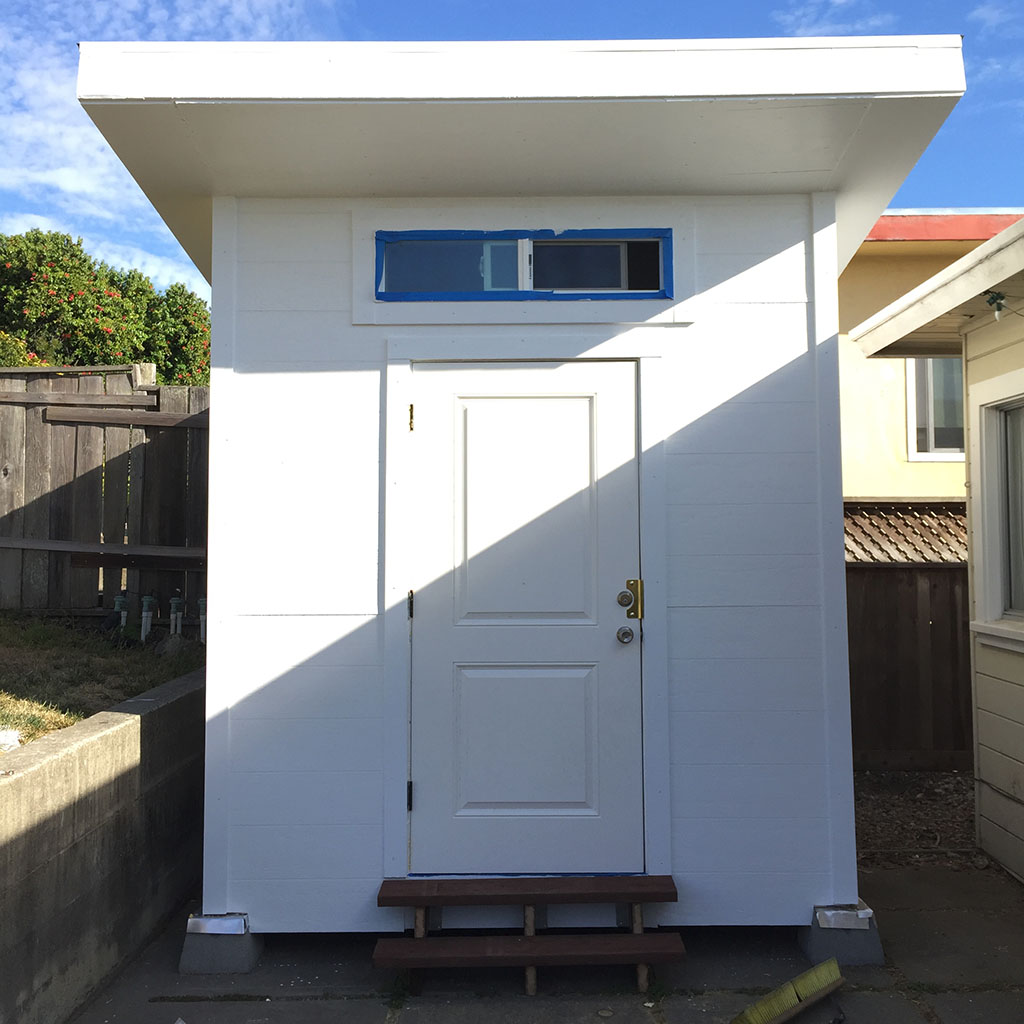
The finished product! Here you can see the soffit vents in place and the colors we went with. This also allowed us to test out a color scheme that we were thinking about for the house, which was fantastic, as we ended up using a darker shade for the trim and also going down a sheen level for both the primary and trim paints.

So far, this shed has lasted two years without collapsing, so I’m going to call it a win!
Thanks for reading!
While there are lots of great shed solutions out there, such as TuffShed, that allow you to purchase a kit and put it together yourself, I was pretty specific about what I wanted in a shed and it wasn’t a kit. I really wanted something that had a bit of a mid-century look to it, in order to match our 1951 house and I had a pretty specific space in which to fit this shed.
Although I build lots of buildings for movies, that in no way translates into me knowing how to actually build a building in my back yard. Accordingly, I spent some time hunting for plans online and ended up purchasing a set of plans from https://www.icreatables.com/ for their ‘8x8 Modern Shed’ Once I had those in hand, I had to do a bit of reconciling against my actual needs shed-wise and what I was willing to spend on said shed. I didn’t need nearly as many windows as the plans called for, both because I didn’t want people to be able to see what I was storing in the shed and because I didn’t want to have to buy a bunch of new windows. I did, however have a store nearby that sells used and surplus doors, windows and misc construction things.
With my measurements in hand, I went to the store, and found a door that was the proper size and a single sliding window that I could adapt to fit above the door, mostly for light and ventilation purposes. I placed an order at a nearby lumber store and a few days later they dropped off about a million pounds of wood in front of our house, which my amazing wife dragged into the garage while I was at work.
In all, it took me something like 9 days of solid work to tear down the old shed and build up the new one, which was about 5 days longer than I was expecting. Learning!
On a bright and sunny Saturday morning, I started with this pile of lumber, a mixture of 2x4s, 2x6s, 2x8s, some chip board sheet goods and some trim boards:
Here’s the old shed that I was replacing. I forgot to get a picture before I started tearing it down, so here it is after I already removed the door (it was an interior door that had warped and was coming apart from getting wet over the years).
After demolishing the old shed, I cleared and leveled out the area underneath. The helpful assistant dog also gave it a very thorough sniffing.
I used deck footers as my ‘foundation’ since I didn’t want to pour concrete and wanted to get it up above the ground just a bit. These were readily available at the local big box store and seemed well suited to the job. I used compacting gravel under the back two blocks, in order to get everything level and square.
Here you can see the framing well under way. It’s pretty much put together like a house, which is probably way more than I needed for a shed, but I’m a fan of over-engineering. I figure that if I build it strong the first time, I won’t have to fix it later.
It was around this time that I discovered how heavy all the green lumber was, when it was all nailed together into a wall. Most of my previous building experience had been using kiln-dried lumber from Home Depot, which is significantly lighter, since all the water has been cooked out. I didn't realize that the standard from a lumber yard was going to be 'green' lumber, meaning that it hasn't been dried, so still has all that water in it. This makes it heavier and also means that it'll shrink a bit as it dries.
You might also notice the bright yellow pneumatic hose in this photos. I already had an air compressor, so I bought a fairly inexpensive framing nailer and I cannot recommend it enough! There is no way my arm would have held up to pounding in that many nails by hand (did I mention that I sit in front of a computer all day?).
This is the one that I purchased and it served me well: https:www.amazon.com/gp/product/B0032JTDPO
It’s also worth noting that for the most part, I was building this by myself. There were a few occasions that I found myself unable to lift, stabilize and square-up walls all by myself, so I dragged my wife out to help a bit, but generally it was just me putting this thing together.
Here you can see the walls framed and some sheathing attached. What is also of note here is that you can see how the area above the doorway was altered from the plans in order to accommodate the single window that I found at the store.
Getting the rafters in place for the roof was probably the hardest part of this whole project. It turns out that a 12’ long green 2x8 is HEAVY. Most of the boards could be propped up and then dragged up and into place, but the front, back and outside ones were tricky. I ended up screwing a few temporary brackets onto the end of the rafters so that I had a support for the front and back boards. With my wife’s help, I could get them propped up in place well enough to be able to put in a few nails and get things secured. I was definitely sore after this day was done.
Here you can see the door and window installed and the soffits installed under the edges of the roof. This was also about the stage that I realized I goofed in a few ways on the roof. The sheer act of getting the boards in place was so hard that I forgot to measure the diagonals and make sure it was square, so it ended up just a bit off, which resulted in some gaps in the roof surface. I also accidentally made the roof stick out about 6” too far on each side, but I don’t mind the way it looks, so no worries there
Here you can see my makeshift flashing to keep water from pooling in the footers and soaking into the floor frame. In hindsight, it probably would have been better to use pressure-treated lumber for the floor framing. This was just some aluminum roof flashing and a whole lot of flashing sealer to hold it all together.
For the roof, I put down a water/ice barrier layer and then standard shingles. There was also a drip edge involved and a bunch of nails. Once again, probably far more than needed for this shed, but hopefully I’ll move away before it ever needs replacing.
A quick wrap to make it generally weather-proof. There are also some intake vents on the lower right side and you’ll see the roof vents in the finished photo as well.
Finally, some basic siding and trim installed. The siding was just a cheap plywood kinda stuff that had a horizontal line pattern that was similar to the house.
Here’s the interior of the shed and you can see the couple of shelves that I made out of a few extra 2x4’s that I had around. This was just to give me a place to store things like suitcases up out of the way and for a basic work surface, in case I needed it. Although, in practice, that lower shelf has just been more storage rather than any sort of work space.
Here’s the whole thing, primed, locks installed and some simple steps in place.
The finished product! Here you can see the soffit vents in place and the colors we went with. This also allowed us to test out a color scheme that we were thinking about for the house, which was fantastic, as we ended up using a darker shade for the trim and also going down a sheen level for both the primary and trim paints.
So far, this shed has lasted two years without collapsing, so I’m going to call it a win!
Thanks for reading!